How to use
How to use
Our New Service
AI Voice Bot
Minimize Call Center task
Our AI Chatbot provides 24/7 voice support, reducing workloads and ensuring quick, accurate responses.
See more
Dashboard
Dashboard is a summary of chatbot usage statistics, which will include.
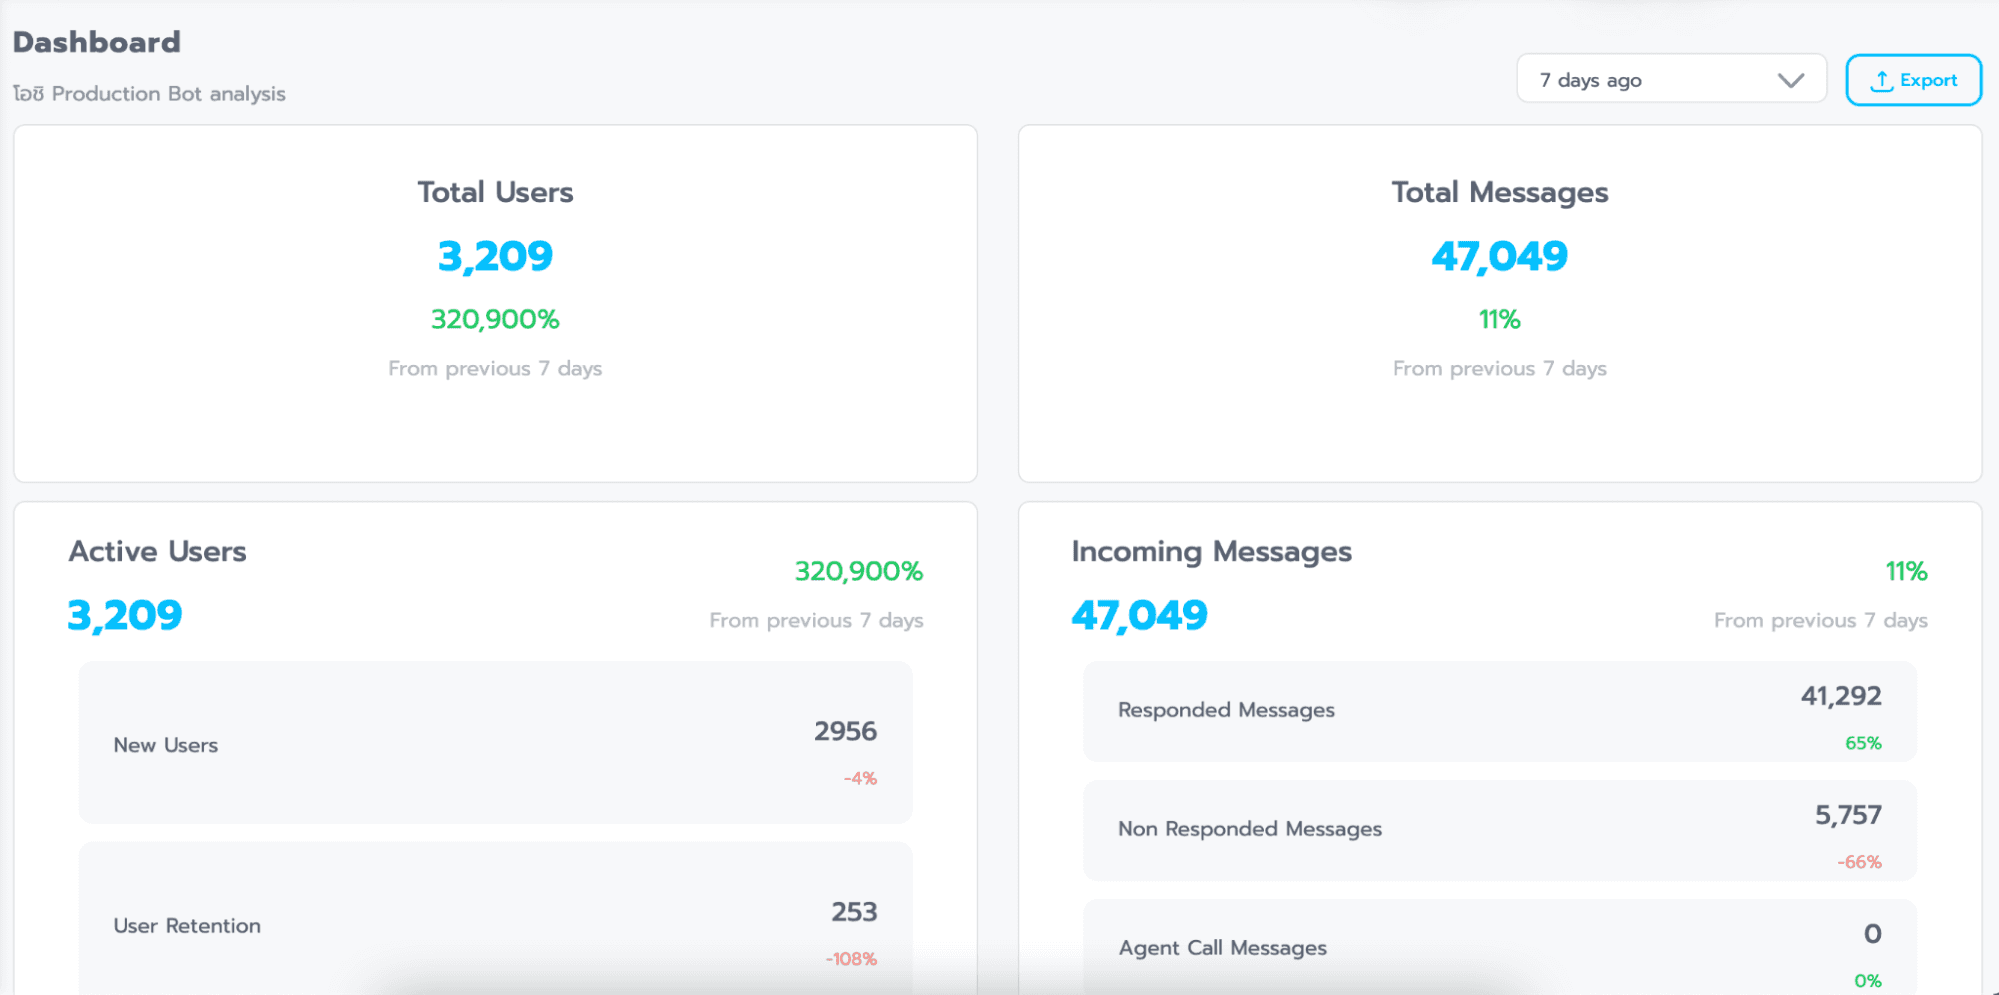
Date range can choose to view data in 3 time ranges, which are:
7 day - Weekly statistics, with a percentage comparison to the statistics of the previous 7 days.
30 day - Monthly statistics, with a percentage comparison to the statistics of the previous 30 days.
365 day - Yearly statistics, with a percentage comparison to the statistics of the previous 365 days.
Total Users is the statistics of the total number of users since the chatbot was activated.
Tip: The percentage % represents a comparison with the previous time period according to the selected time range (7 days ago, 30 days ago, 365 days ago).
Total Messages is the statistics of the total number of messages that the chatbot has responded to since it was activated.
Active Users is the statistics of the number of people who have used the chatbot exclusively within the selected time range, divided into
New User is a user who comes to use the chatbot for the first time.
User Retention are users who have come to talk with the chatbot and come back to use it again.
Incoming Message is the number of messages that users send to chat with the bot, divided into
Responded Messages is the number of messages that the chatbot can respond to.
Non Responded Messages is the number of messages that the chatbot cannot respond to. (Default Fallback)
Agent Call Messages is the number of messages where users want to talk to an agent.
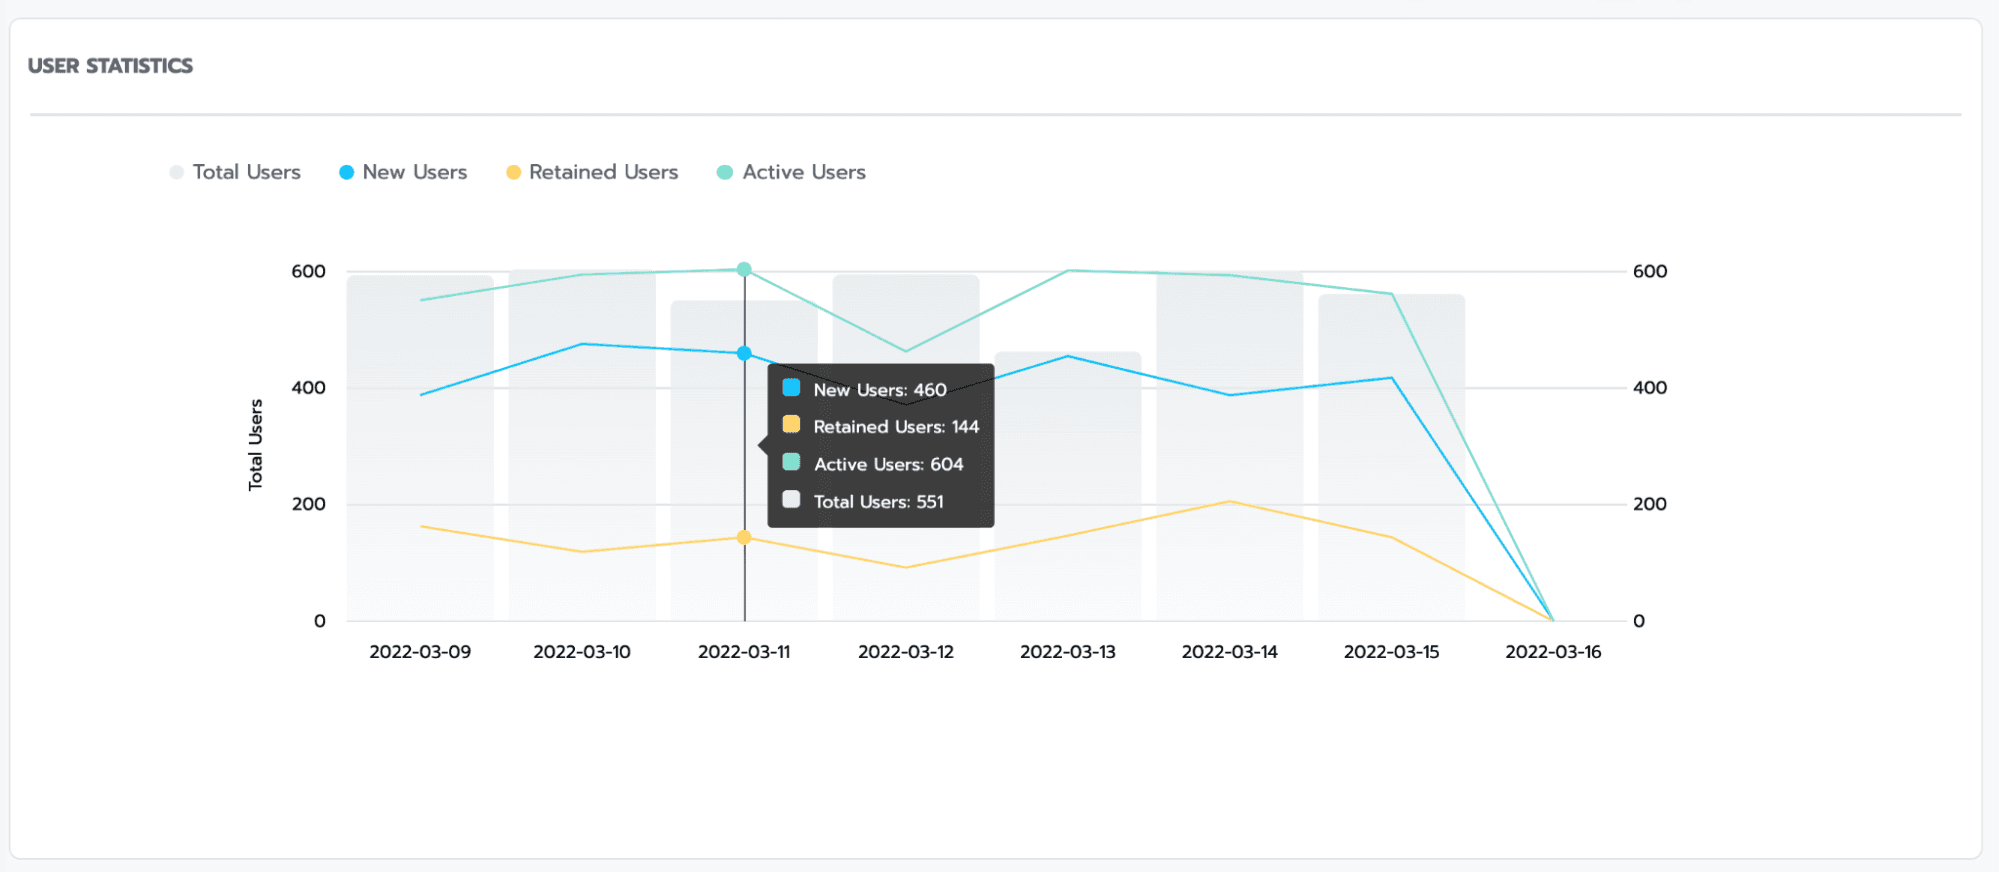
User Statistics is the statistics of the number of chatbot users presented in graph format.
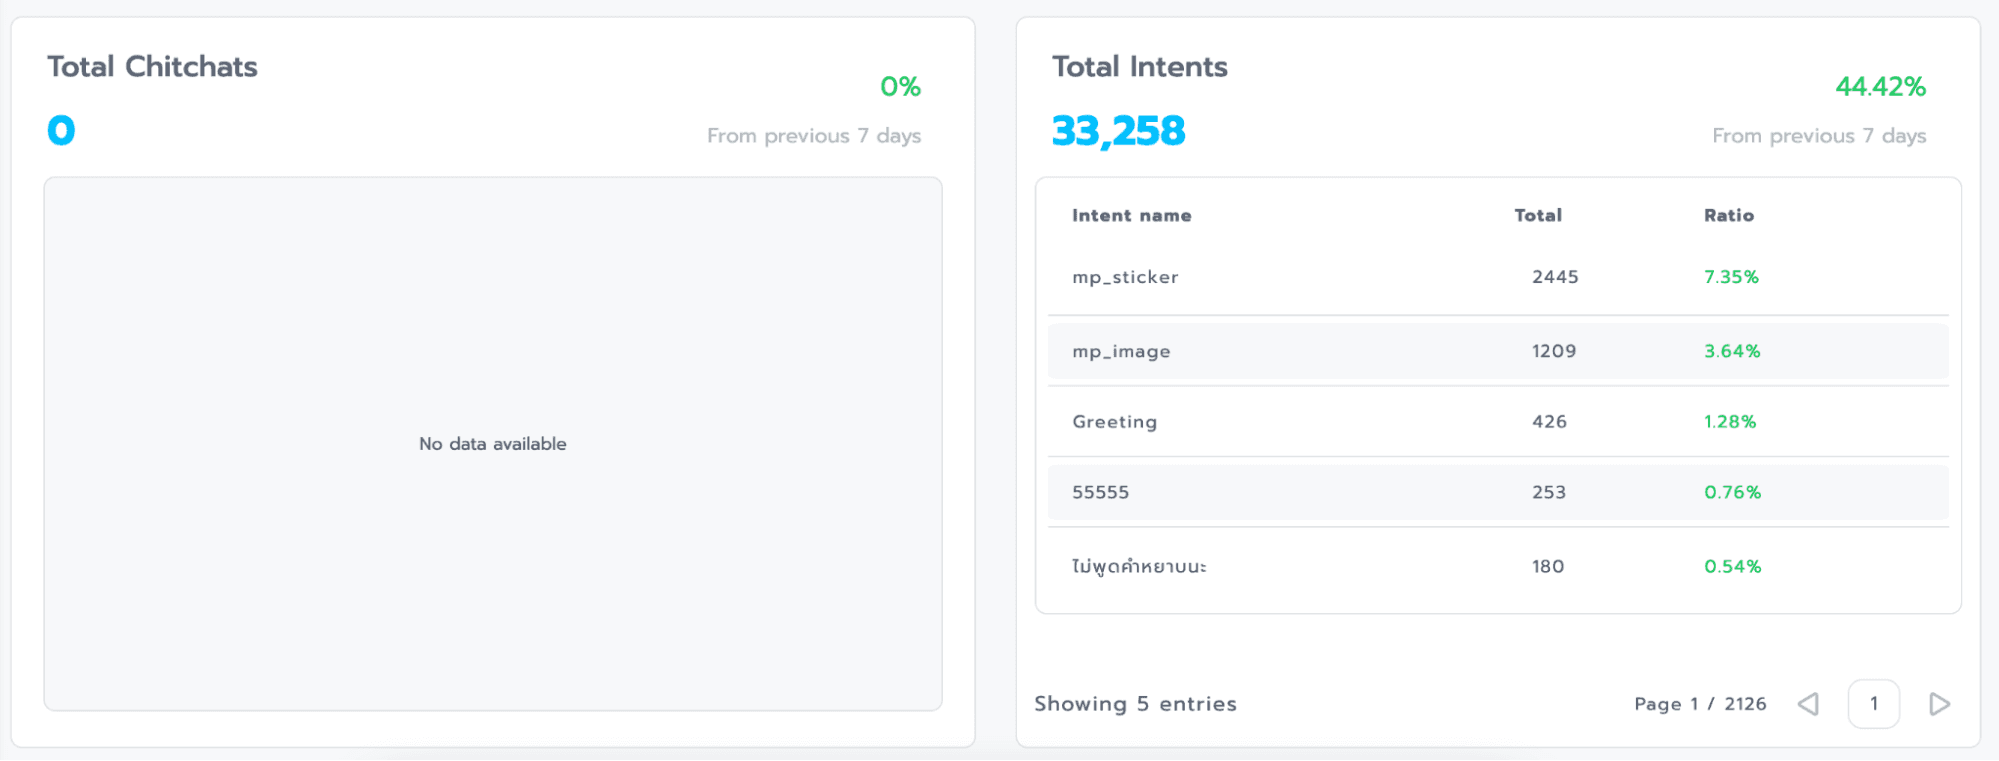
Total Intents is the total count of times when an intent is invoked to respond to users.
The intent table displays a list of intents that have been called to respond. They will be sorted in descending order by frequency, and results will be shown 5 intents per page.
Intent name is the name intent
Total is the number of times the intent has been invoked to respond.
Ratio is the percentage proportion that the intent has been called compared to the total number of intent calls.
Train Bot
Train Bot is an important component in building chatbots because it is the part used to configure the bot's responses to user questions, allowing them to interact. The components of the Intent list are as follows.

Search Intent is used to search for the Intent, Phrase, and Response configurations you want to set up.
Sort is used to arrange Intents in alphabetical (a-z) or chronological (oldest to newest) order.
Default Fallback displays all of the user's messages that the bot doesn't understand when the confidence level of those messages is lower than the configured threshold.

Here's how you can configure the Default Fallback:
a. Bot Response is the configuration for the responses you want the bot to provide when it doesn't understand a user's input, typically when the system detects a confidence percentage below the configured threshold. This allows you to define how the bot should reply when it encounters uncertain or ambiguous user messages.
b. Confident refers to the confidence threshold that determines when the bot should respond to user inputs. It represents the level of certainty the bot needs in order to provide a response. Generally, a higher confidence threshold, closer to 100%, means that the bot will respond only when it's very confident that the user's input closely matches the information it has been trained on. In other words, users would need to provide inputs that are highly accurate and closely aligned with the bot's training data to trigger a response when a high confidence threshold is set.
Example Default Message is 'Sorry I don't understand,' and the Default Confidence Threshold is set to 65%.
The configuration of Bot Response is set to "Sorry I don't understand," and the Confidence Threshold is set at 65%. This means that when a user's message has a confidence level greater than 65%, the bot will respond with the Bot Response associated with the specific Intent in which the bot is confident. However, when the user's message has a confidence level less than 65%, the bot will respond with the Bot Response "Sorry I don't understand" that we have set in the Default Fallback.
Chitchat is the mode for casual conversation used to train the bot with one-on-one question and answer interactions. This is because sometimes the text input can be very specific, making it challenging to categorize sentences into specific Intents. For example, if someone asks, "Do you want to live on Mars?" there's no need to create a separate Intent for it. Instead, you can directly instruct the chatbot to respond with "Do you want to go together?"
For training the bot in the Chitchat section, go to the "Trained" section, where you can teach the bot in two different modes together.
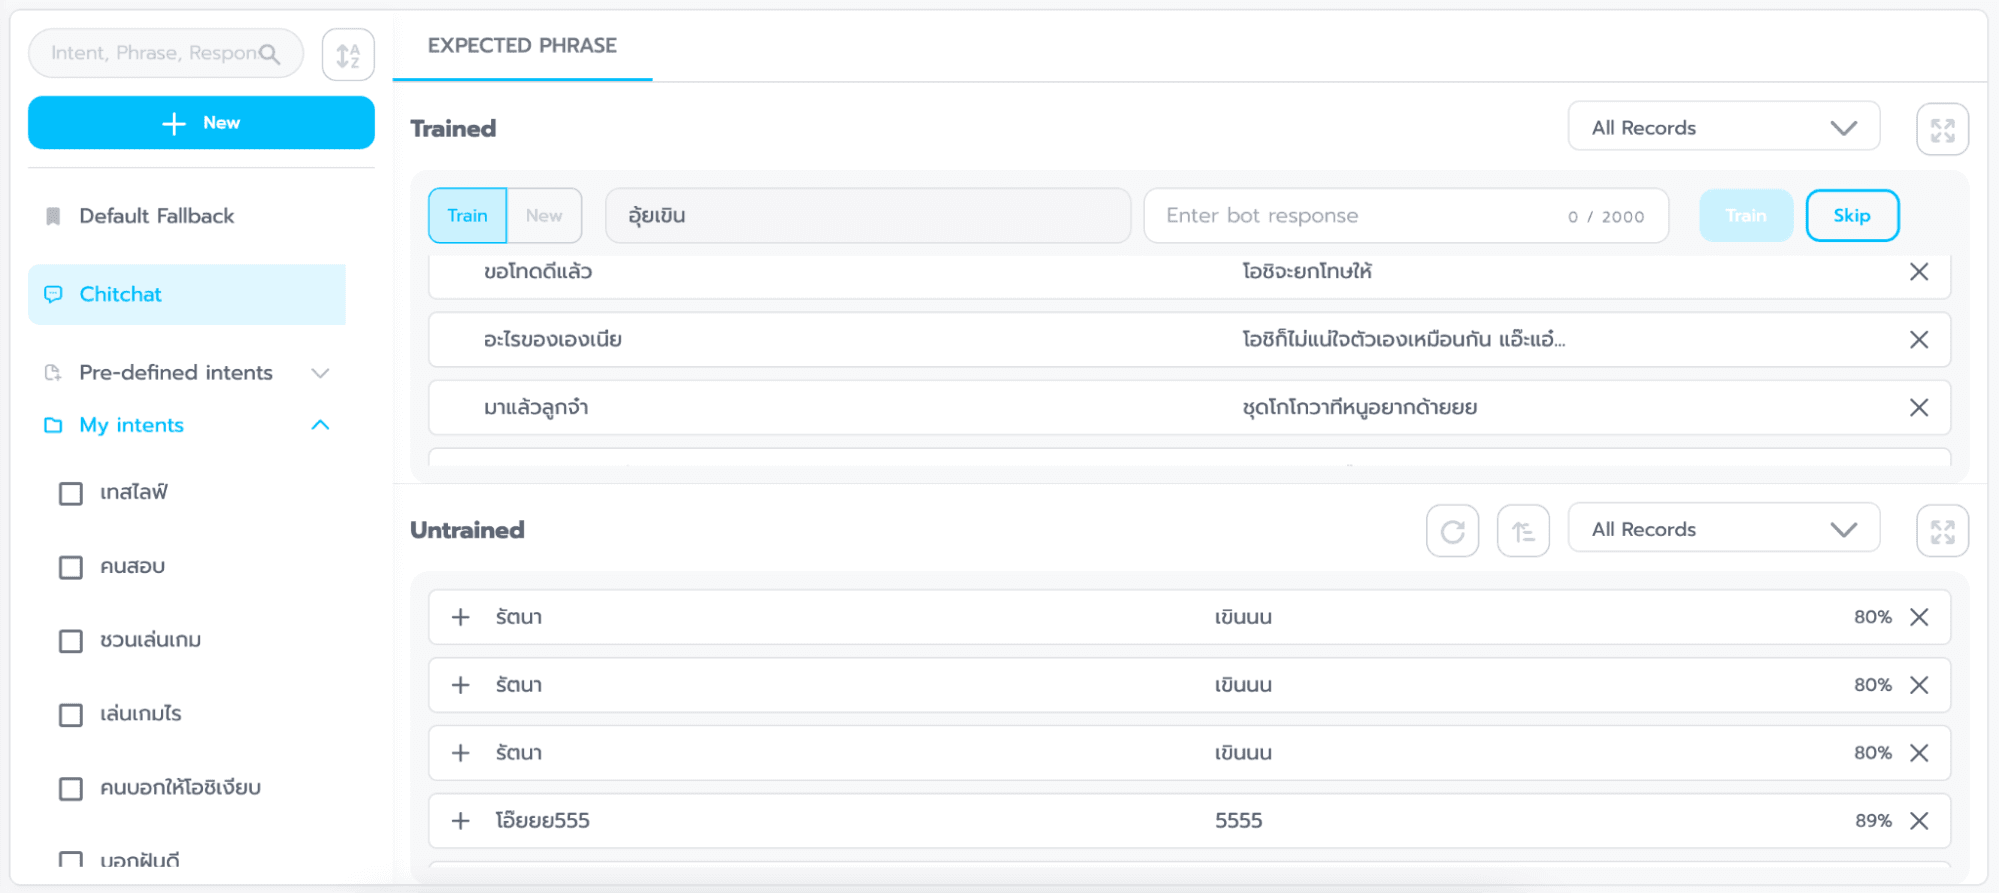
a. Train In this "Train" mode, the system will prompt questions from the "Untrained" section below. You can teach the bot by entering the desired response in the "Enter Bot Response" field and clicking the "Train" button to save the response. Alternatively, you can click the "Skip" button to move on to the next sentence without providing a response.

b. New In the "New" mode, you will need to come up with your own questions. You can enter a question in the "Enter Phrase" field and provide the bot's response in the "Enter Bot Response" field. Then, click the "Train" button to save the response. This mode allows you to create custom question-answer pairs for training the bot.

Intent (IN) is used to create categories for teaching messages with the same meaning but different wording together, making it easier to manage. For example, an Intent named "Greetings" would collect various greeting phrases such as "Hello," "Hi there," "Hey," and "Good morning." You can group these different phrases together and create a set of responses for this group, simplifying management tasks all in one place.
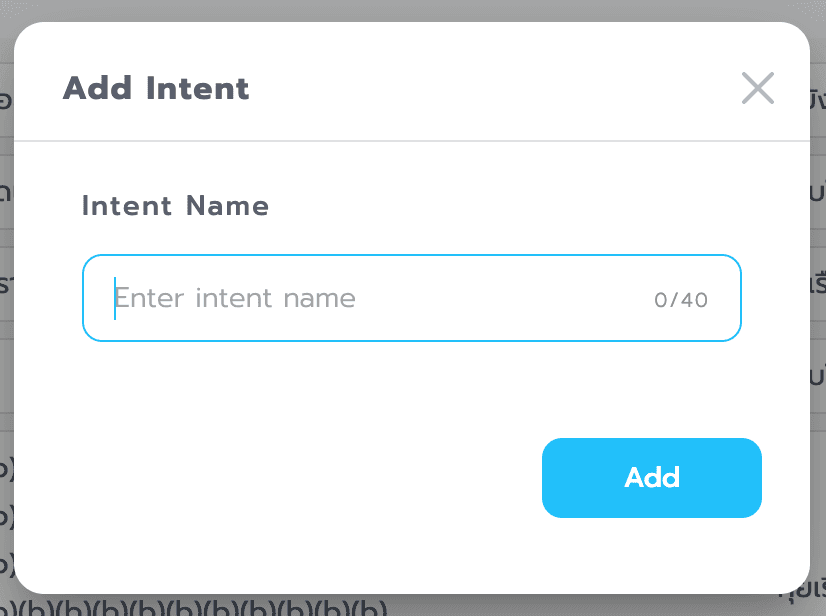
a. +New button is used to create a new set of Intents.
b. Intent Name field is where you can specify the name for your Intent.
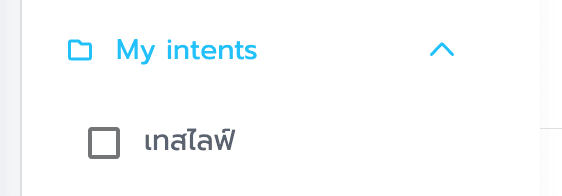
Tip: New Intents that you create will be displayed in the "My Intents" list below.
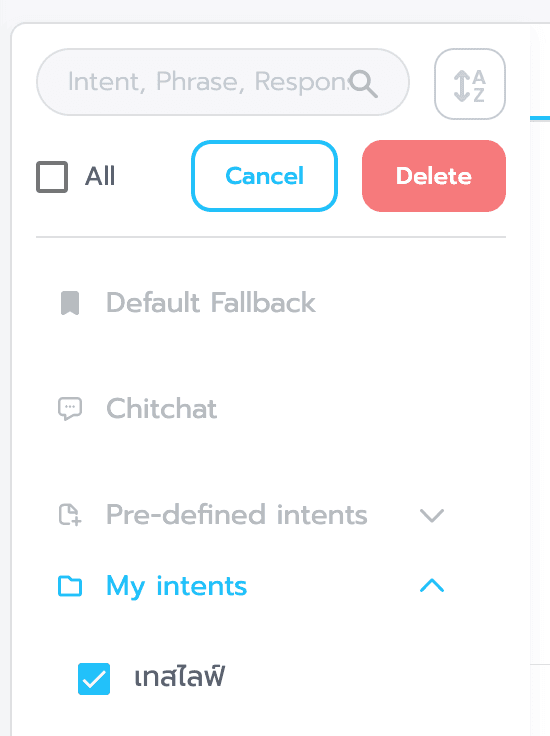
Tip: You can delete an Intent by checking the box next to the Intent's name, and then the system will display a delete button for you to press. Click the Delete button to proceed with the deletion, or you can delete all Intents at once by checking the box next to "All" and then pressing the Delete button.
For teaching a bot, the section on Intent is divided into two main parts: teaching the bot to understand the purpose of the messages sent by users (Expected Phrase) and teaching the bot to respond to questions in line with that purpose (Bot Response).
c. For teaching the bot to understand the purpose of the messages sent by users (Expected Phrase), you can do so using two methods:
a. In the "Trained" section, you can type the text that you anticipate users will inquire about into the "Enter Phrase" box, and then press the "Train" button to save it.
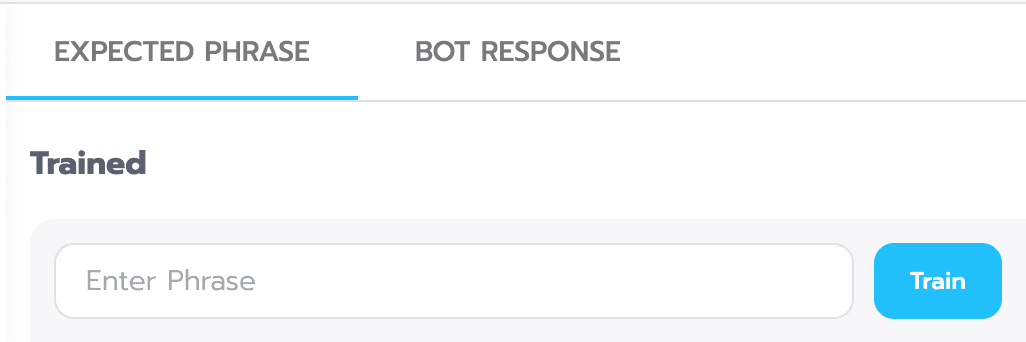

Tip: You can edit the text in the "Trained" section by clicking on the pencil icon next to the text.
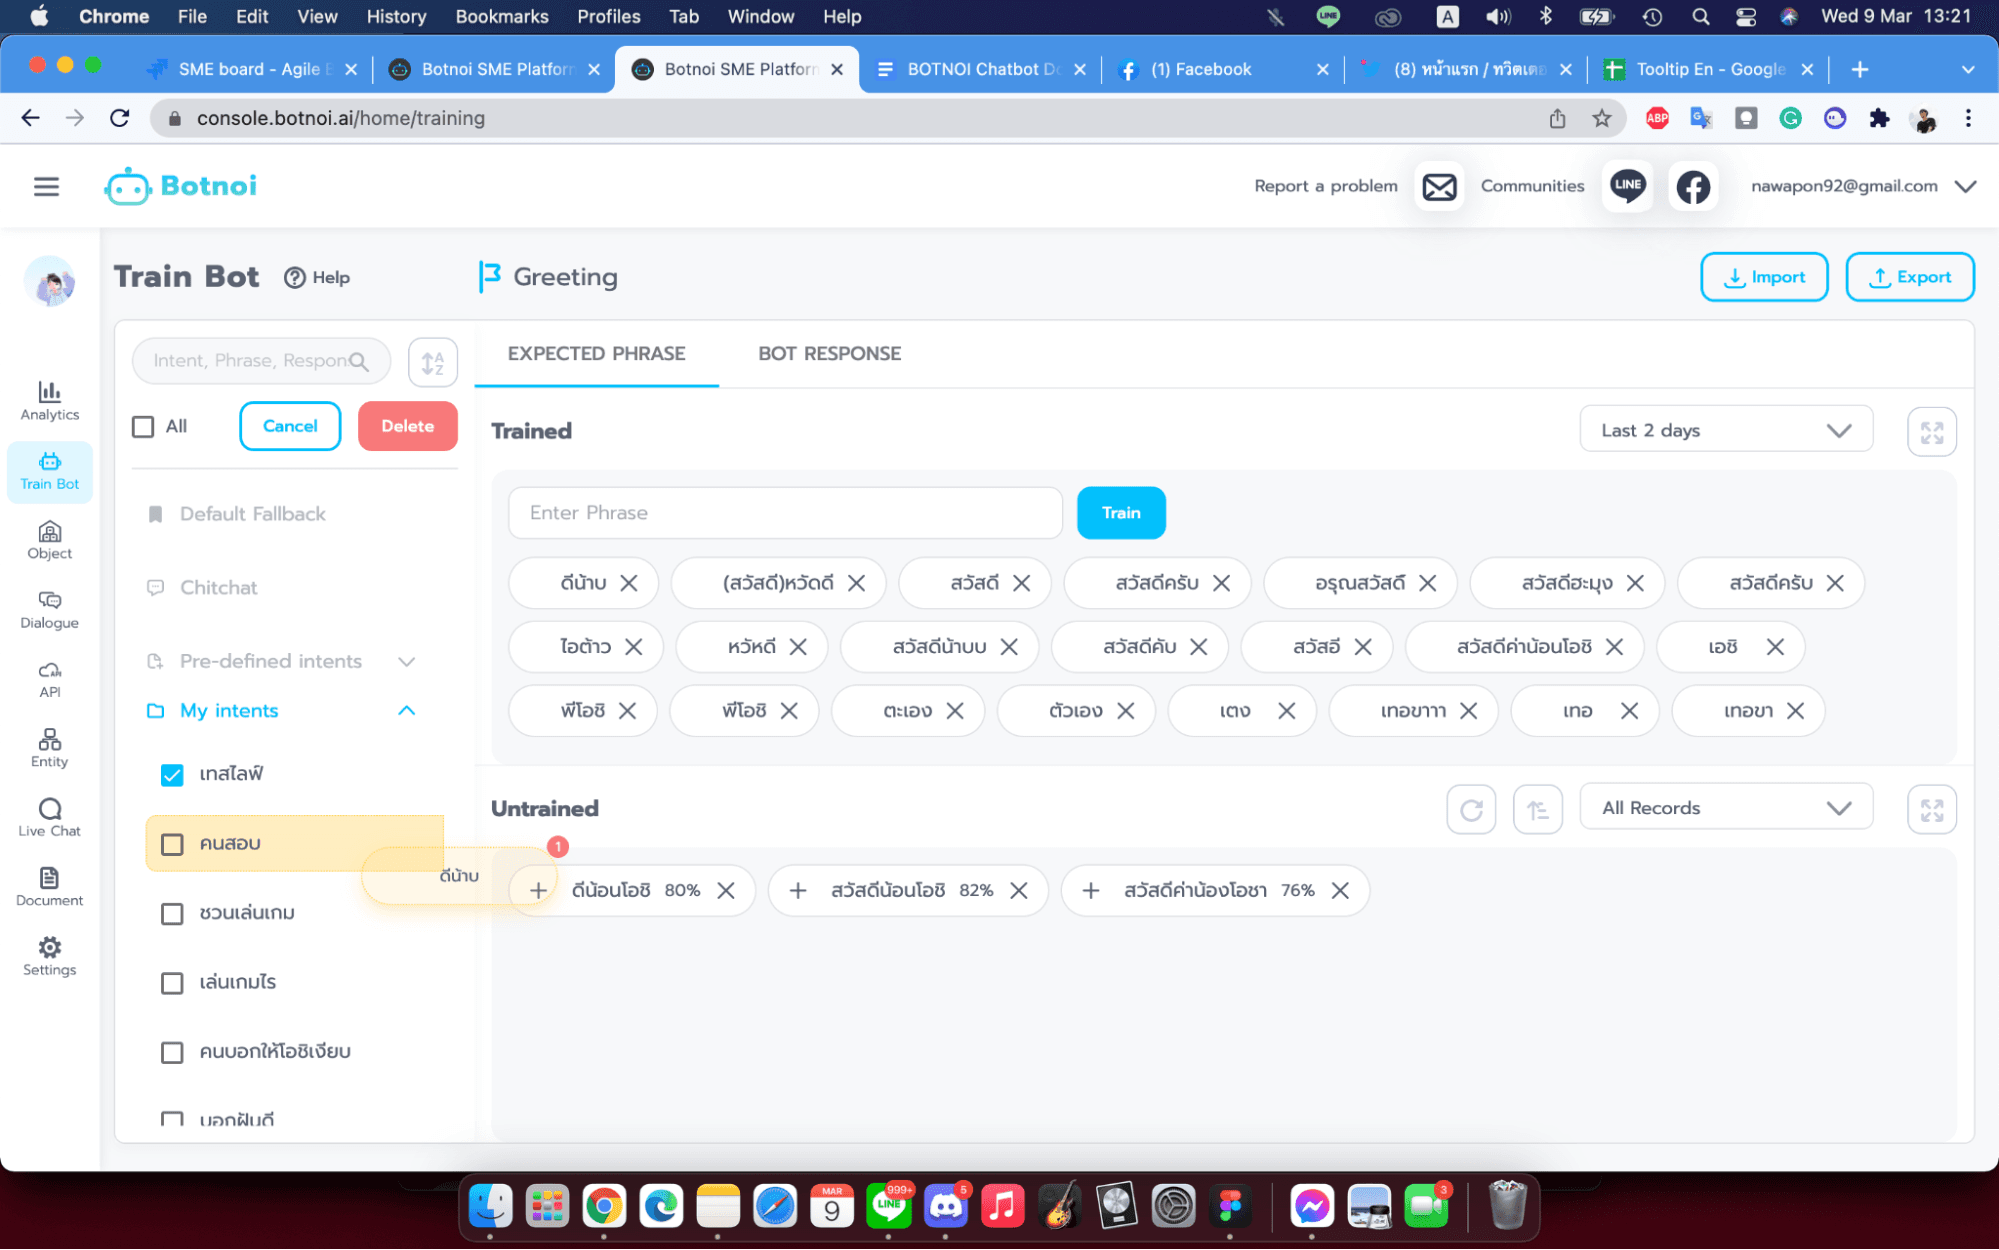
Tip: You can also drag and drop the text from the "Trained" section into other Intents listed in "My Intent" on the left-hand side.

Tip: You can delete data in the "Trained" section by clicking on the text phrase you want to delete and then pressing the "Delete" button. Alternatively, you can delete all trained data by clicking on the "Delete Trained" button on the left.
a. In the "Untrained" section, if the text entered by users doesn't match what you've previously trained (with confidence less than 100%) but has confidence higher than what's set in the Default Message settings, those messages will be displayed in the "Untrained" section. You can click on the plus icon to teach the bot, and the trained messages will move to the "Trained" section above.

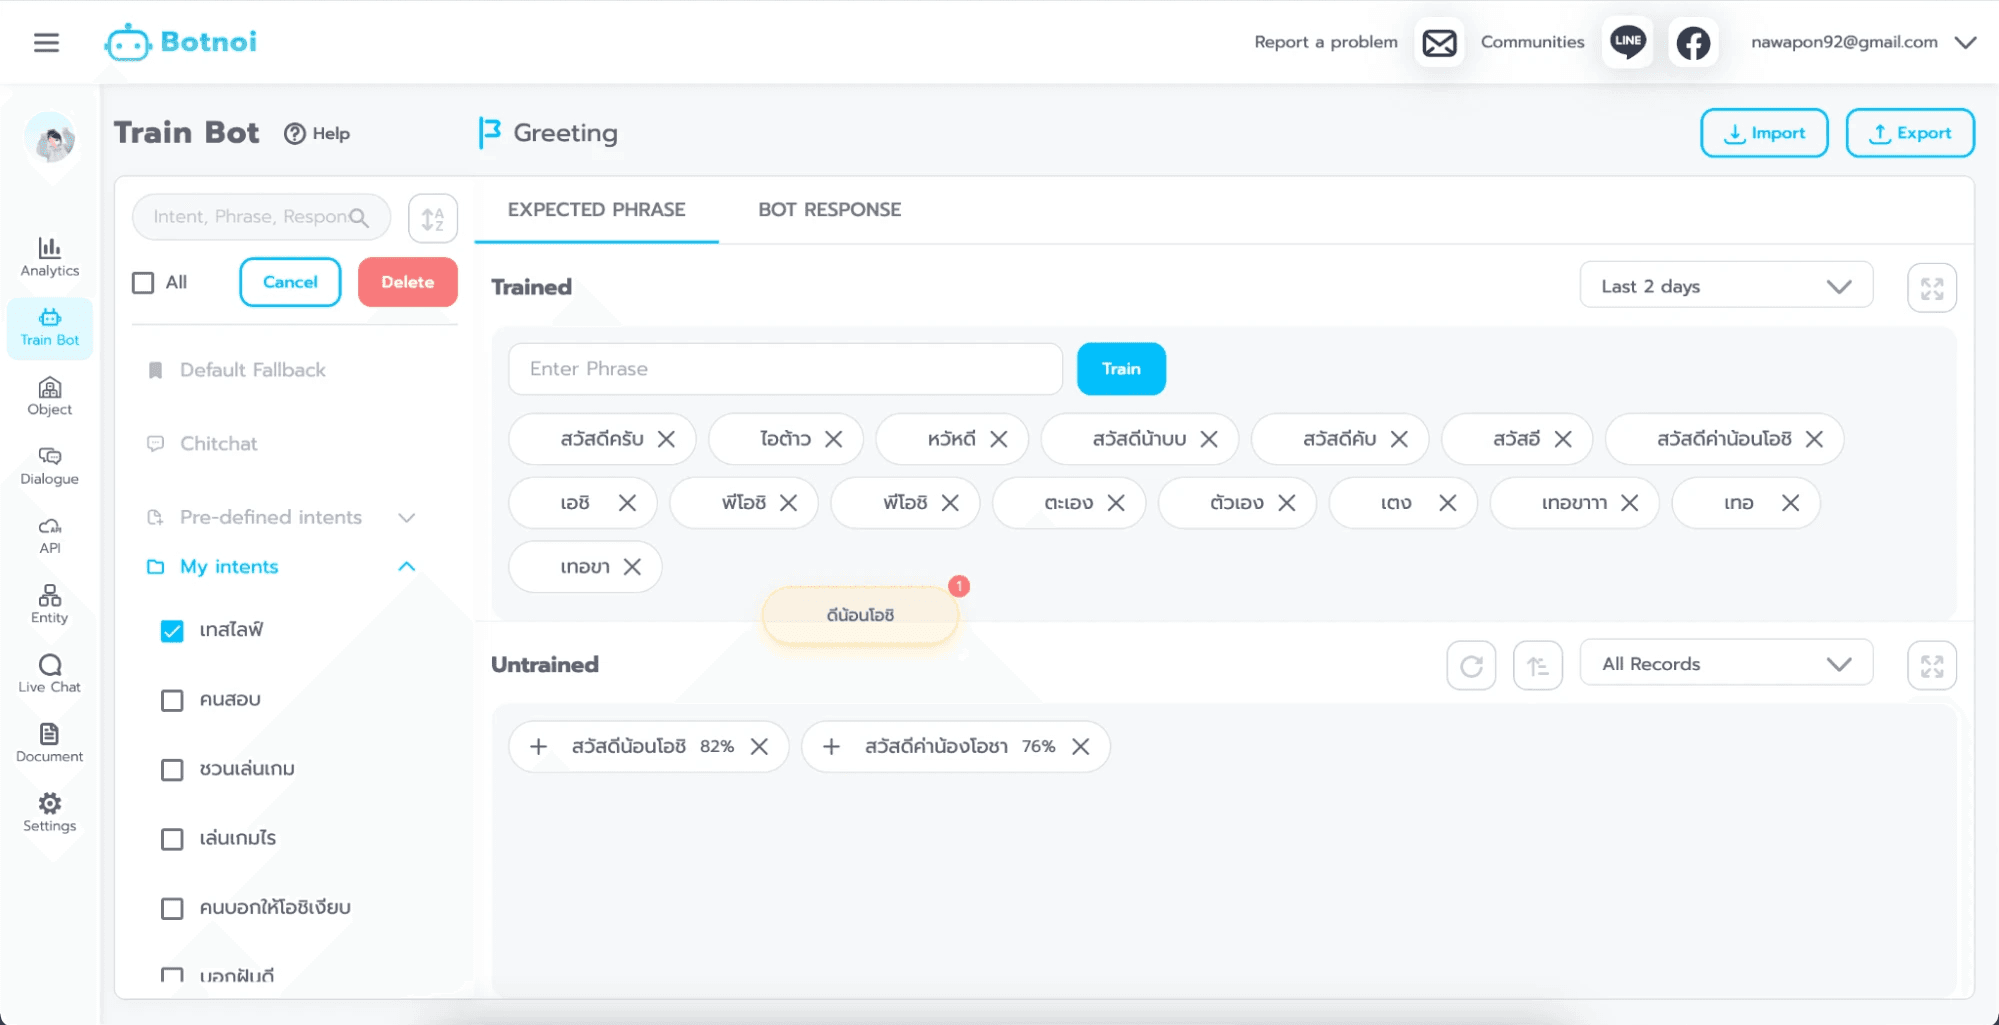
Tip: On the "Untrained" page, you can drag and drop those text phrases into other Intents listed in "My Intent" on the left-hand side or into the "Trained" section at the top.

Tip: You can teach the bot multiple words at once by clicking on the text phrase you want to teach and then pressing the "Add" button. This will allow you to teach multiple words in a single teaching session.

Tip: You can delete data in the "Untrained" section by clicking on the text phrase you want to delete and then pressing the "Delete" button. Alternatively, you can delete all untrained data by clicking on the "Delete Untrained" button on the left.
d.Bot Response for managing bot responses, where the bot's responses can take multiple formats.
a. +New Button for creating sets of chatbot responses.
b. Response A set of chatbot responses can be created in multiple formats.
Existing objects: Selecting responses in the form of Objects or Intents from the media library that has been previously created.
Text: Responding in text format or as plain text.
Image: Responding in image format.
Carousel: Responding in the format of a rotating carousel with images and buttons.
Button: Responding in the format of Quick Reply buttons: responding with message buttons that can be clicked once. Flex Message: responding in a format that can be customized by us. Custom Payload: responding in a format that we can customize ourselves.

Tip: If you want to delete a set of responses, check the box in front of the response set name, and the system will display a delete button for you to press. To delete all response sets, check the "All" box and then press the "Delete" button.
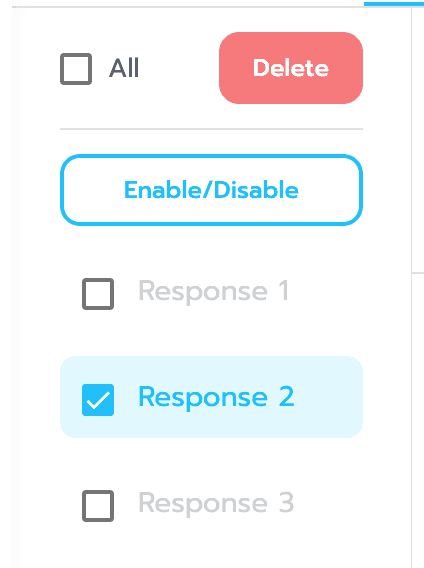
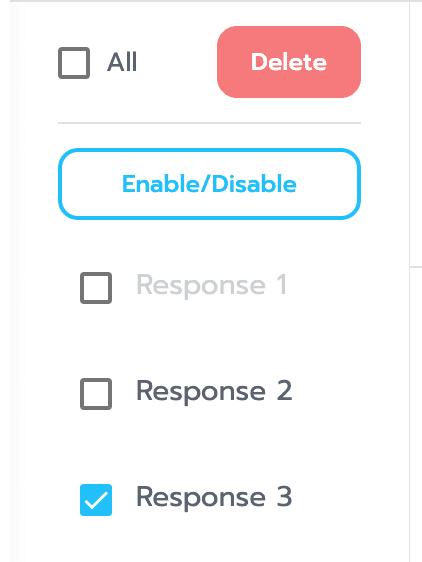
Tip: If you want to enable or disable the use of a set of responses, check the box in front of the response set name. The system will display an "Enable/Disable" button for you to click. Click it once to toggle between enabling (text color will be bold) and disabling (text color will be faded). When disabled, the bot will not use this set of responses to respond to users. To use the response set again, check the box in front of the response set name and click the "Enable/Disable" button once more.
e. Import Adding data through Excel is suitable for managing a large volume of data efficiently.

You can "Download Template" that is provided to edit the data immediately. There are three types available in total.
a. Download the "Intent-Phrase Template" for managing the groups of questions for each Intent.
a. Intent It refers to the field where you can input the name of the Intent.
b. Phrase is the field where you can enter the words or sentences associated with that specific Intent.
b. Download the "Intent-Response Template" for managing groups of responses for each Intent.

a. Intent refers to the field where you can input the name of the Intent.
b. Response is the field where you can enter the responses or sentences you want the bot to provide for that specific Intent.
c. Download the "Chitchat-Response Template" for managing groups of questions and responses for chitchat conversations.

a. "Phrase" is the field where you can enter the questions or sentences that you anticipate users will type or input.
b. "Response" is the field where you can enter the responses or sentences you want the bot to provide for that specific Phrase.
Tip: The headers of the columns in the template must not be changed.

f. Export to export the trained data in Excel format.
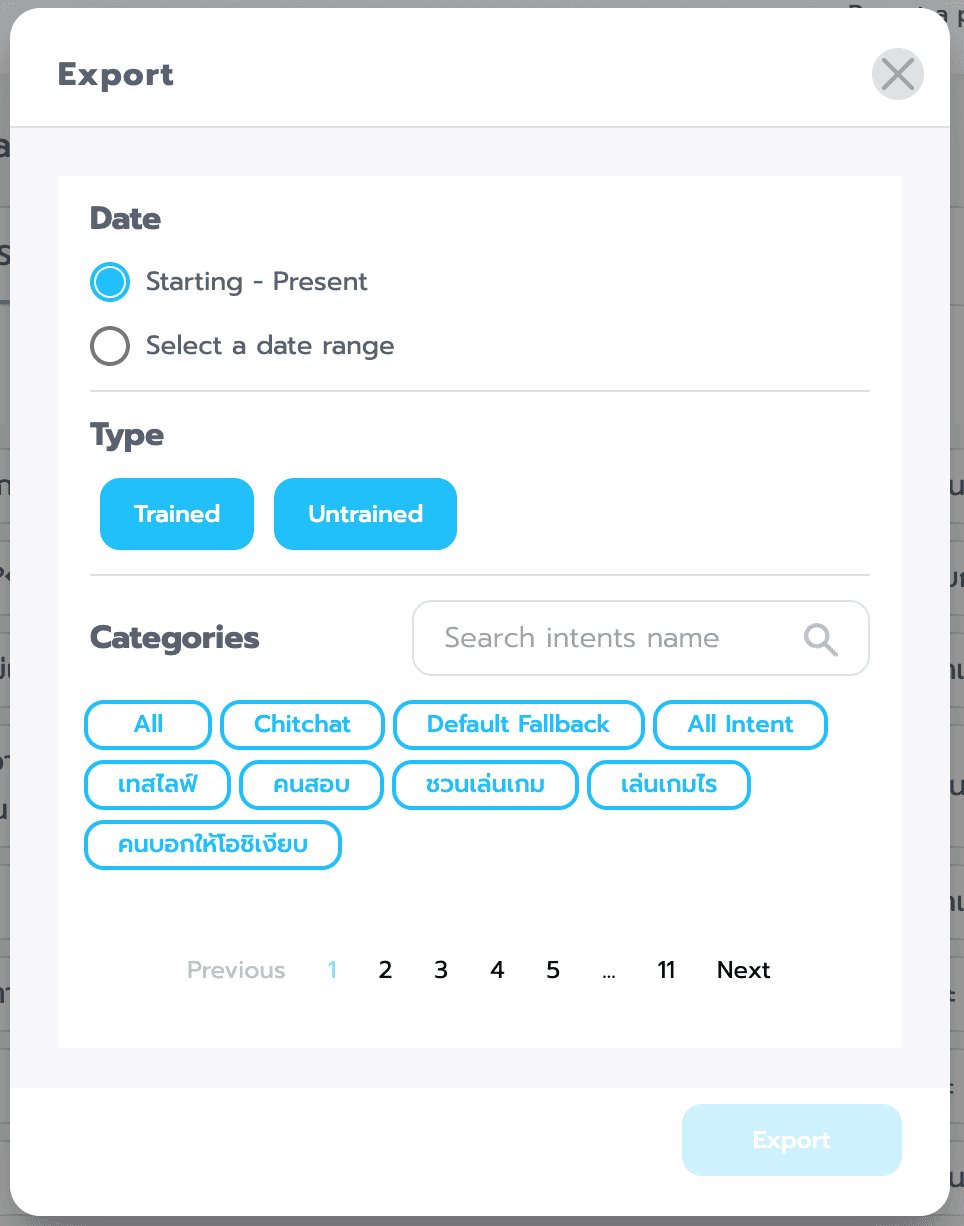
a. You can specify a date range for the data you want to export.
a. Starting-Present: You can select a date range from the beginning up to the present.
b. Select a date range: You can choose a specific time range.
b. Type you can select the specific data you want to export, specifying which parts or sections you'd like to include.
a. Trained: The data in the "Trained" section.
b. Untrained: The data in the "Untrained" section.
c. Categories You can choose the data type you want to export.
c. All: All data types.
a. Chitchat: Only Chitchat data.
b. Default Message: Only Default Message data.
c. Intent: Only Intent data.
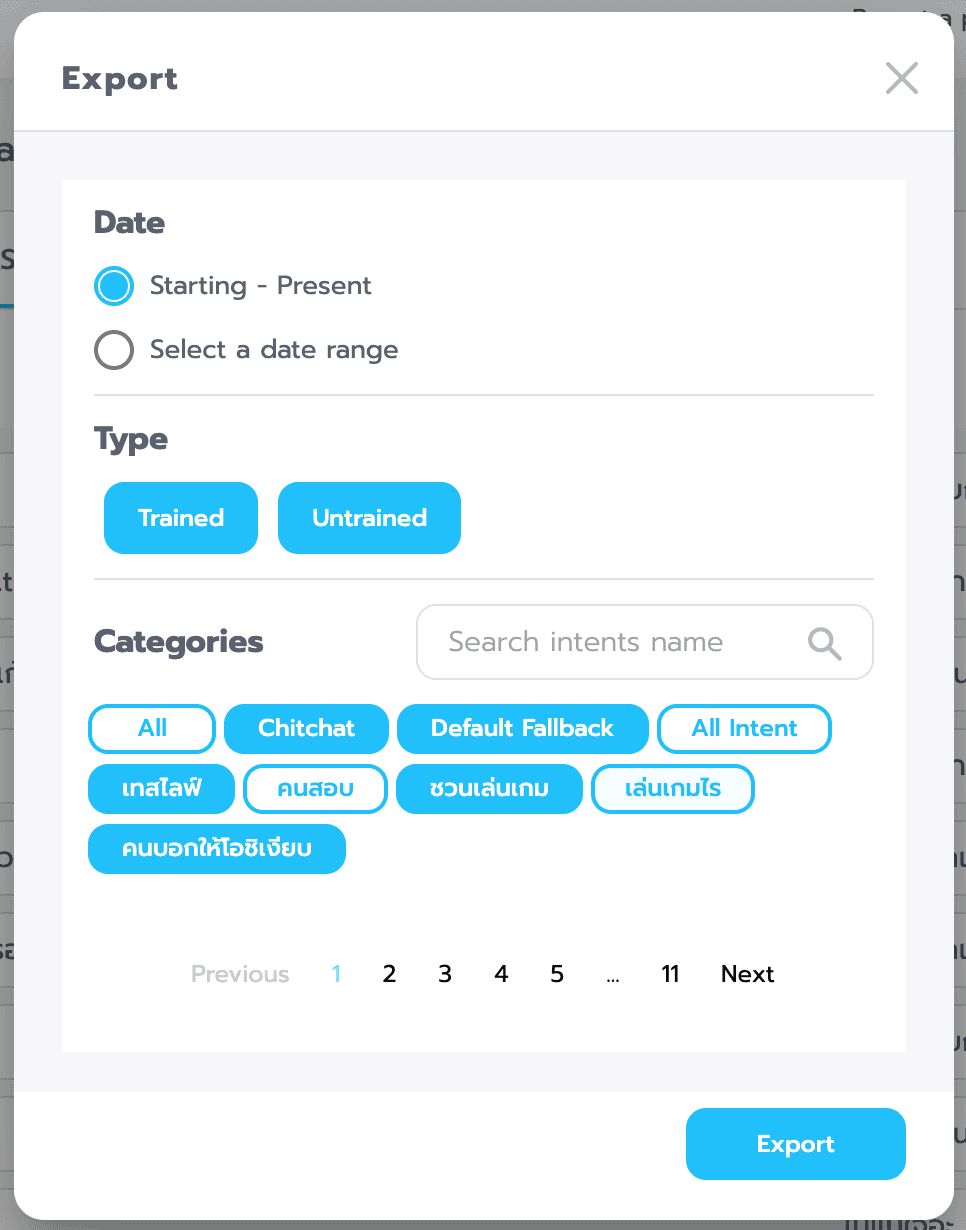
d. Tip: You can select and export specific data simultaneously.
Entity
It is a group of various words that are categorized together, or they are words that have the same meaning (the Entity feature will be used in Object Dialogue).
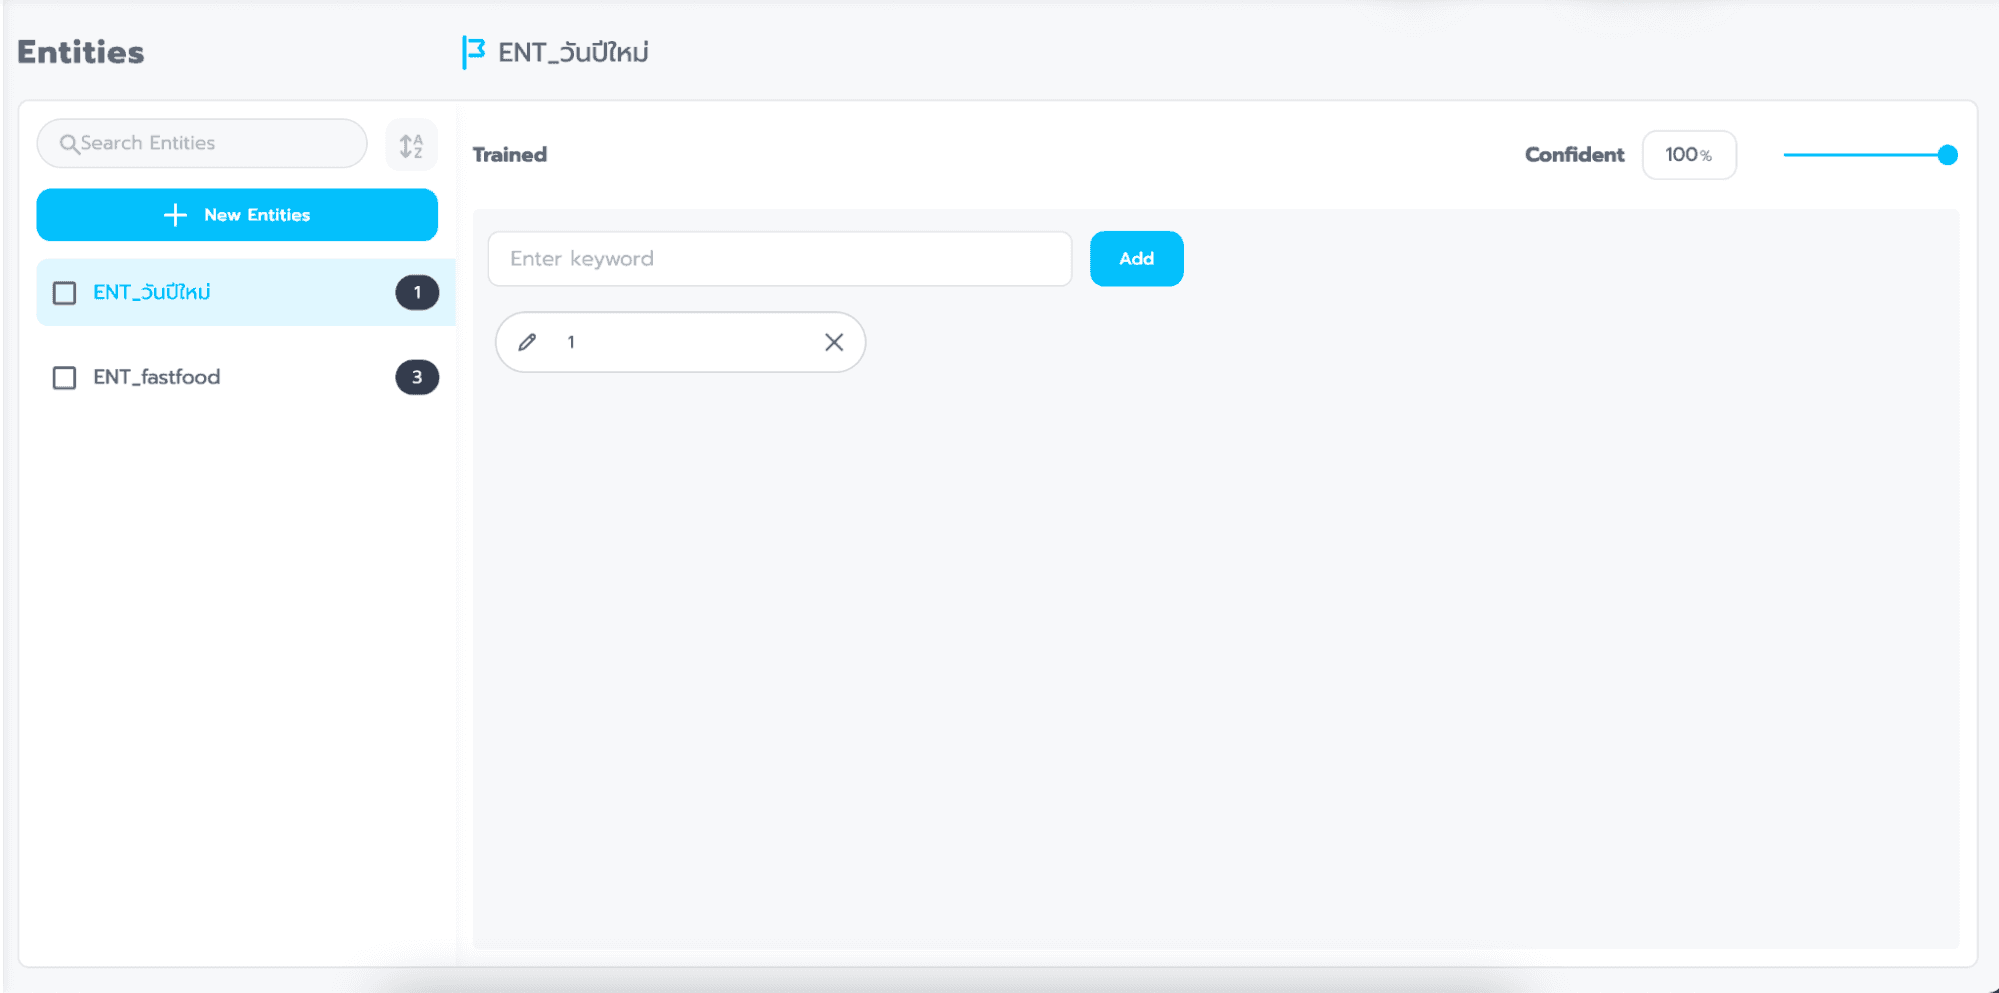
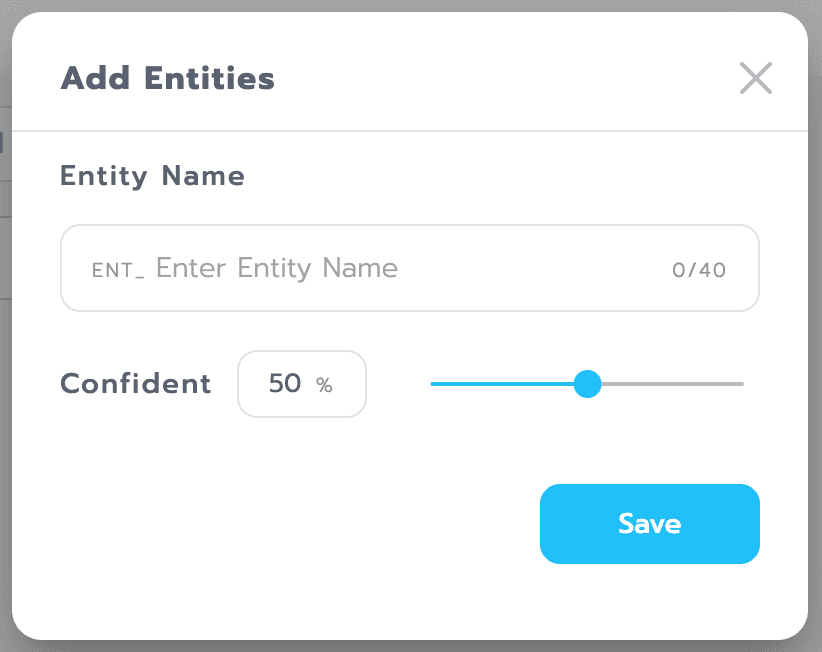
a. New Entities - Button for creating sets of entities.
b. Entities Name - Field for naming entities.
c. Click the button (+Add Phrase).
d. Confident - Field for setting the confidence level of entities.

Tip: You can delete data in Trained by clicking on the phrase text you want to delete and pressing the Delete button to remove it.
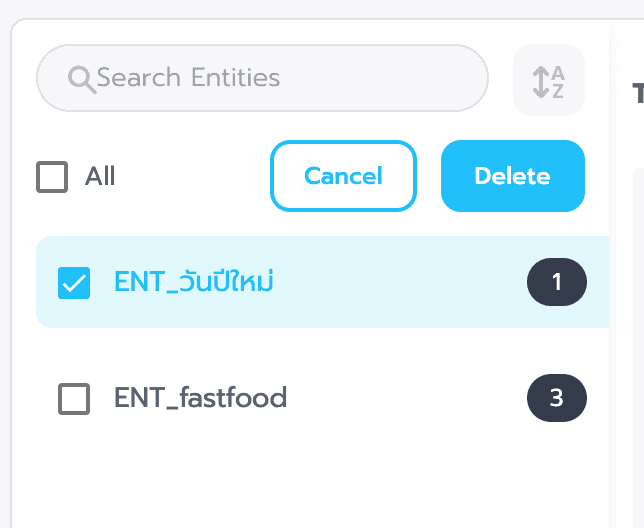
Tip: You can delete entities by checking the box in front of the entity name. Then, the system will display a delete button for you to click. Press the Delete button to remove it. Alternatively, you can select and delete all entities at once by checking the 'All' box, then clicking the Delete button.
Dialogue
Normally, general chatbots respond in a 1:1 question-answer format. However, Dialogue is another response format that can engage in continuous conversations. In this format, you can both define the format of questions and answers and the flow of the conversation. You can also collect user response data to use in connecting with other systems.
Components of the Object (Dialogue Flow) page
The Object Dialogue page has six main components
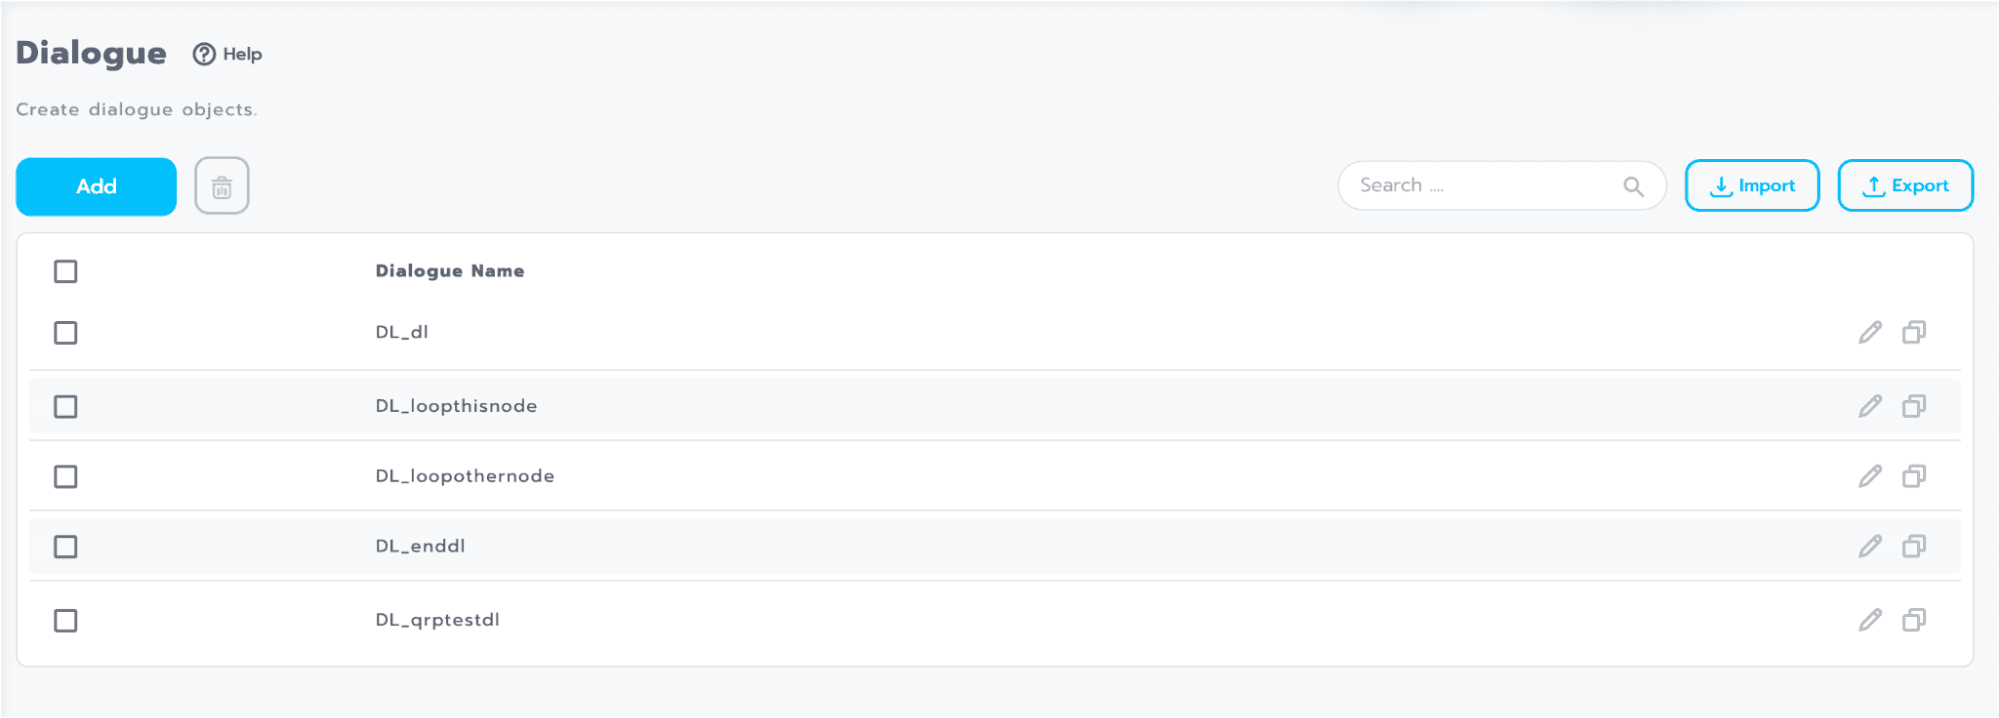
Add a button to create a Dialogue page.
Delete button for deleting Dialogue (trash can icon).
Import/Export buttons for importing and exporting dialogue files.
Edit button for editing dialogue (pencil icon).
Duplicate button for copying dialogue (stacked paper icon).
Search - Field for searching dialogue names.
Components of the creation page dialogue
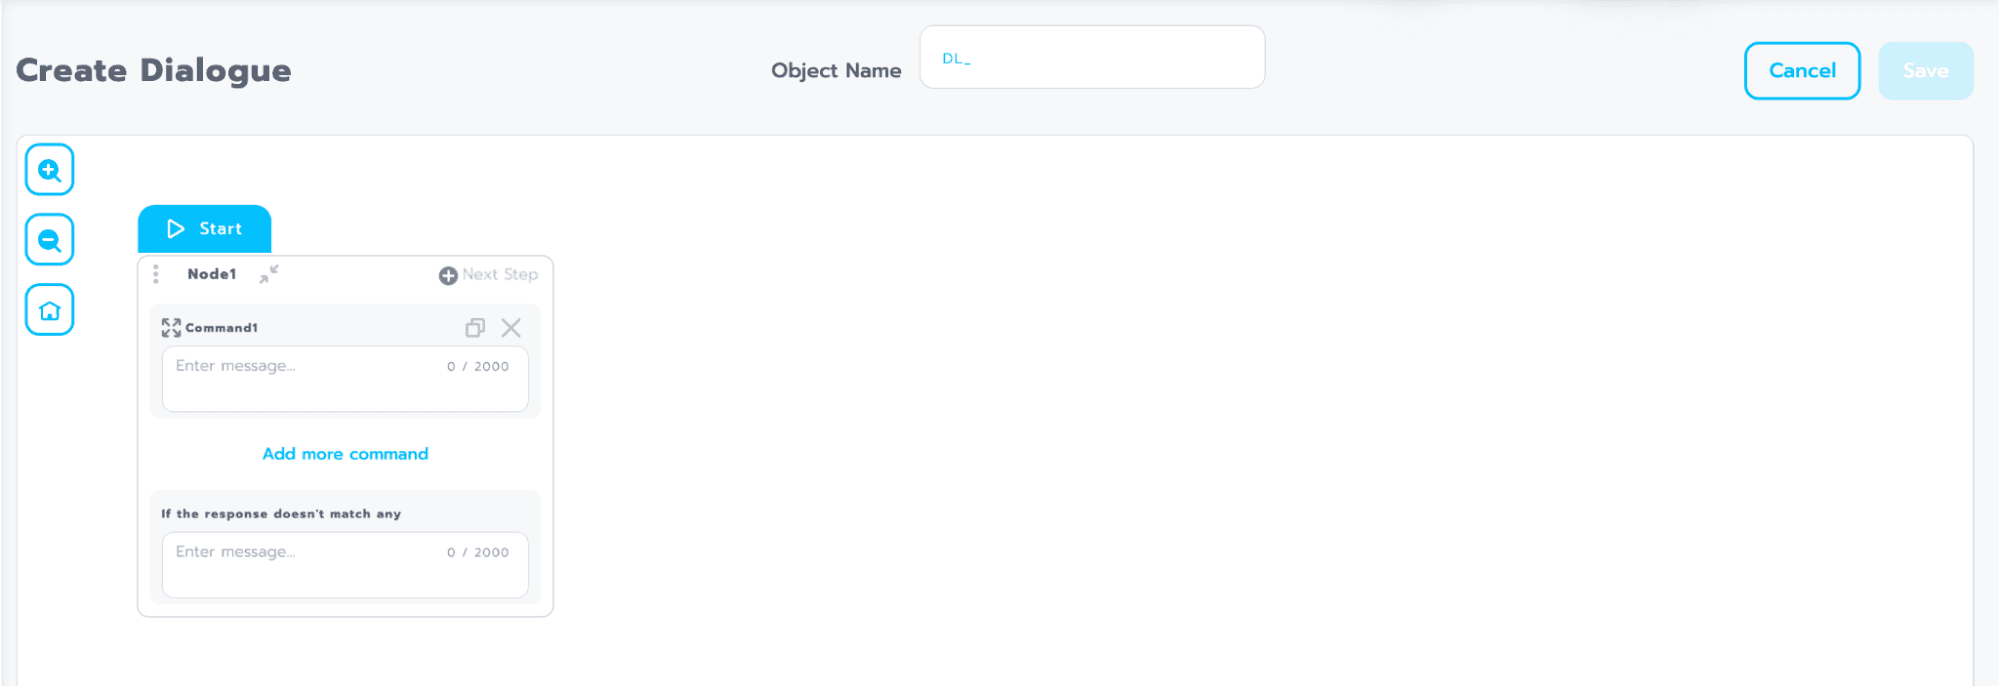
Object Name - Field for naming the Dialogue.
Zoom In - Button for enlarging the workspace view (plus magnifying glass icon).
Zoom Out - Button for reducing the workspace view (minus magnifying glass icon).
Home - Button to return to the starting point of the flow (house icon).
Save - Button for saving the Dialogue.
Components of a Node.
"Node" refers to a way of indicating the sequence of text boxes or messages that a chatbot will use to respond to a user. These text boxes or messages are typically numbered sequentially, starting from 1 and continuing in order. Each node represents a step or a part of the conversation, allowing the chatbot to provide responses in a structured and sequential manner.
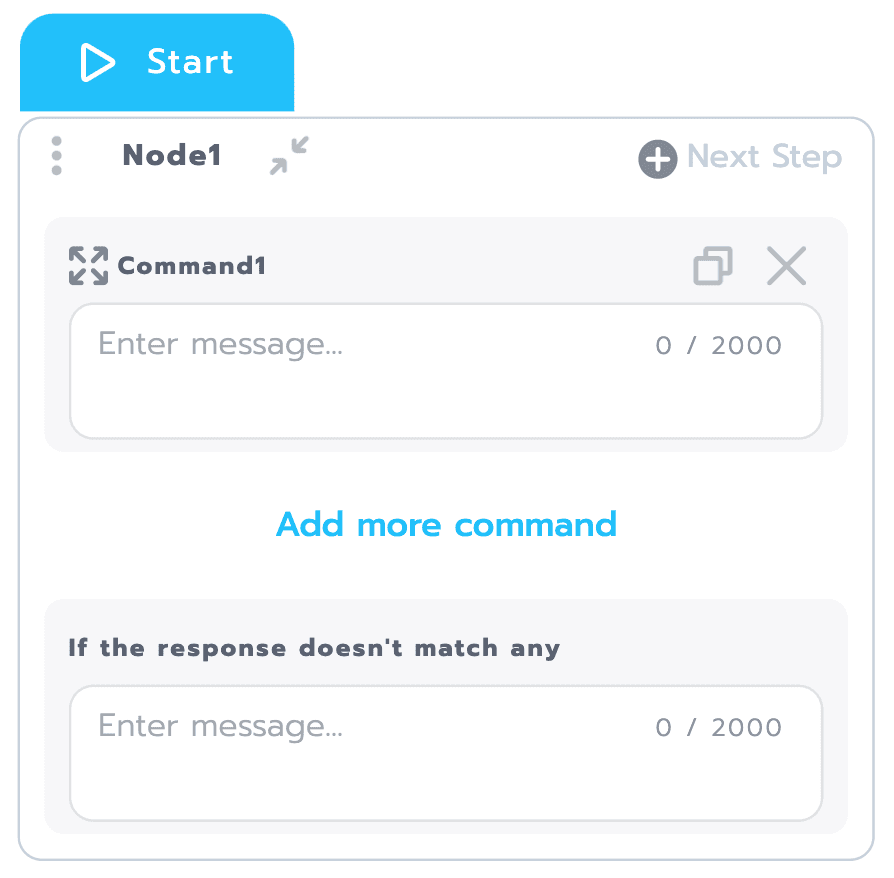
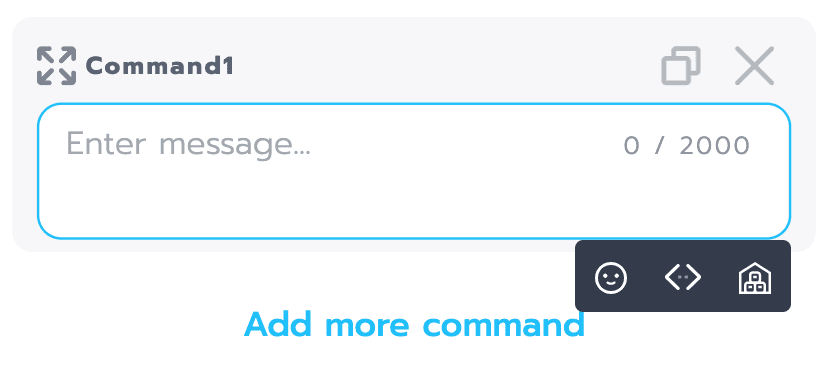
Command - A field used to input text or objects for the chatbot's responses.
Duplicate (stacked paper icon) is a function used to copy the Command.
Delete (trash can icon) is a function used to delete the Command.
Enter message - A field for inputting the text you want the chatbot to respond with. You can also input emojis, parameter <..>, Object
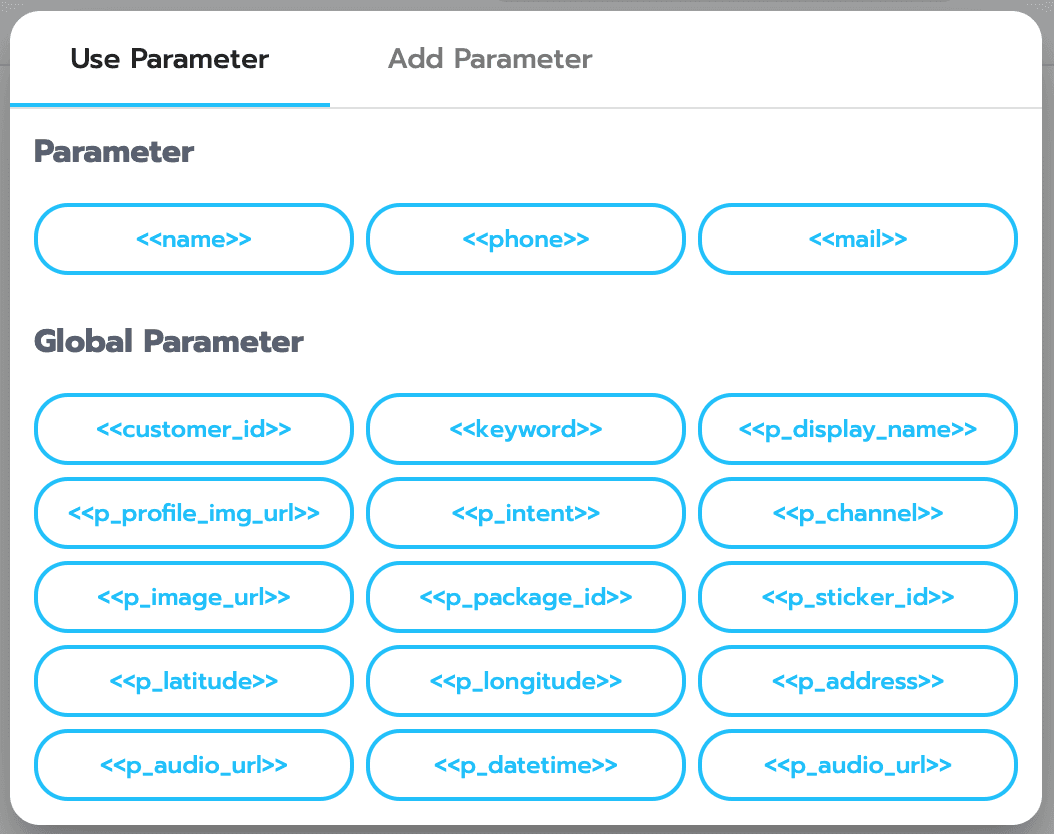
Parameter <..> - This function is used for storing and displaying the values of variables. 'Use parameter' is a way to display the variable's value, while 'Add parameter' is used for storing the variable's value.
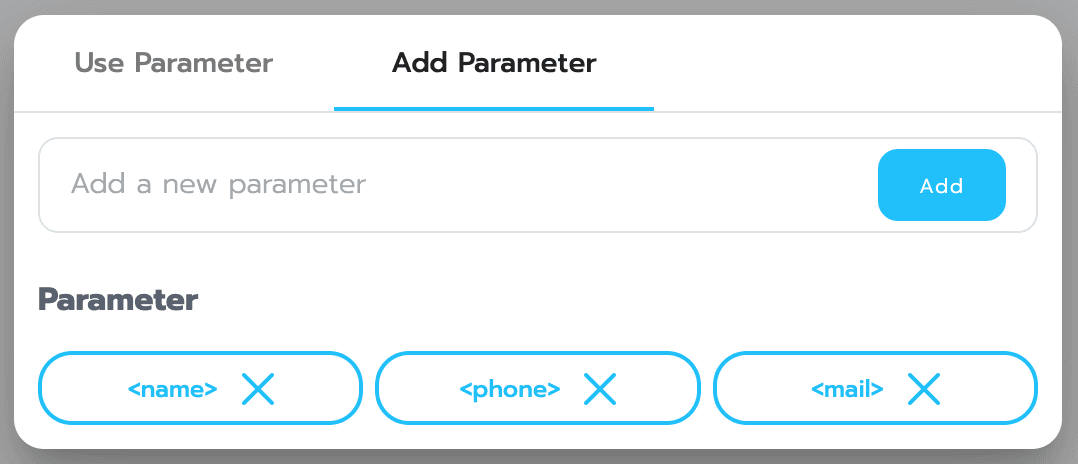
a. Add parameter - You can add variables to store data from this section. The variables added here will be displayed in the Parameter section and can be reused.
The format of data storage variables will be enclosed with <variable name>, for example, when called, it will store data such as names, etc. - 'Use parameter' allows you to use the variables added from this section. This function is used to display the data stored in the variables, with the added variables appearing in the Parameter section. There are system default variables that can be used directly and are located in Global parameter. You can use them immediately. The format of data storage variables will be enclosed with <<variable name>>, for example, <<name>>, when called, it will display the stored name, and so on.

Additional Parameter Usage.
Add Parameter - An example of creating variables to store data.
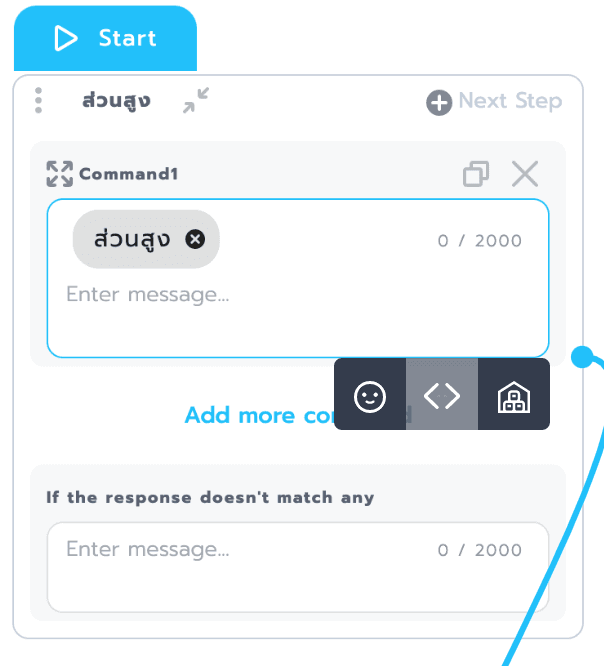
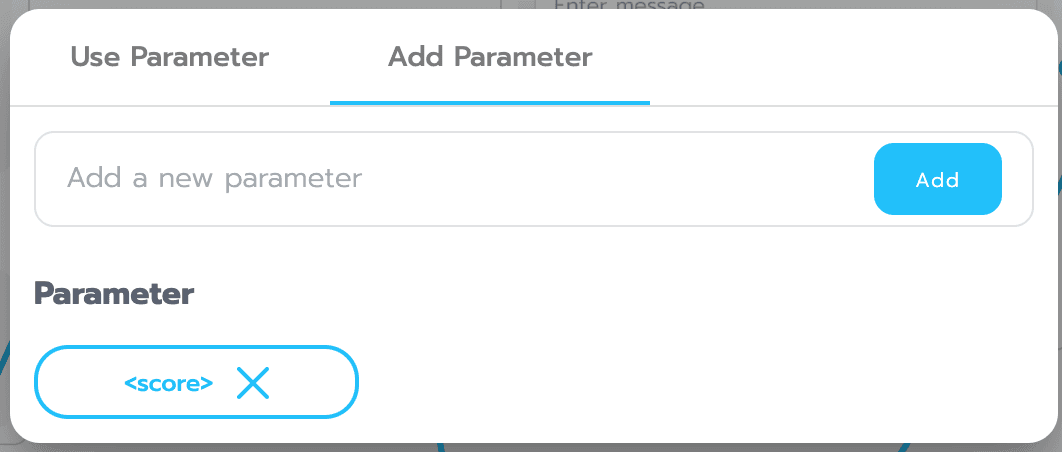
Click on the <..> icon to open the parameter creation window.
Click on the 'Add parameter' tab, enter the variable name you want in the field, and then click 'Add'.
Creating a normal variable will look like the picture above, with a <variable name> sign covering the variable name.
Use Parameter - An example of how to access data stored in variables.

Retrieving the data stored in a variable adds a <<variable name>> symbol around the variable name.
Value Parametor Example of assigning values to variables.

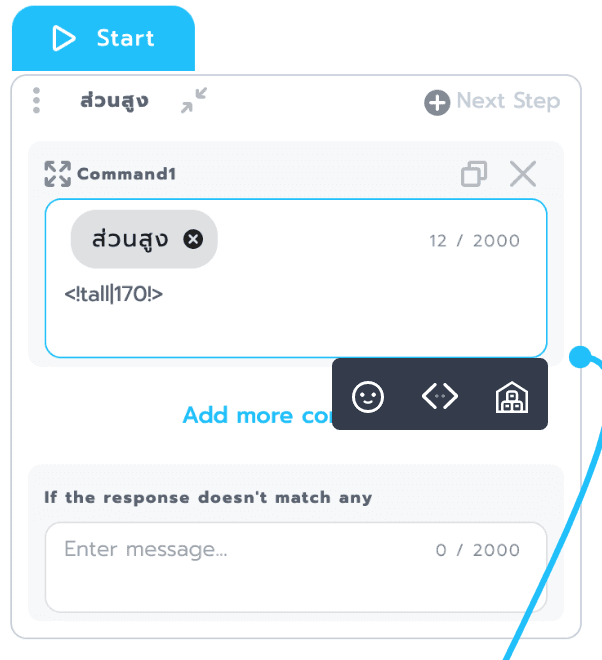
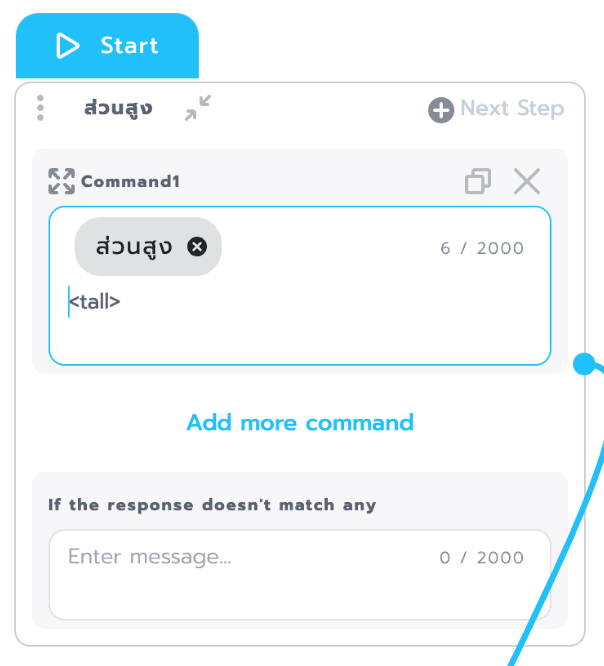
When creating regular variables, they will be displayed in the format on the left, enclosed with <variable name>.
To assign values to variables, we edit the text to the format on the right, as shown in the image. This format will look like <!variable_name|variable_value!>.
Formula Parameter - Using variables in mathematical calculations, including addition, subtraction, multiplication, and division.
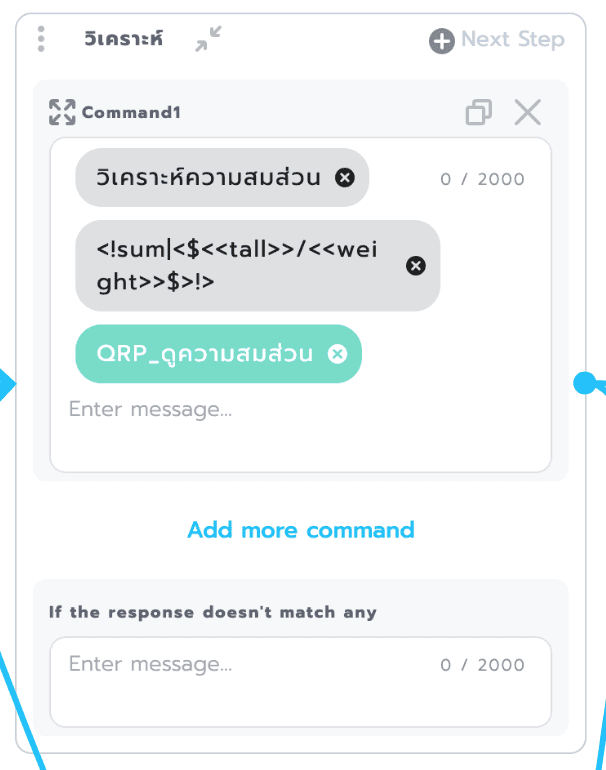
We can use the values of our variables for calculations as shown in the figure. An example demonstrates the formula format <!variable_name|<$<<variable_name>>/<<variable_name>>$>!>
In this example, it's taking the value in the 'tall' variable and dividing it by the value in the 'weight' variable, then storing the result in the 'sum' variable <!........|....!> = Assigning a value to the variable <$……$> = Using the calculation function in the formula.
Add more command - You can increase the number of commands.
Tip: The added command list will respond in cases where the user's response doesn't match the set conditions and is still within the conversation flow.
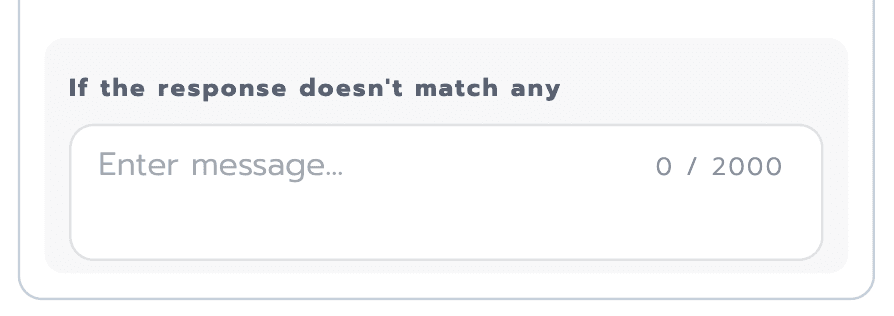
If the response doesn't match any, it's the slot for the message that the bot will respond with in the event the user responds inaccurately and ends the conversation or exits the Flow conversation.
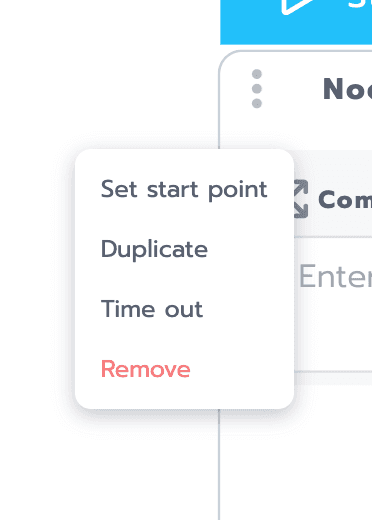
Setting has four main components as follows:
Set start point - To establish the starting point of the flow, indicating from which Node the process should begin.
Duplicate - For copying a node.
Time out - For setting up the flow when the user doesn't respond within the specified time.
Remove - For deleting a node.
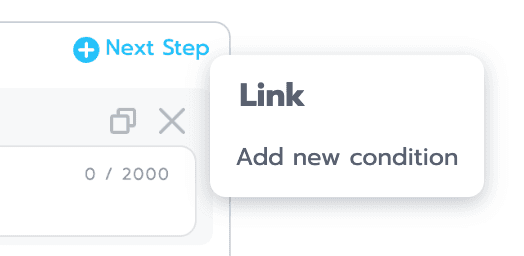
"Next step" function to add or connect to the next condition to create conditions for the chatbot to work in the next step. There are four types of conditions that can be defined.
Entities
Intent
RegEx
Match
component of Condition
Condition Section for creating or setting conditions that allow the chatbot to work in the next step according to the configured settings.
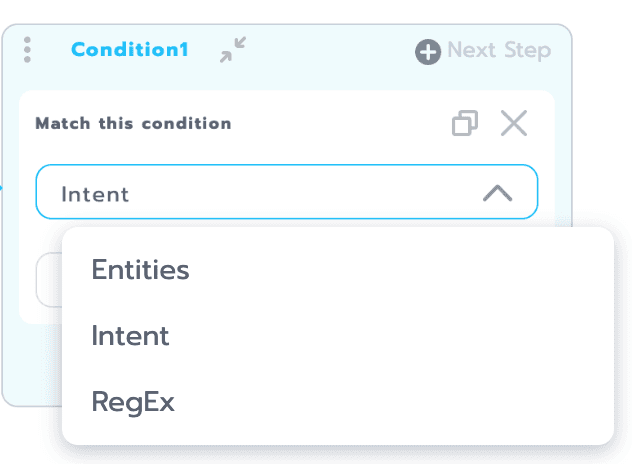
"Entities" as a way to establish conditions based on words, sentences, or groups of words. If a user types text that matches what you've defined, the chatbot can proceed to the next step.
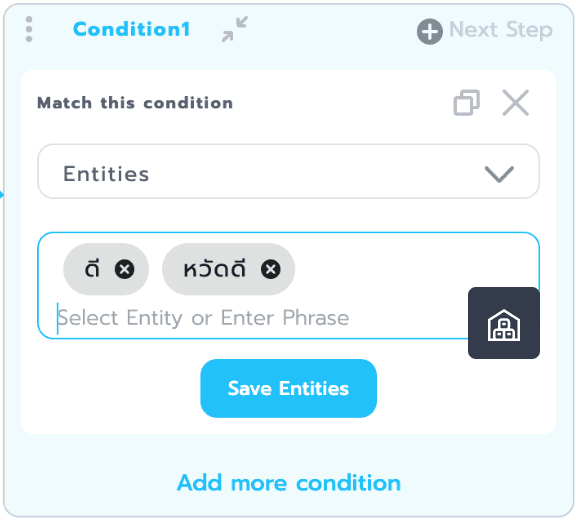
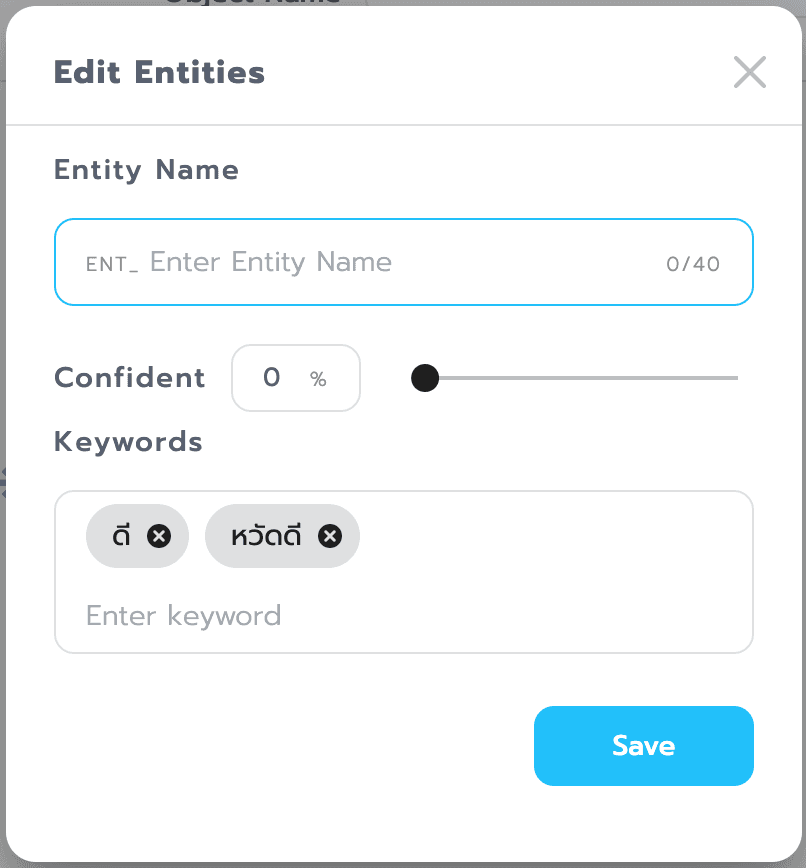
Usage - You can choose from.
Entities that we've created can be used by clicking on the icon (depicted as an elephant) or by typing text into the 'Select Entities or Enter Phrase' field. You can also save them as new entities by clicking on the 'Save Entities' button. A window will appear where you can enter a name, adjust conditions, and click the 'Save' button to save it for future use.
Intent - Capturing the intention of the words or sentences from the user, as previously trained, on the 'Train Bot' page.
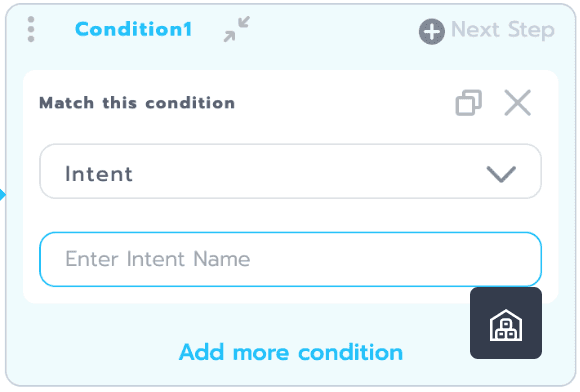
Usage - You can select from the Intents that we've already created by clicking on the elephant icon.
"RegEx or Regular Expressions is a way to define patterns or groups of words for the purpose of searching for various texts according to our needs. It can be used to search for both ordinary characters or specific patterns, allowing us to search for specific content. For example, if we want the user to respond with numbers, such as a phone number or a national identification number, RegEx can be used.
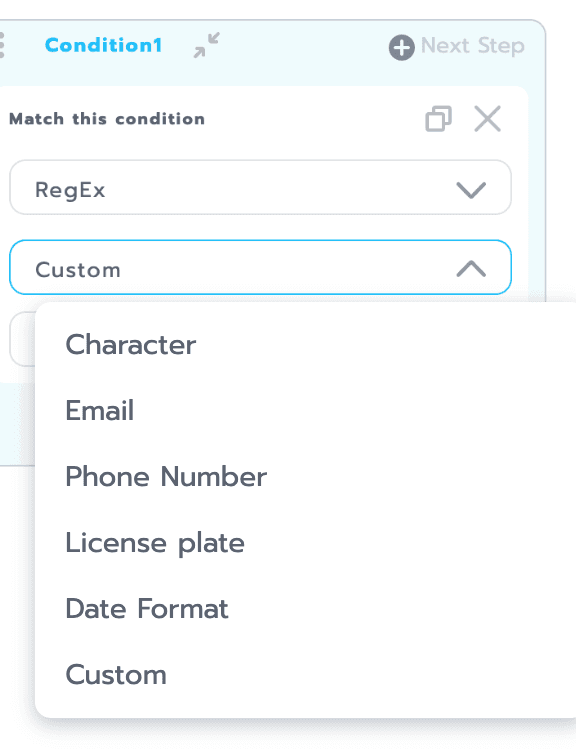
Usage - You can select the format of RegEx from the list of options that we have prepared, or
"Character" Receive all text characters.
"Email" captures text in email format.
"Phone Number" captures text in phone number format.
"License Plate" captures text in license plate format.
"Date Format" captures text in date format.
"Custom" allows you to write or define your own RegEx pattern.
Match is setting conditions based on the number of values stored in that parameter. If it is equal to or greater than the specified number of values, events will occur in the subsequent flow that we have created.
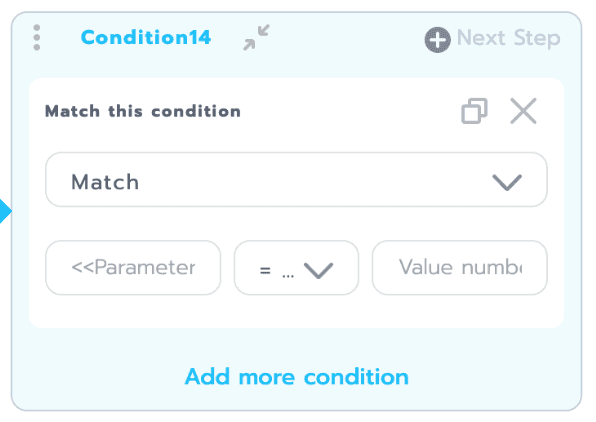
The text "<>" is a placeholder used to indicate where to specify the name of a parameter.
The middle field is for us to select a symbol to indicate the condition of the values in our parameter, such as =, !=, <, >, <=, >=.
"Value number" is referring to a field or input box where you can enter the numerical value for the parameter
Image (IMG)
Image (IMG) is the bot's response in the form of images.
Page components Image
The Object Image page has 6 main components, which are
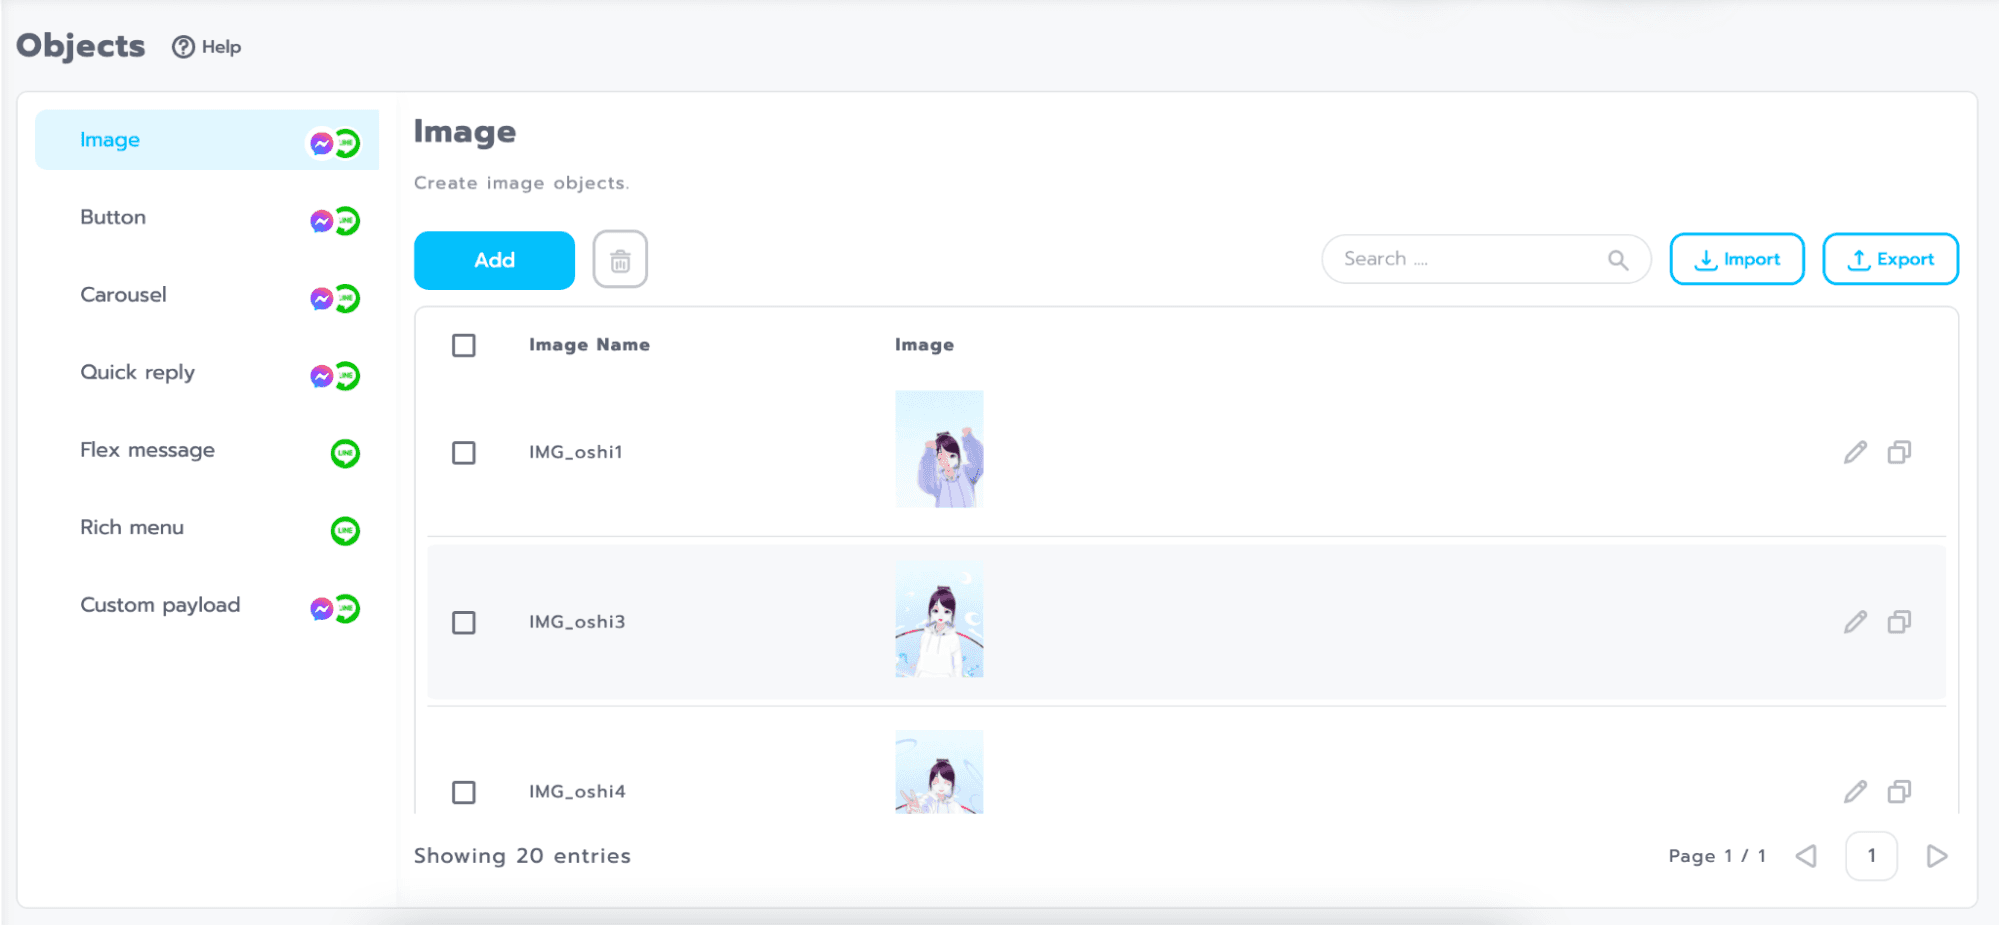
Add button for adding an Image
Delete button for deleting an Image (trash can icon)
Import/Export button for importing and exporting Image files
Edit button for editing an Image (pencil icon)
Duplicate button for copying an Image (stacked paper icon)
Search box for searching Image name
Components of the creation page Image
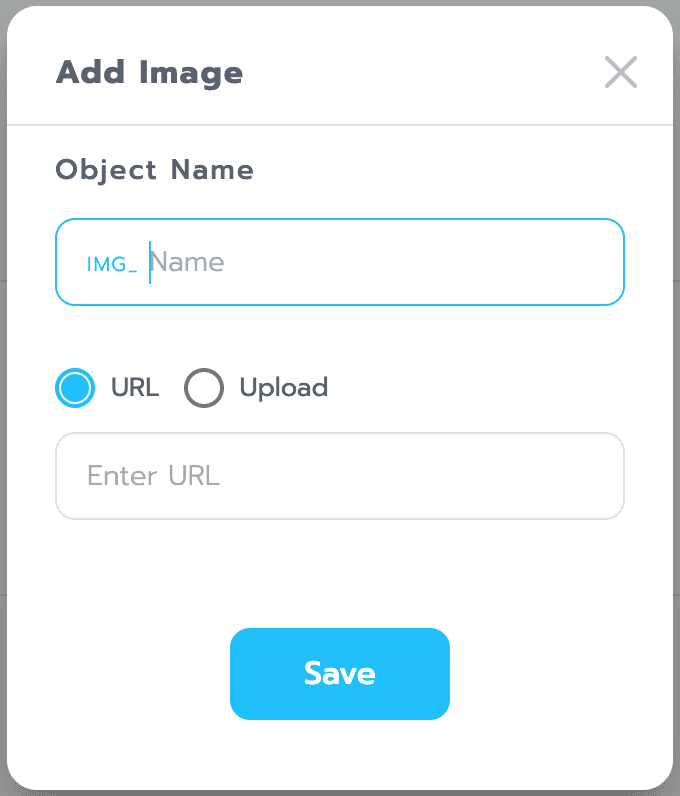
Object Name Field for entering the name of the Object Image
URL Field for entering the web link of the image to be used, must be in https format.
Upload Field for uploading an image from your computer to store it in the system.
Image Recommendations and Limitations
a. Recommended size: 900*900px
b. Minimum size: 450*450px
Carousel (CRS)
Carousel (CRS) is the bot's response in the form of a Card that includes an image and text, with buttons that can be clicked to view additional information. It can respond as either text or an Object.
Page components Carousel
The Object Carousel page has 6 main components, which are:
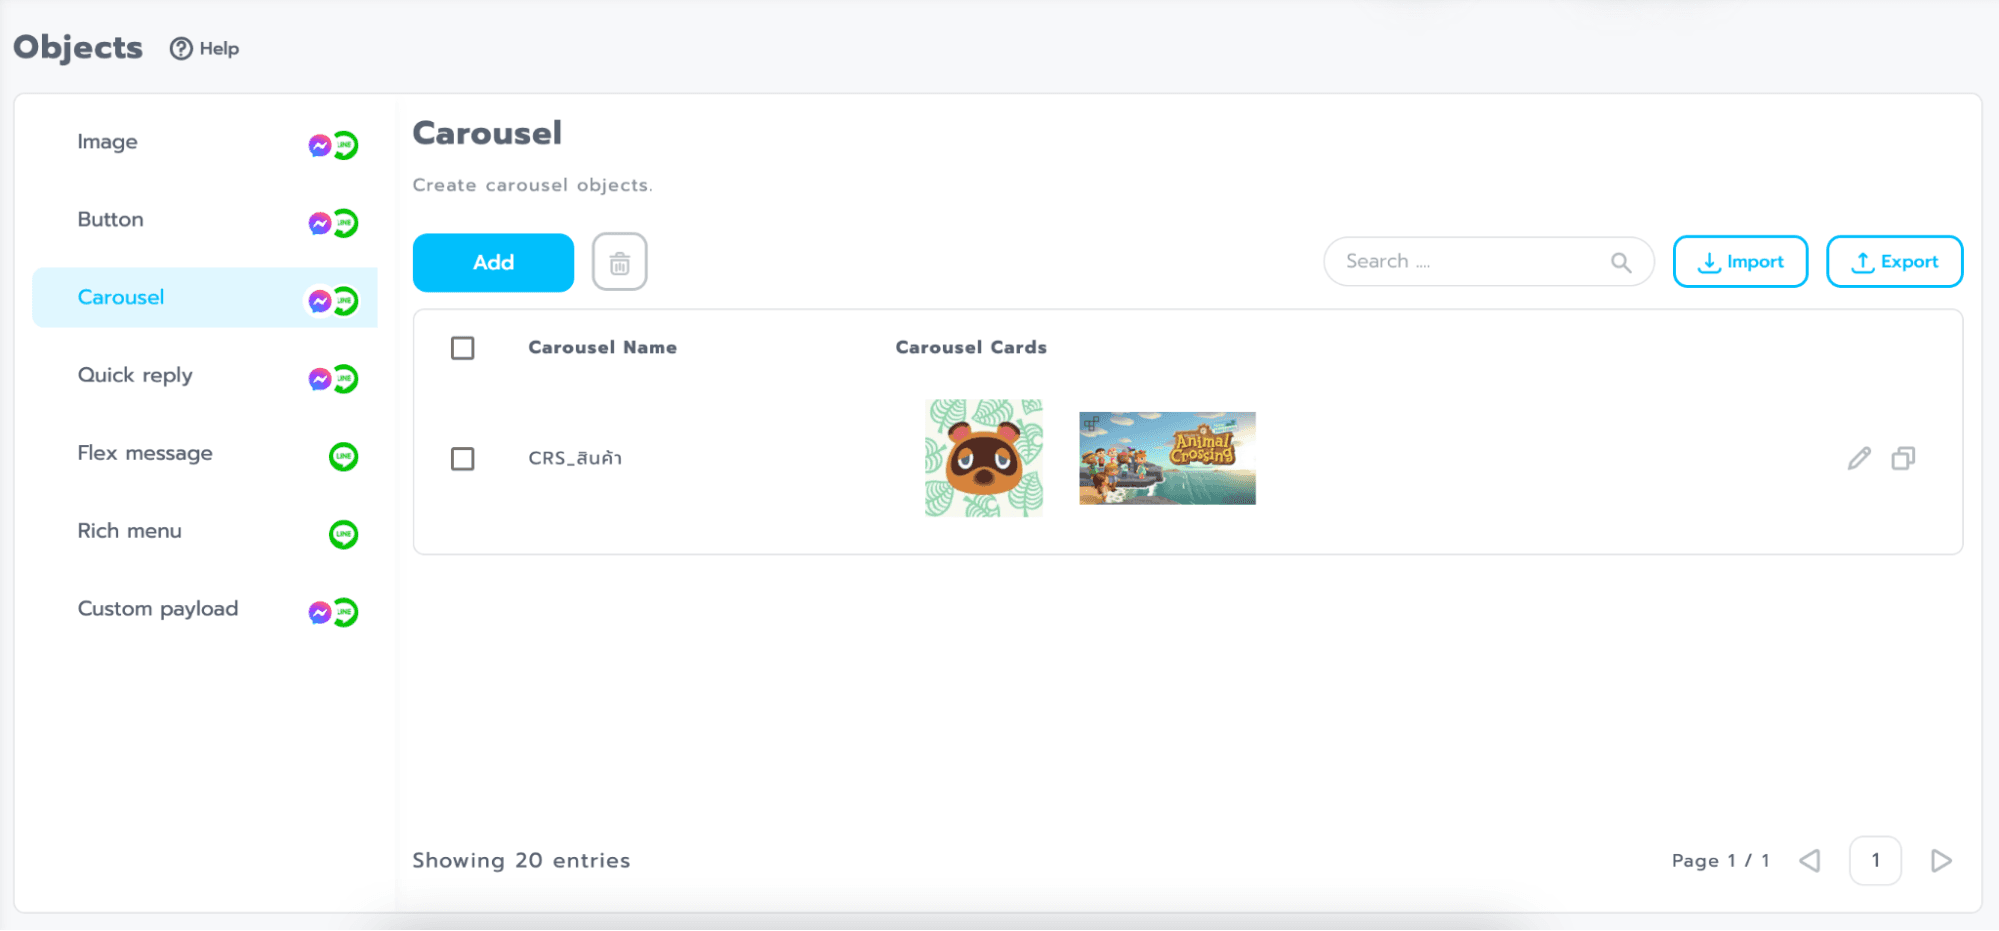
Add button for adding a Carousel
Delete button for deleting a Carousel (trash can icon)
Import/Export button for importing and exporting Carousel files
Import/Export button for importing and exporting Carousel files
Duplicate button for copying a Carousel (stacked paper icon)
Search box for searching Carousel names
Elements on the creation page Carousel .
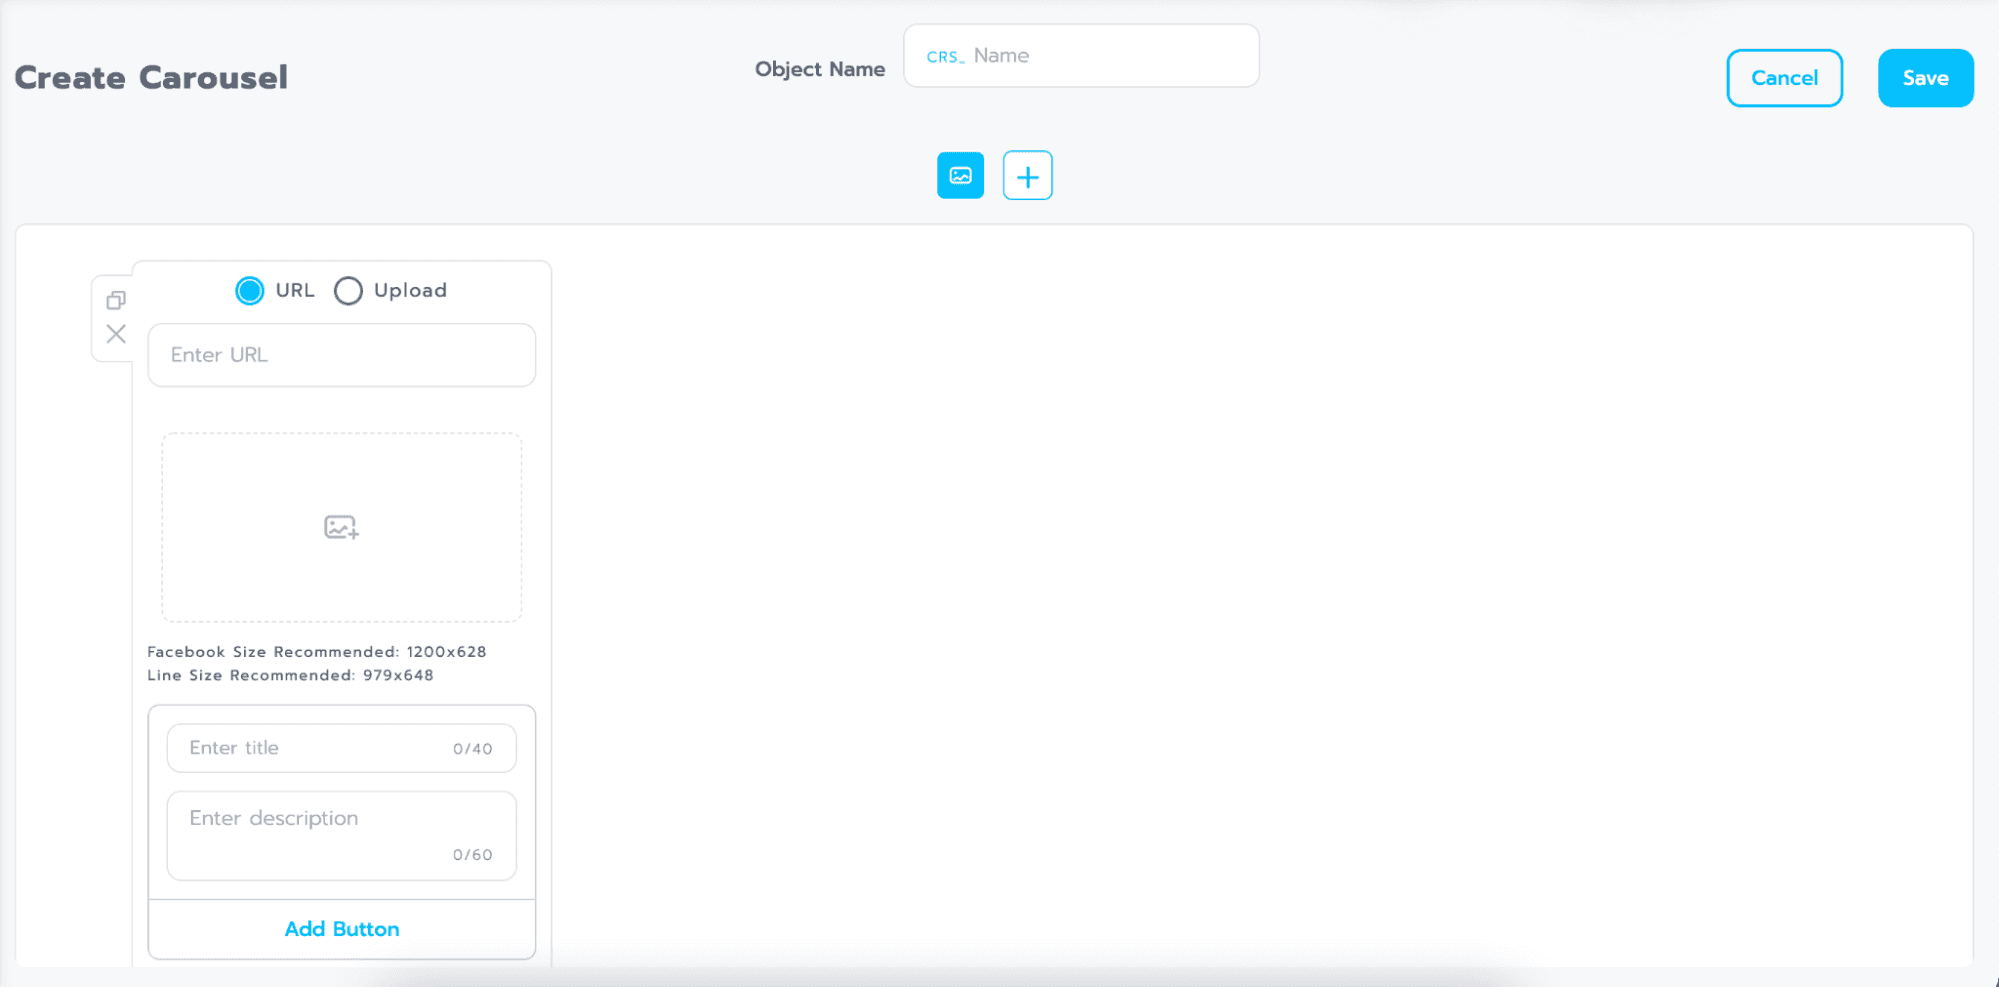

Field for entering the name of the Object Carousel.
Add button to add additional Carousel cards (plus icon +).
Tip: You can add a maximum of 10 cards.
Tip: You can click on the image icon to drag and rearrange the positions of Carousel cards.
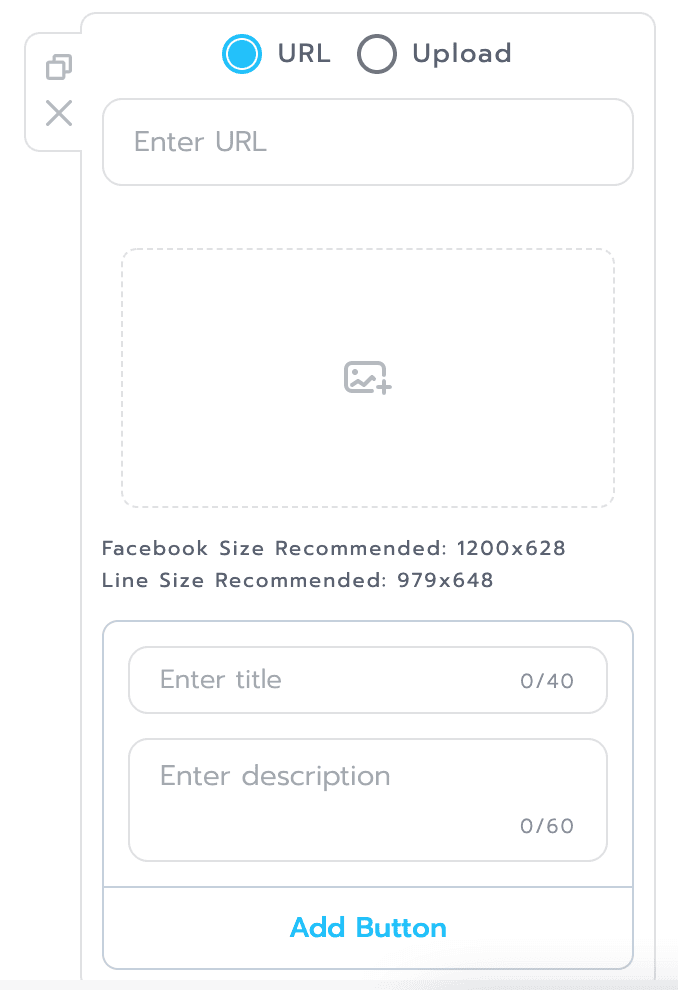
a. Duplicate for duplicating Carousel cards (stacked paper icon).
b. Delete for deleting Carousel cards (trash can icon).
c. URL for entering the web link of the image to be used, must be in https.
d. Upload for uploading an image from your computer to store it in the system.
e. Enter title field for entering the title of the Carousel.
f. Enter description Field for entering the description of the Carousel.
g. Add button Field for adding buttons to the Carousel, with the ability to add up to 3 buttons.
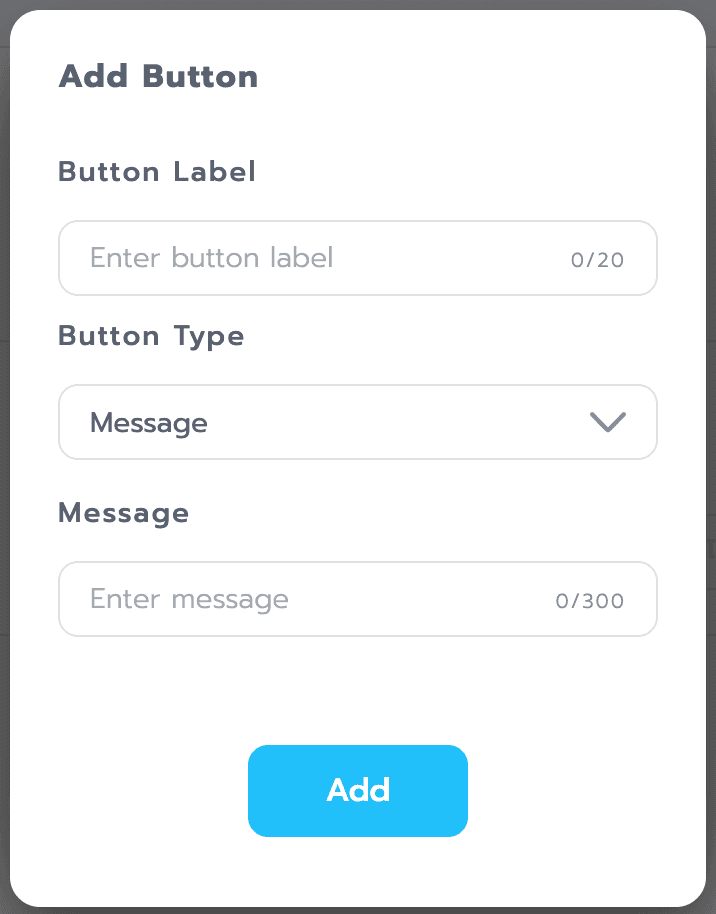
a. Button Label Field for setting the button label.
b. Button Type Dropdown to select the button type, with 3 options:
1. Message for creating a regular text button.
2. Phone for creating a phone number button.
3. URL for creating a website link button.
c. Message Field for entering the message that the bot will respond with, and the content will vary based on the selected button type.
Recommendations and Limitations of Carousel
Maximum number of cards that can be created: 10 cards
Recommended image size: For Facebook - 1200px * 1200px, For Line - 976px * 648px
Title: Maximum 40 characters
Description: Maximum 60 characters
Maximum number of buttons that can be added: 3 buttons
Button types: There are 3 types (Text, Phone, URL)
Button label: Maximum 20 characters
Tip: When creating cards from the 2nd to the 10th card, it is necessary to create the same number of buttons as in the 1st card.
Button (BTN)
Button (BTN) is the bot's response in the form of clickable buttons, which remain on the screen after being clicked.
Page components Carousel
The Object Button page has 6 main components, which are:
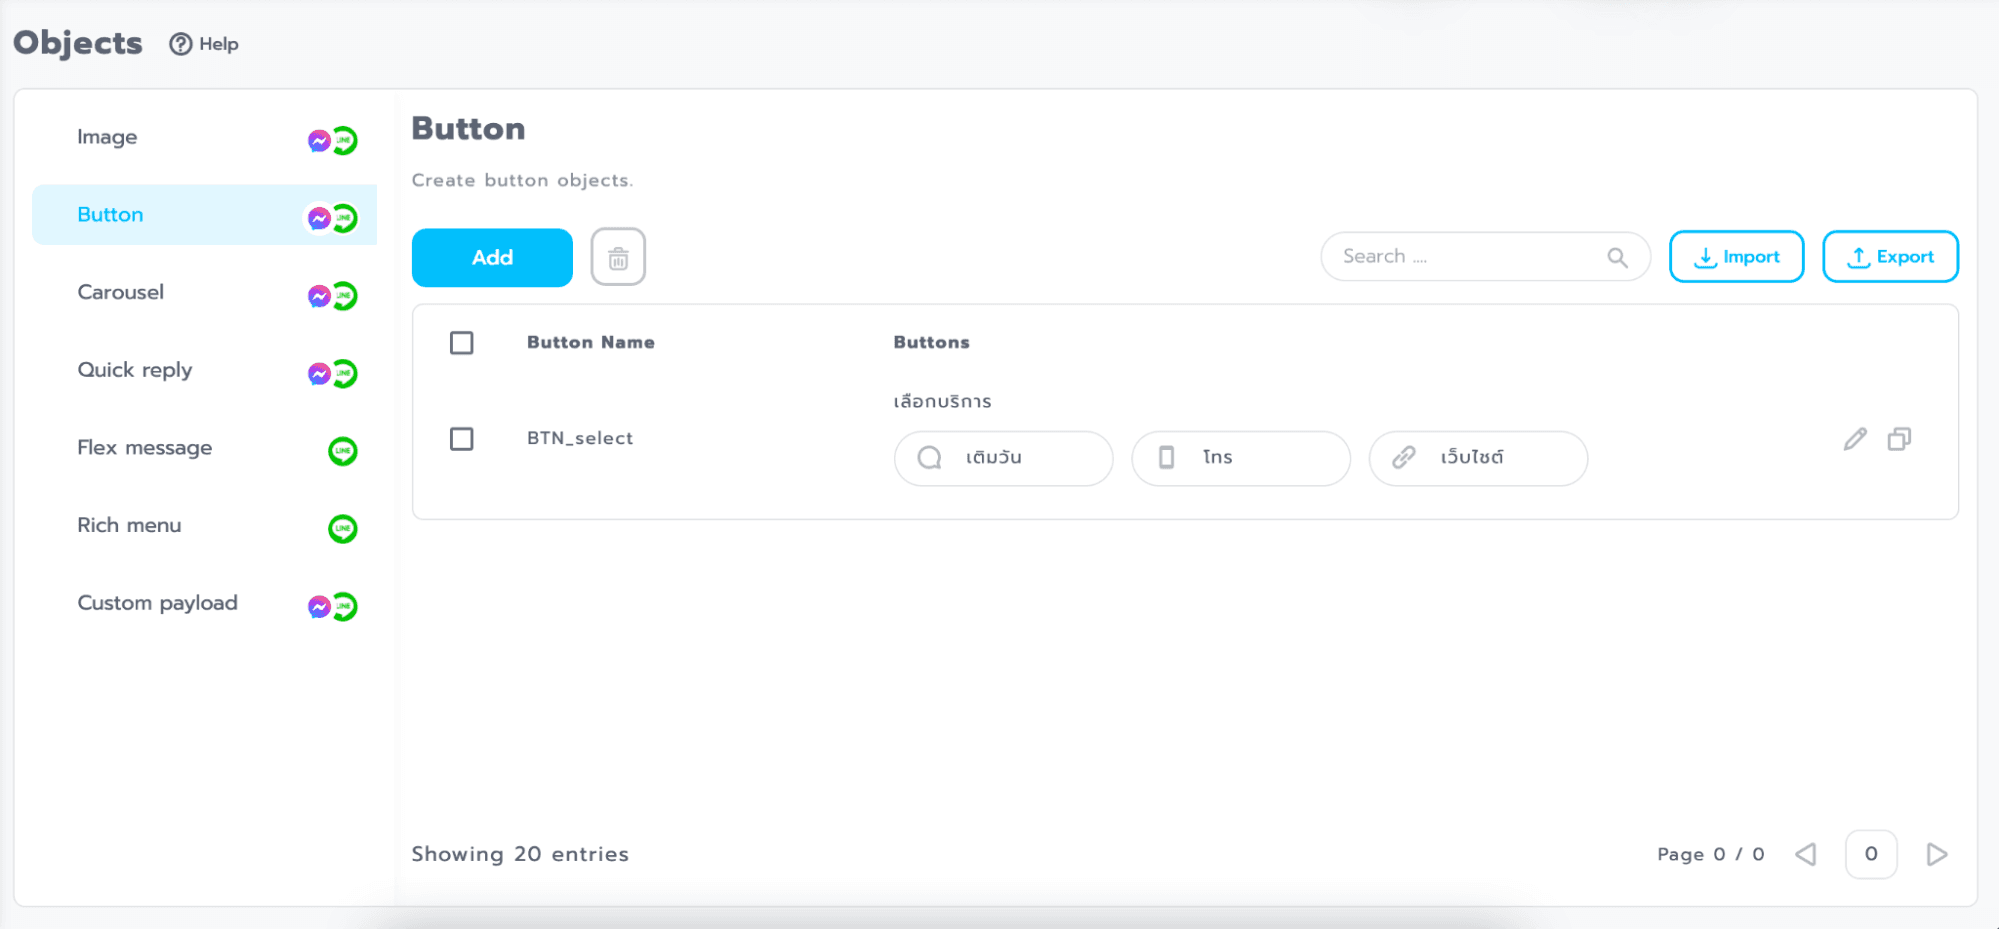
Add button for adding a Button
Delete button for deleting a Button (trash can icon)
Import/Export button for importing and exporting Button files
Edit button for editing a Button (pencil icon)
Duplicate button for copying a Button (stacked paper icon)
Search box for searching Button names
Components of the creation page Button
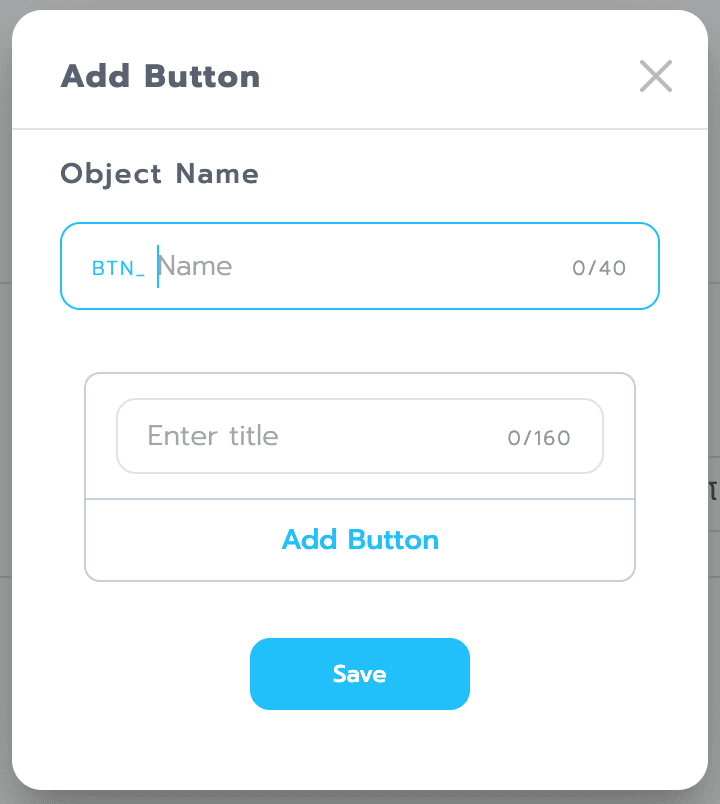
Object Name Field for entering the name of the Object Button.
Enter title Field for entering the title of the Button.
Add button Field for adding buttons to the Button, with the ability to add up to 3 buttons.

a. Button Label for setting the button name
b. Button Type selection has 3 options
1. Message to create a button that is plain text
2. Phone to create a button that is a phone number
3. URL to create a button that is a website link
c. Message to enter the text that the bot will respond with, it will vary depending on the type of button we choose
Button Tips and Limitations
Title: Maximum of 160 characters.
Maximum number of buttons: 3 buttons.
Button types: There are 3 types (text, phone number, URL).
Button label: Maximum of 20 characters.
Quick Reply (QRP)
Quick Reply (QRP) is the bot's response in the form of Choices, which are buttons. When you click on one of the buttons, the Quick Reply disappears
Page components Quick Reply
The Object Quick Reply page has 6 main components:
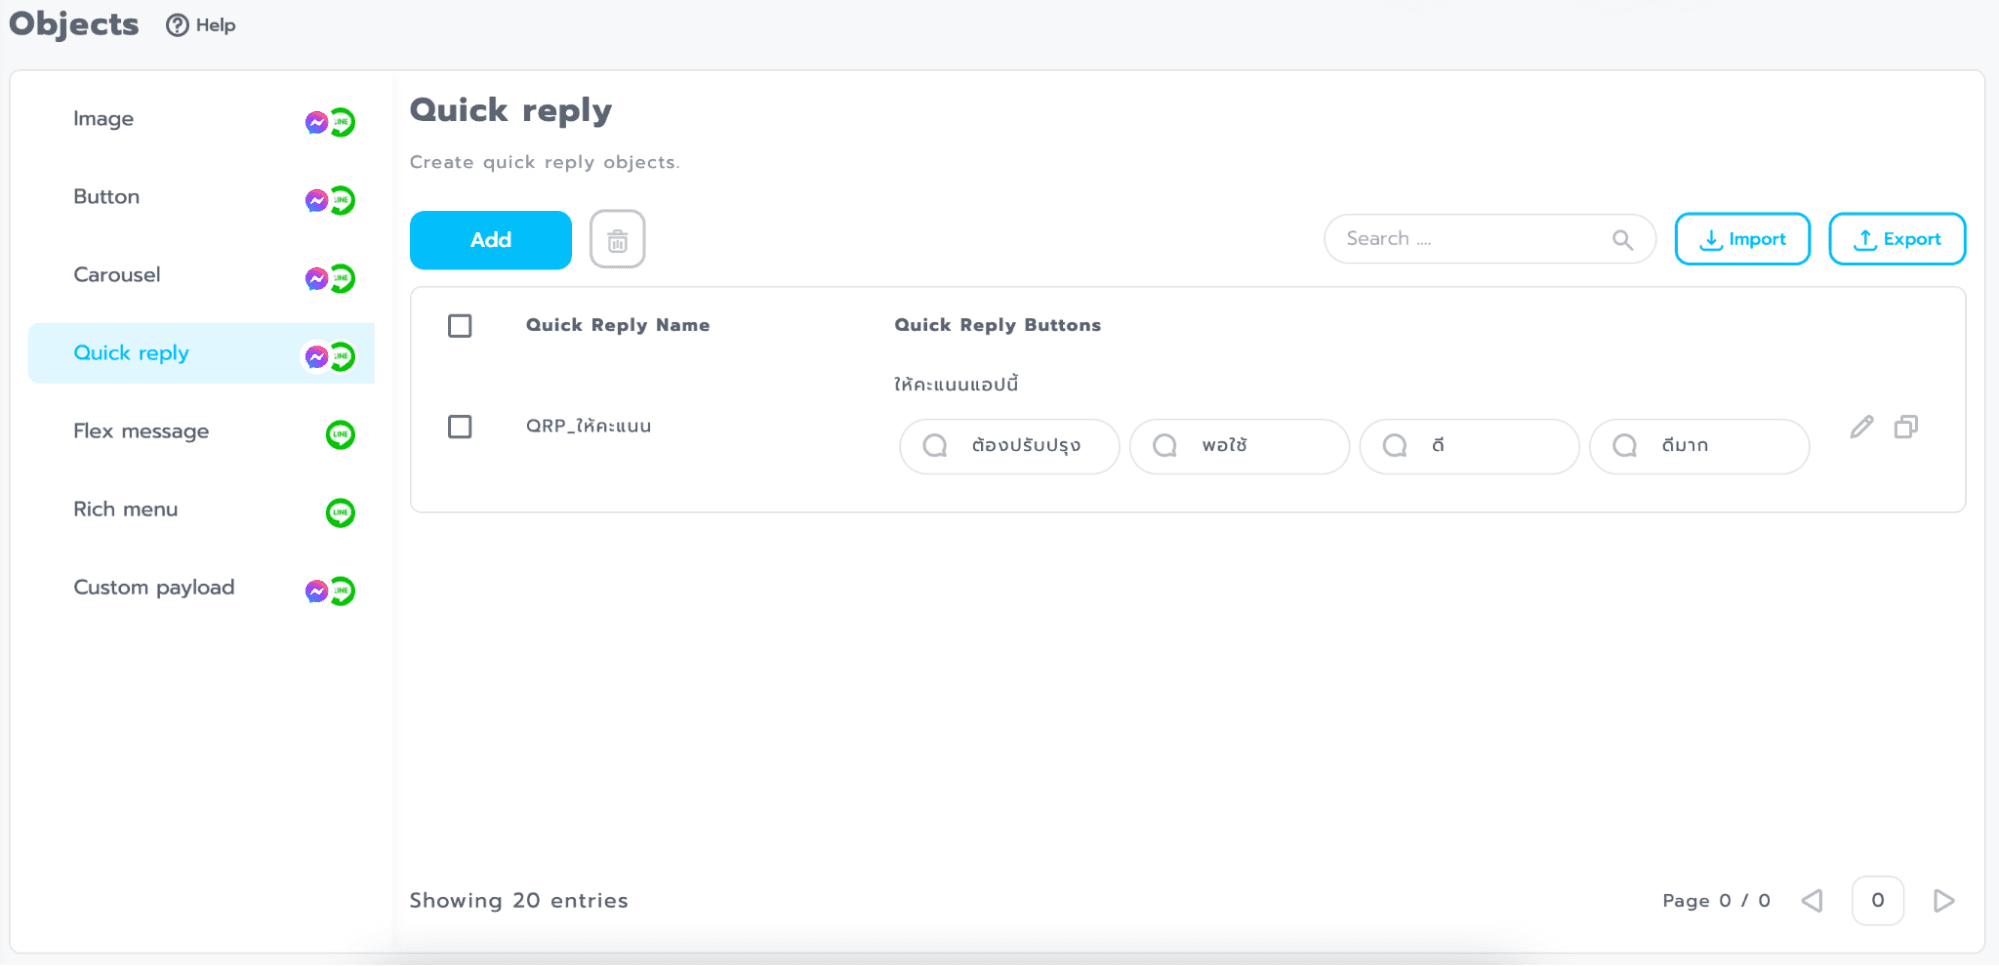
Add button to add a new Quick Reply.
Delete button to delete a Quick Reply (trash can icon).
Import/Export Buttons for importing and exporting Quick Replies.
Edit button to edit a Quick Reply (pencil icon).
Duplicate button to duplicate a Quick Reply (stacked paper icon).
Search search field to search for Quick Replies by name.
Components of the creation page Quick Reply
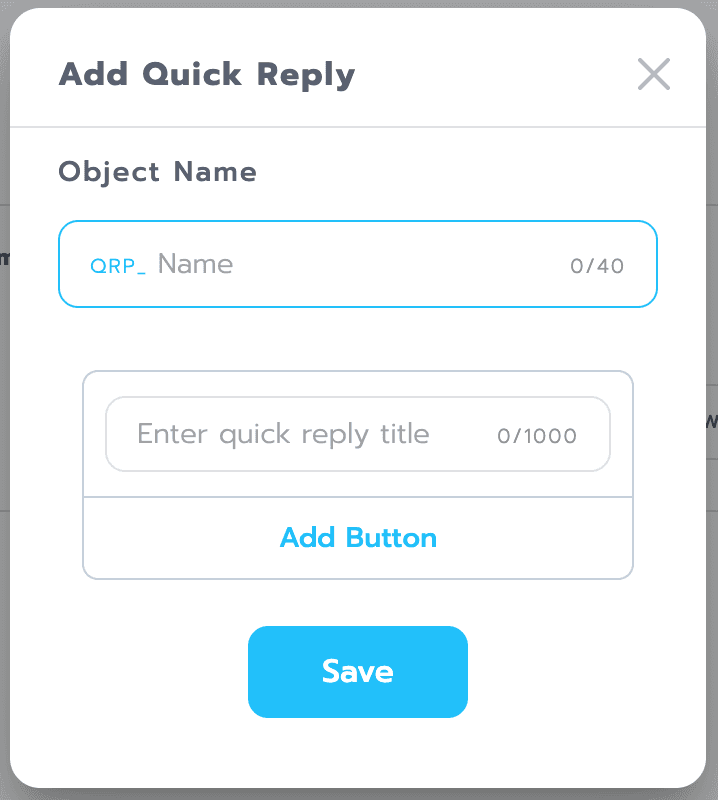
a. Object Name: A field for entering the name of the Object Quick Reply.
b. Enter quick reply title: A field for entering the title or name of the Quick Reply.
c. Add button: A field for adding buttons to the Quick Reply, with the ability to add up to 13 buttons.

Flex Message (FX)
Flex Message is a flexible format for responding to questions that can be designed freely. In a Flex message, you can include buttons, icons, images, text, and more. Additionally, you can create actions from buttons, images, and text.
Tip: Flex-style objects are designed to be displayed exclusively on a single line.
The components of a page Flex
The Object Flex page has six main components
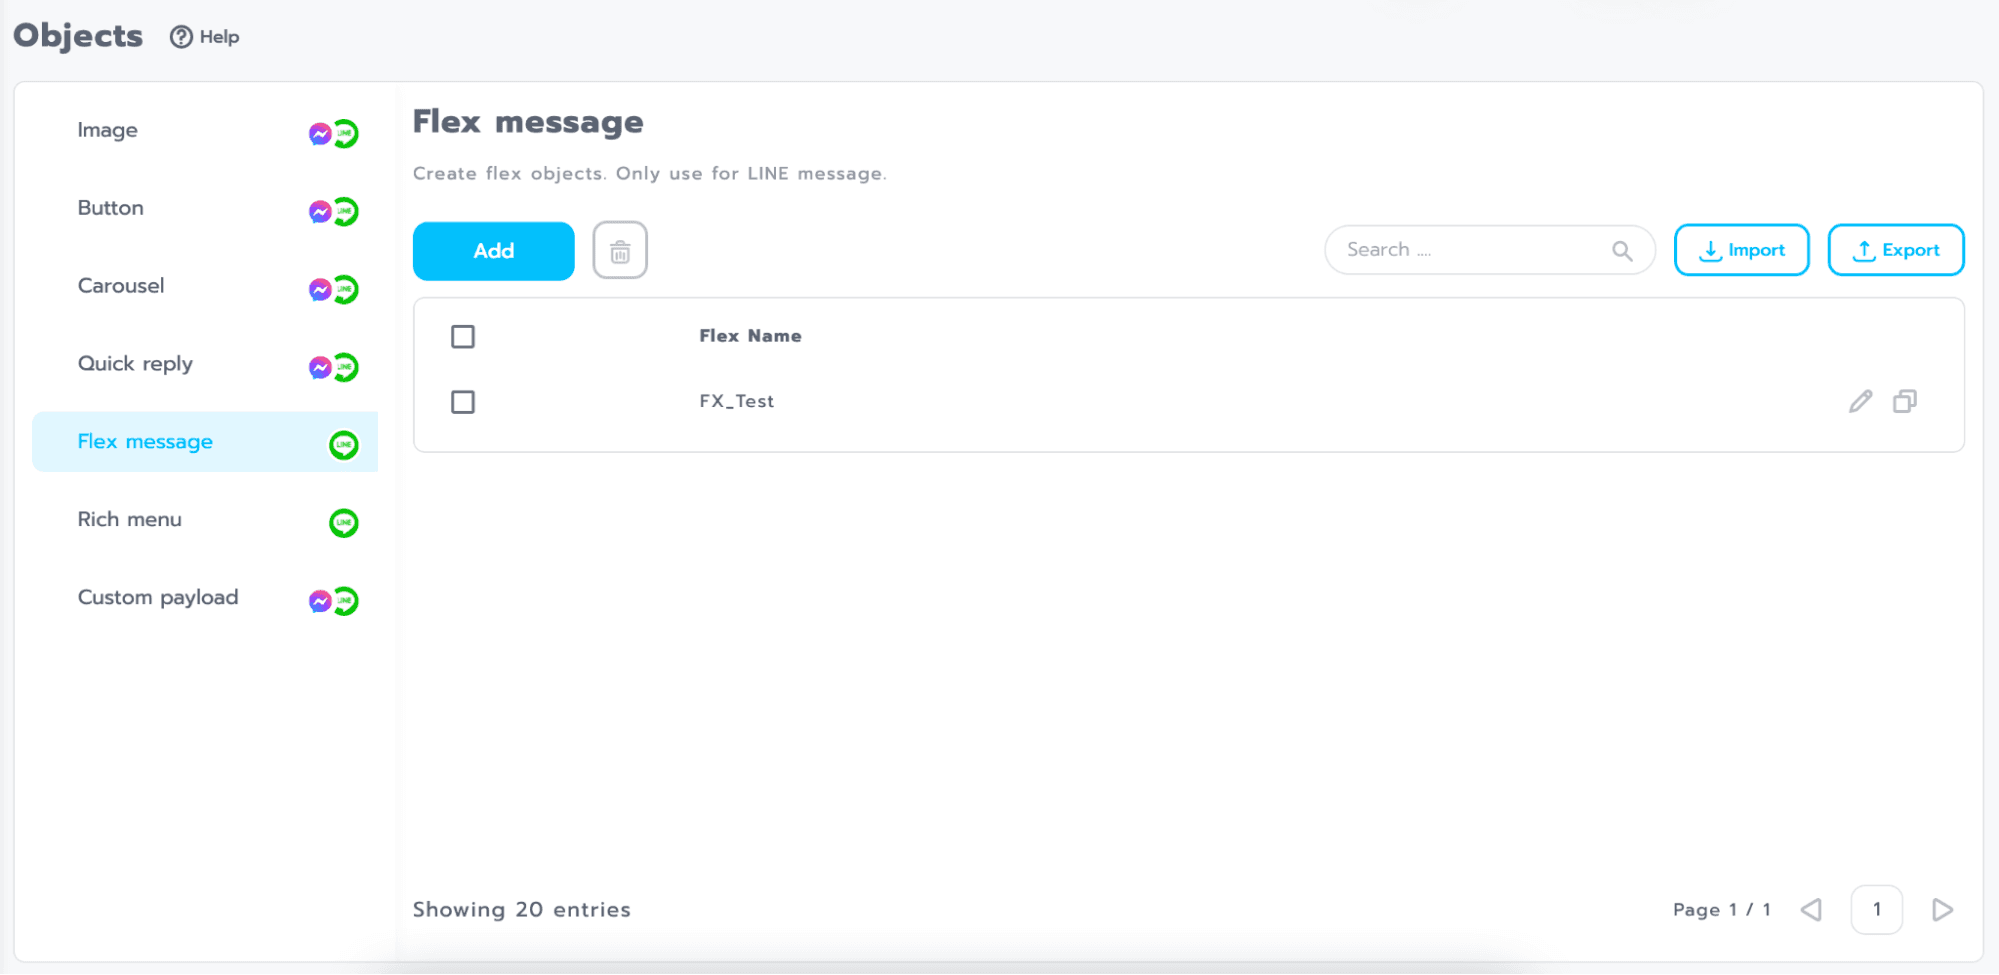
Add Flex Button
Delete Flex Button (Trash Can Icon)
Import/Export Flex Button
Edit Flex Button (Pencil Icon)
Duplicate Flex Button (Paper Stack Icon)
Search Flex Name Field
Flex page components
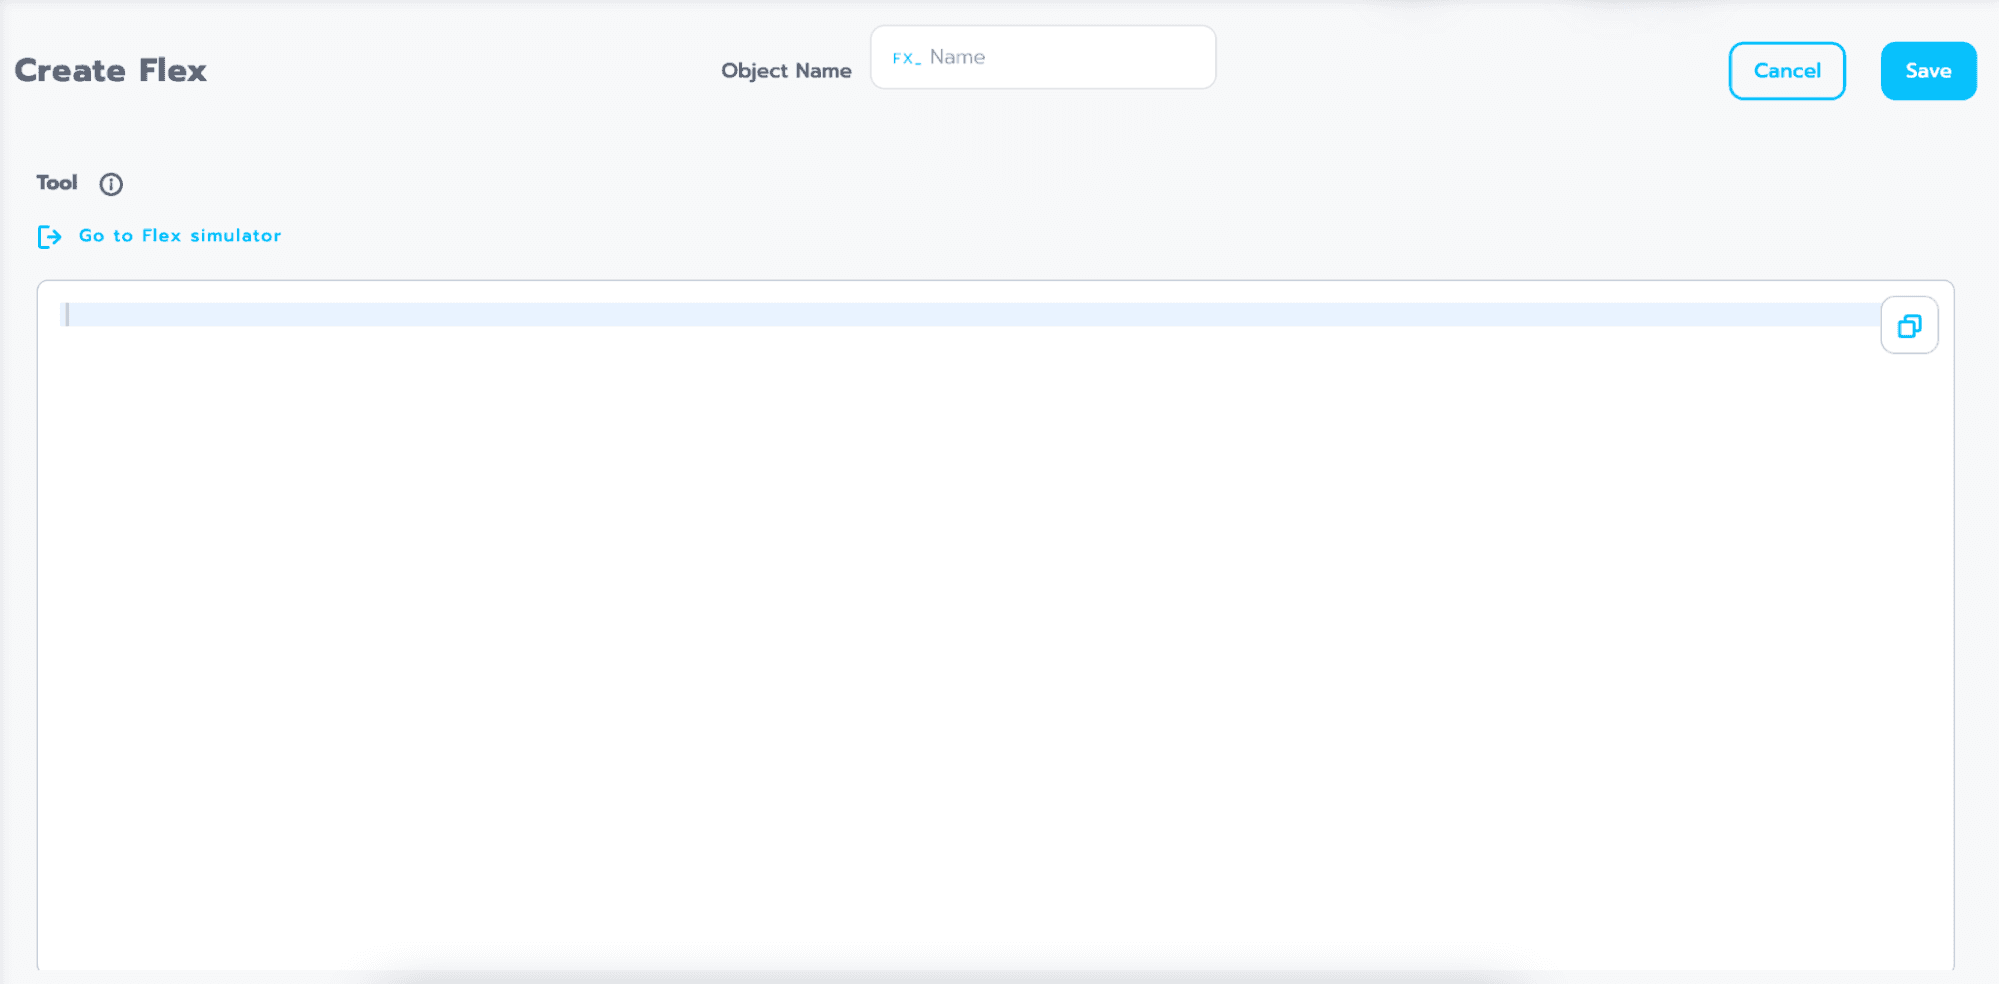
Object Name: A field for entering the name of the Flex Object.
Go to Flex Simulator: A link to go to the platform page used to create Flex.
Field: An empty space for pasting the JSON code of the Flex.
Flex Recommendations and Limitations
Custom Payload (FX)
is a flexible question response format that can be designed freely.
Page components Custom Payload
The Object Custom Payload page consists of 6 main components, namely:
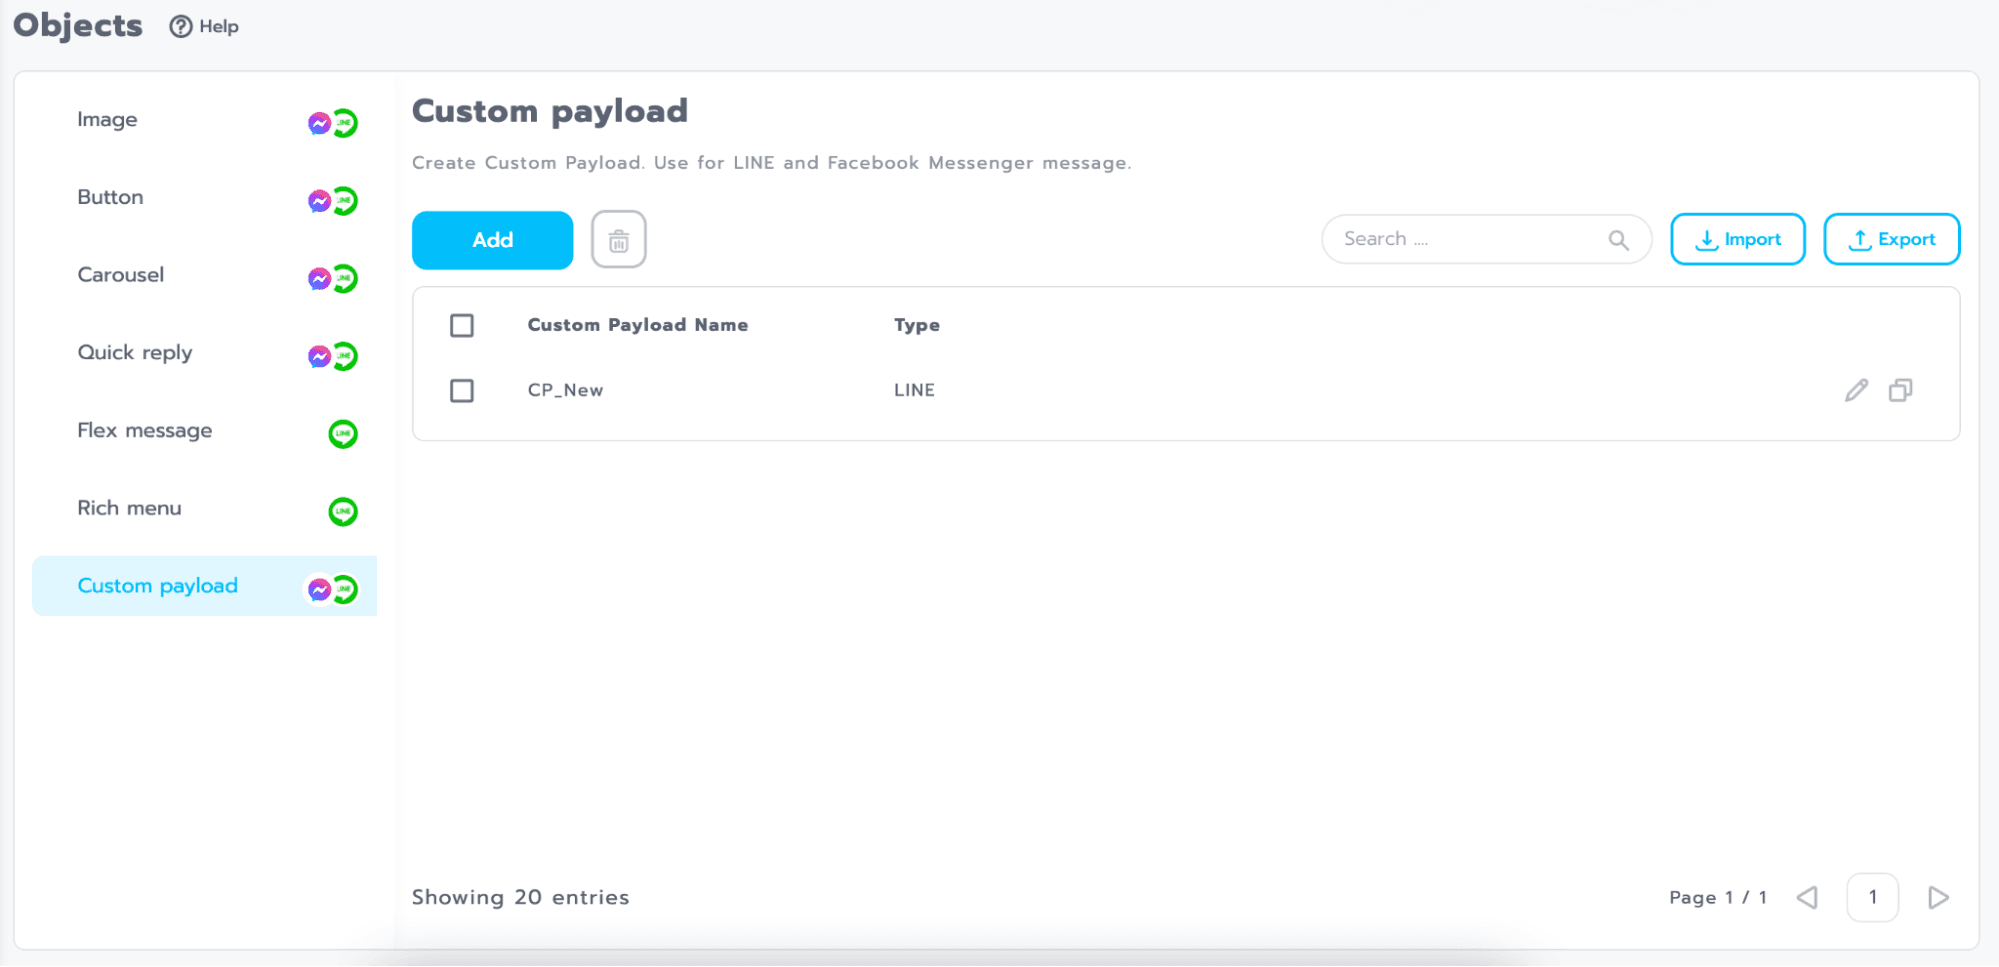
Add button for adding Custom Payload.
Delete button for deleting Custom Payload (trash can icon).
Import/Export button for importing or exporting Custom Payload files.
Edit button for editing Custom Payload (pencil icon).
Duplicate button for copying Custom Payload (stacked paper icon).
Search field for searching Custom Payload by name.
page creation components Custom Payload
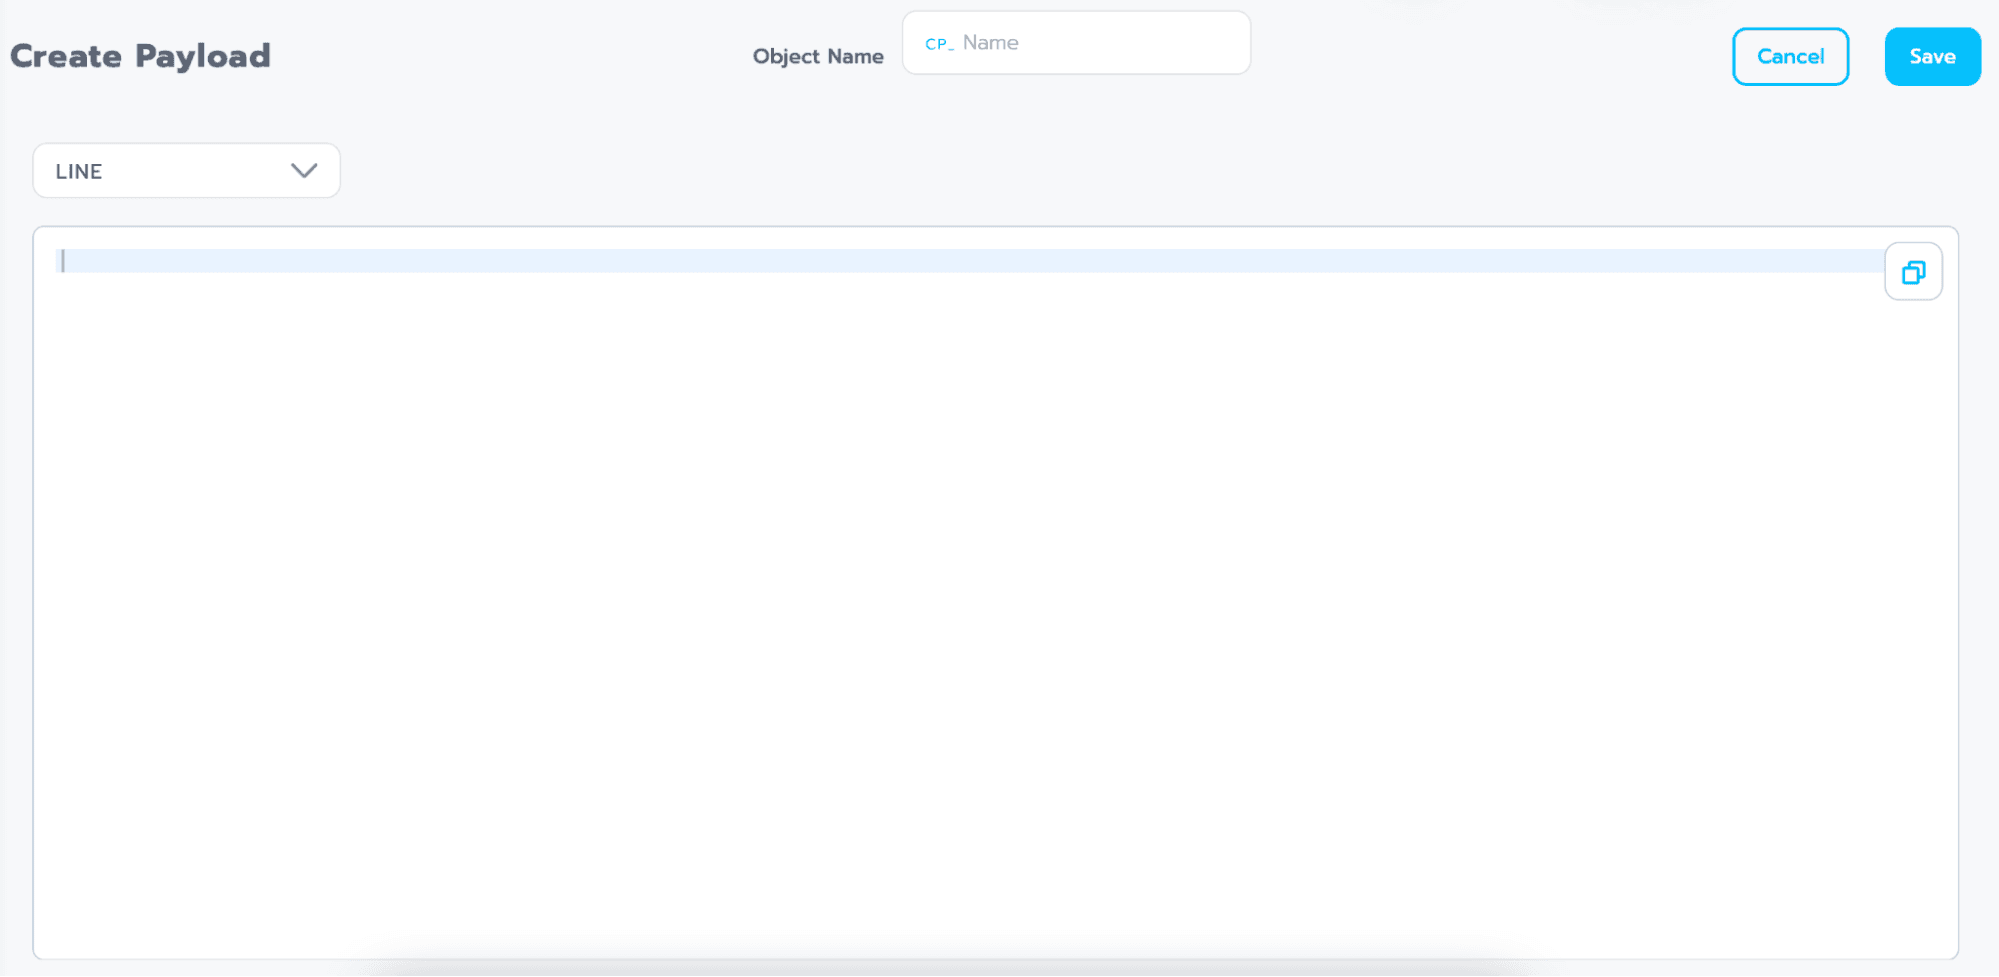
Object Name: Field for entering the name of the Object Custom Payload.
Dropdown: For selecting the type of Custom Payload, whether it's for LINE or Facebook.
Field: Empty space for pasting the JSON code of the Custom Payload.
Instructions and limitations Custom Payload
Rich Menu (RM)
The quick reply menu in the chat room allows you to configure responses when selecting menu items according to your preferences, which can be web links, text, or different intents.
Tip: Rich Menus are supported for display on LINE only.
Page components Rich Menu
The Object Rich Menu page has 6 main components:
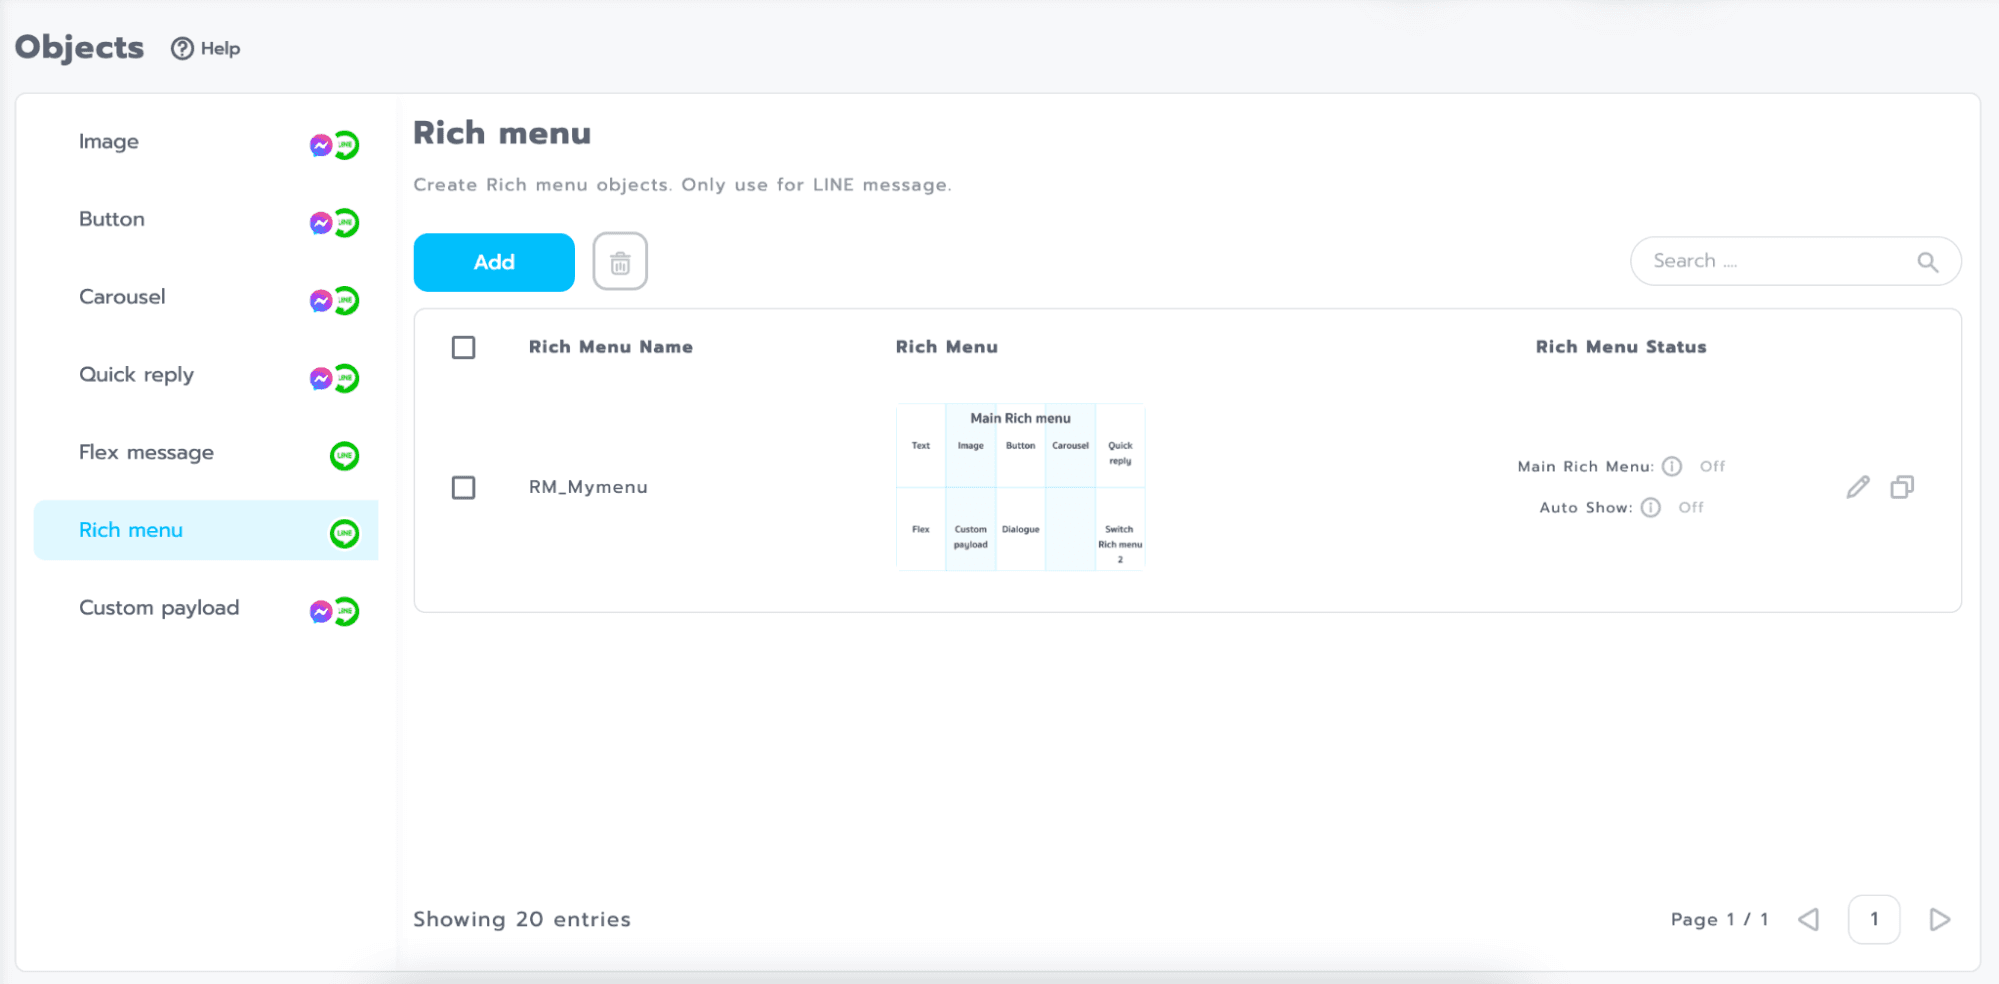
Add button for adding Rich Menu
Delete button (trash can icon) for removing Rich Menu
Import/Export button for importing and exporting Rich Menu files
Edit button (pencil icon) for making changes to Rich Menu
Duplicate button (stacked paper icon) for creating a copy of Rich Menu
Search bar for finding Rich Menus by name
Page components Create Rich Menu
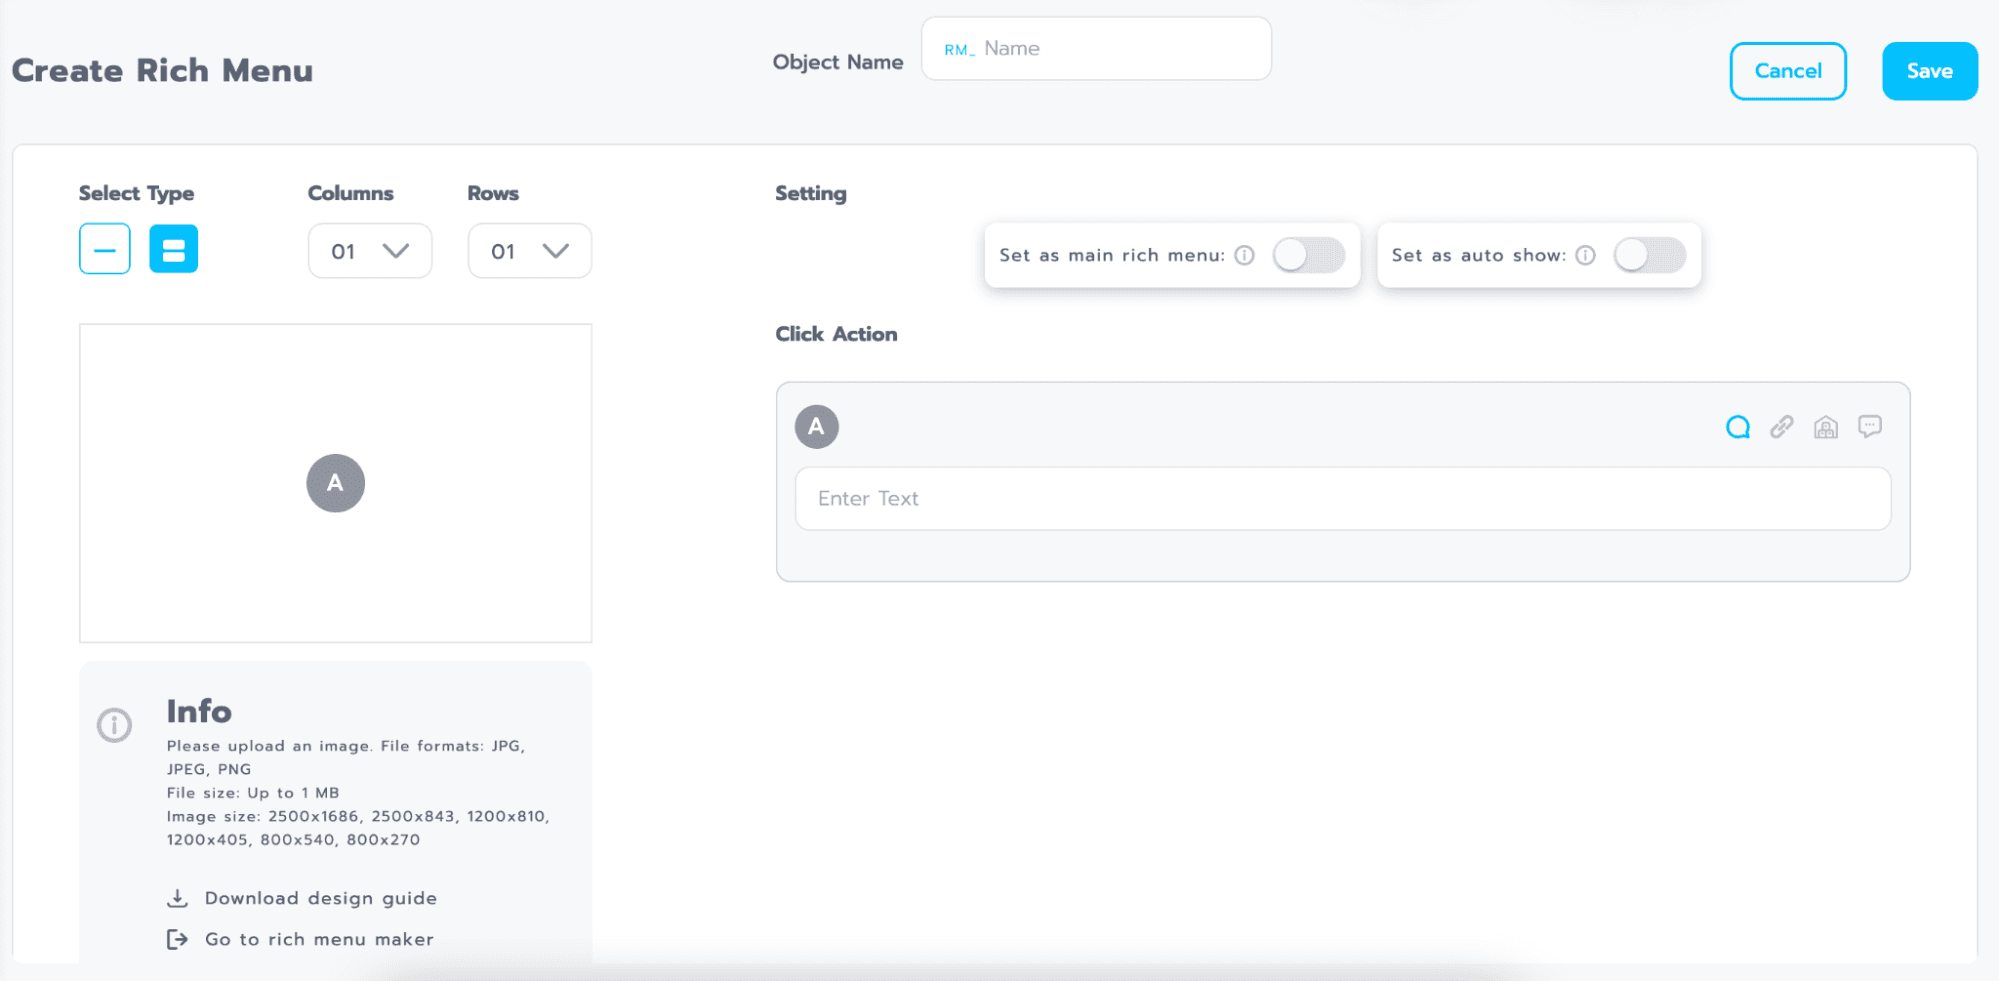
Object Name field for entering the name of the Object Rich Menu.
Select Type for selecting the type of Rich menu whether it is small or large.
Columns Add columns for specifying positions in the Rich menu.
Rows Add rows for specifying positions in the Rich menu.
Rich Menu Image: Area for uploading images of Rich menu.
Setting for setting the functionality of the Rich menu.
a. Set as main rich menu Set as main rich menu when opening LINE.
b. Set as auto show Set to show Rich menu immediately when opening Line.
Click Action for setting the work of each Rich menu position in Created columns and rows, with 4 types of work settings possible.
a. Text Sent as a message when the user presses to the specified area.
b. URL opens the website when the user clicks on the specified area.
c. Object is displayed as Object when the user clicks on the specified area.
d. Intent is displayed as the response from the Intent when the user clicks on the specified area.
Instructions and limitations Rich Menu
Supported file formats: png, jpg, jpeg
File size: Not exceeding 1 MB
Supported image sizes: 2500x1686, 2500x843, 1200x810, 1200x405, 800x540, 800x270 pixels
Website for creating Rich Menu: https://lineforbusiness.com/richmenumaker/
API
Admin Page for Managing User Chat with the Ability to Insert Conversations between the Bot and Users at Any Time.
API page components
The Object Custom Payload page has six main components
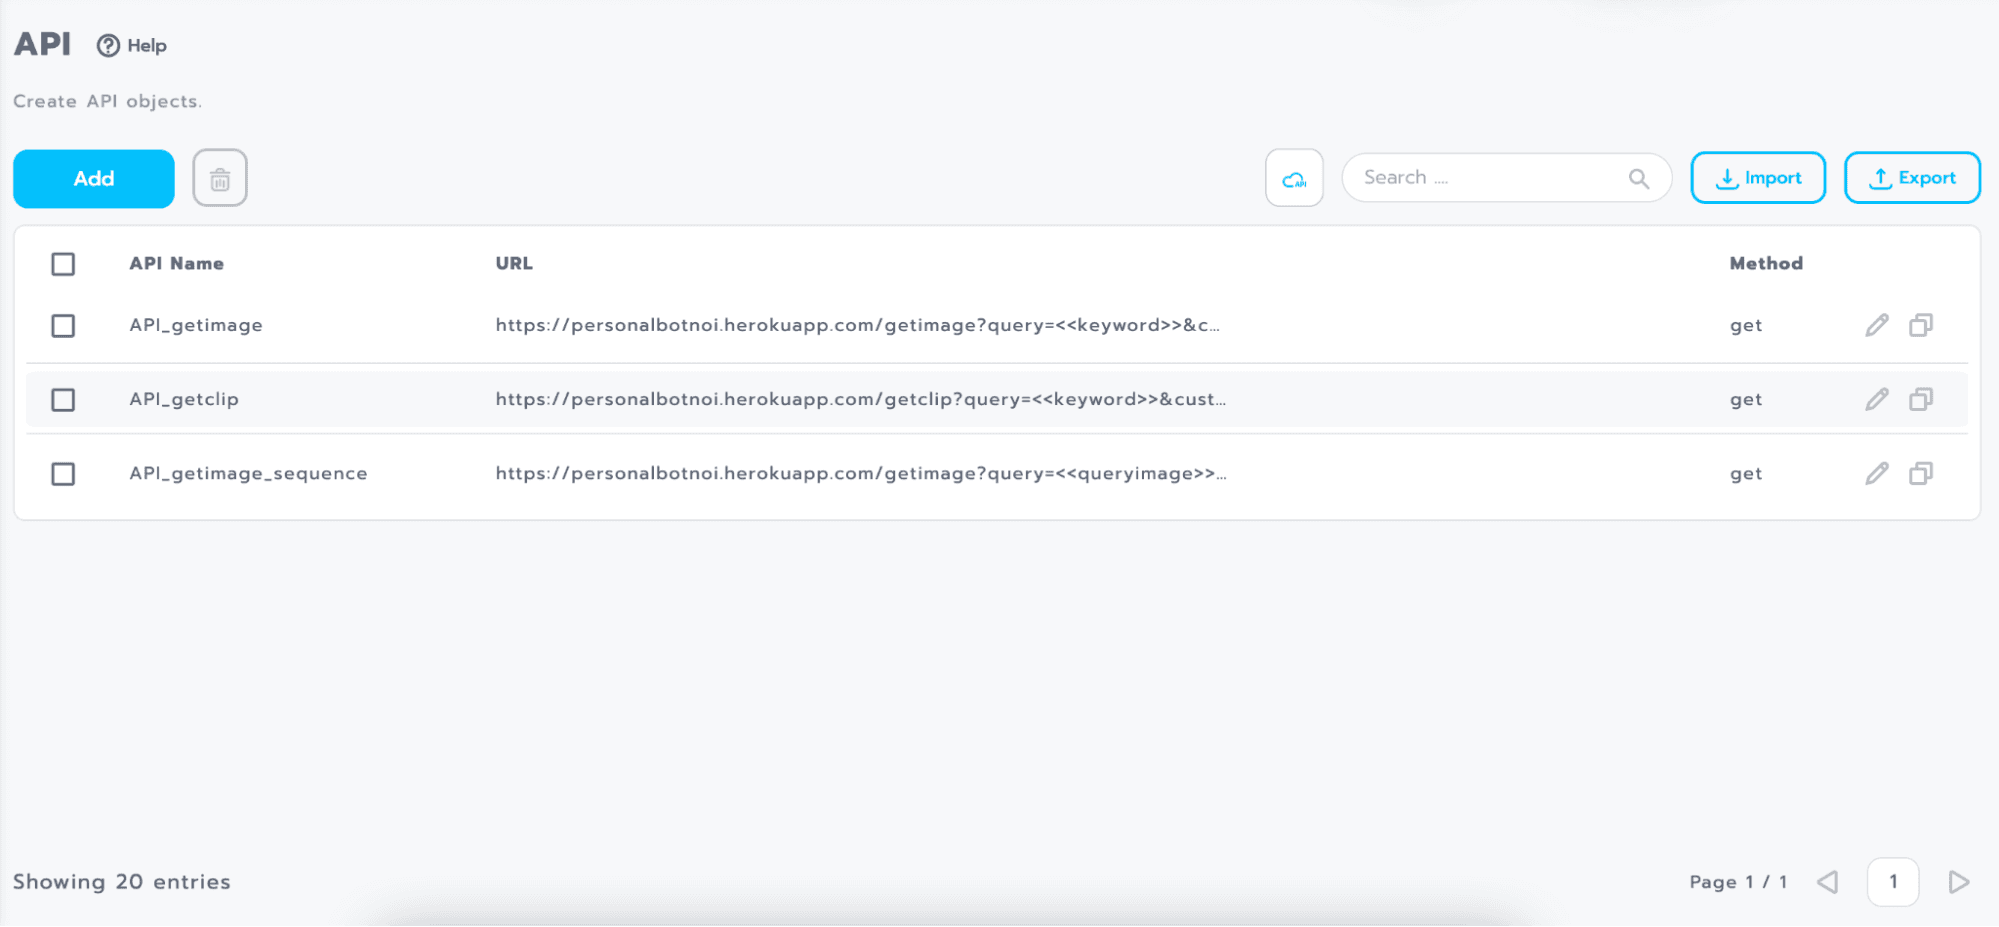
Add button for adding API
Delete button for deleting the API (trash can icon)
Import/Export Buttons for importing and exporting API files
Edit button for editing the API (pencil icon)
Duplicate API copy button (overlapping pieces of paper icon)
Search box for searching for the API name.
API page components
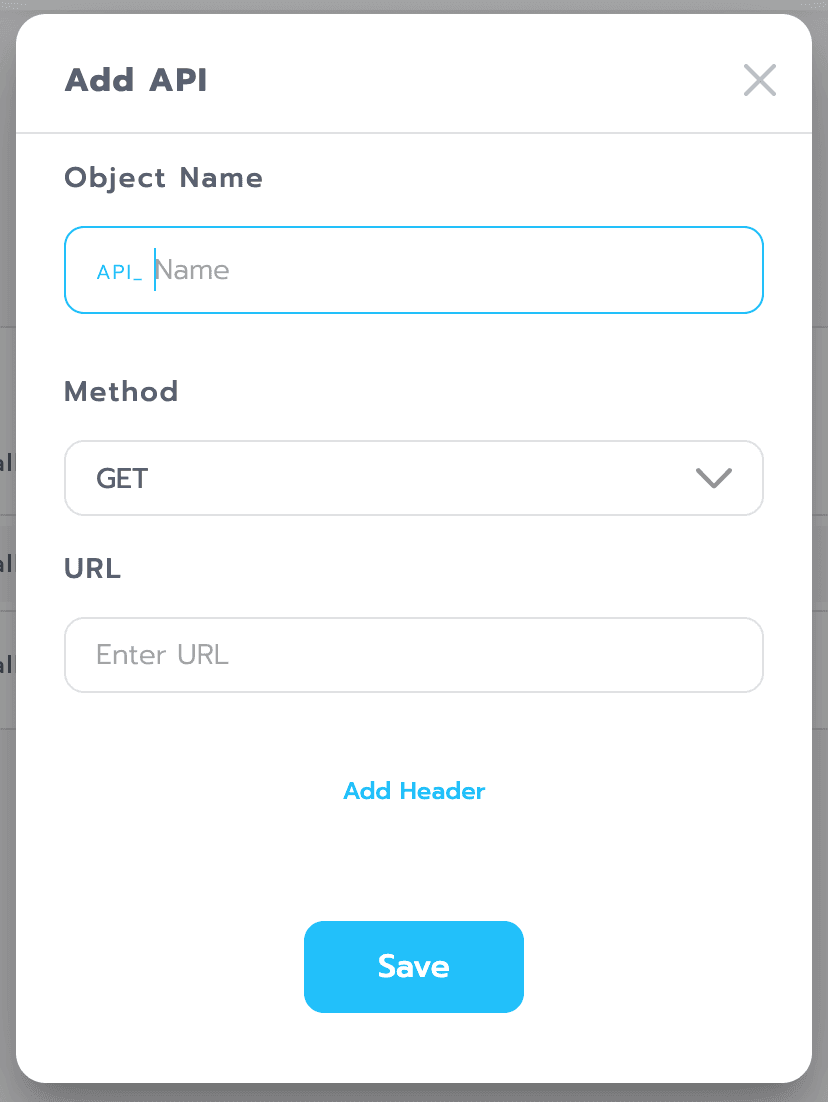
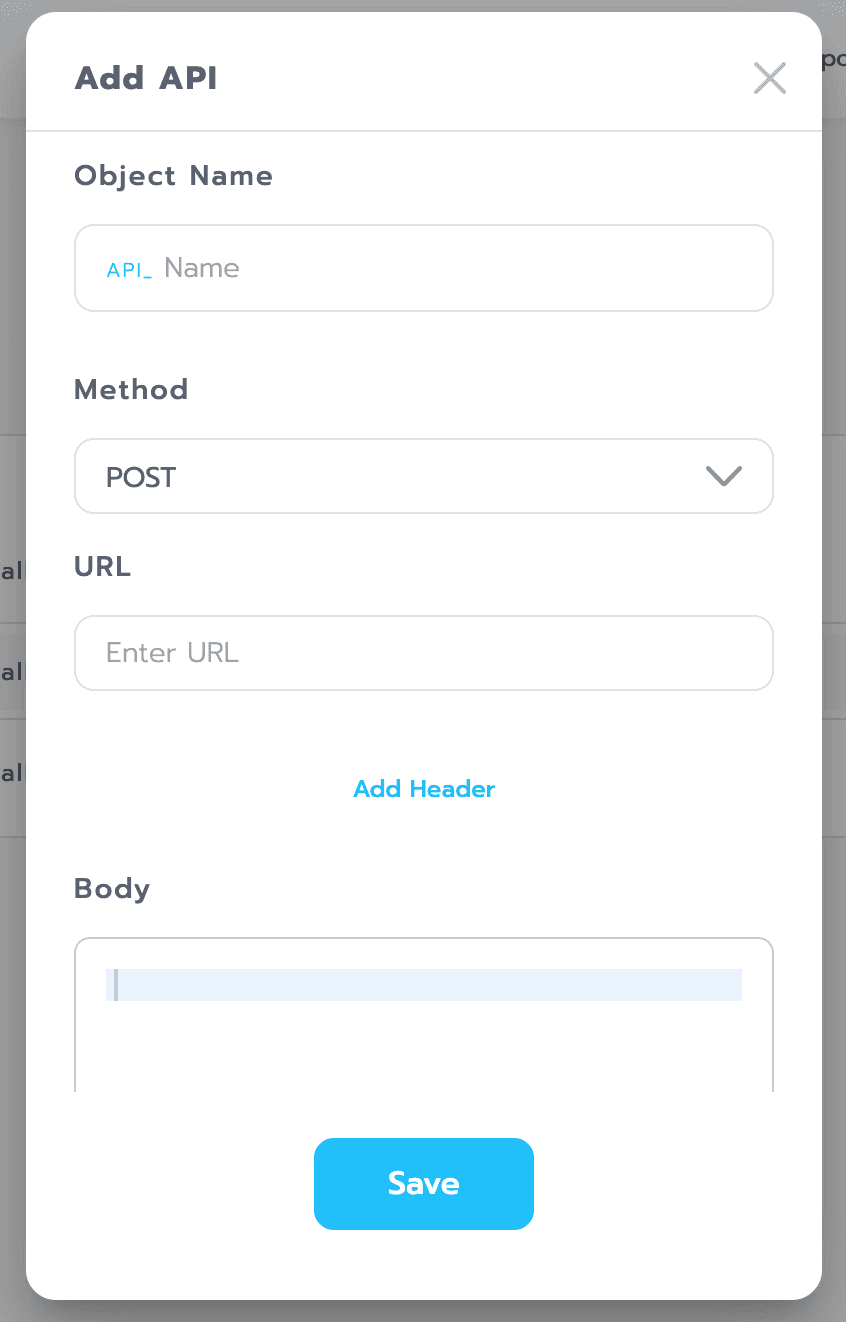
Object Name: Field for entering the name of the Object API.
Method field for selecting the API type.
a. GET
b. POST will have a body section where you can enter the code.
URL field for pasting the API URL link.
Add Header for adding the API Header if you want to use it.
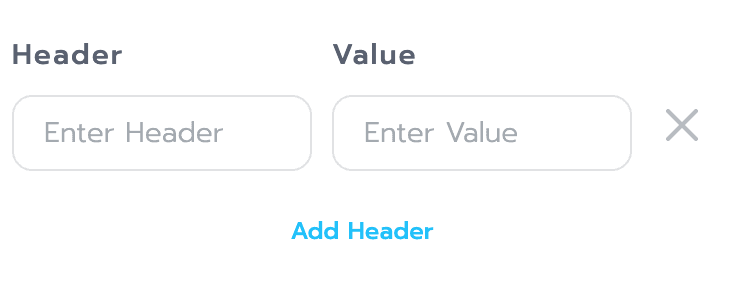
a. Header: Field for entering Header values.
b. Value: Field for entering Value.
Livechat
A page for bot admins to manage chats from users.
You can interrupt the conversation between the bot and the user at any time.
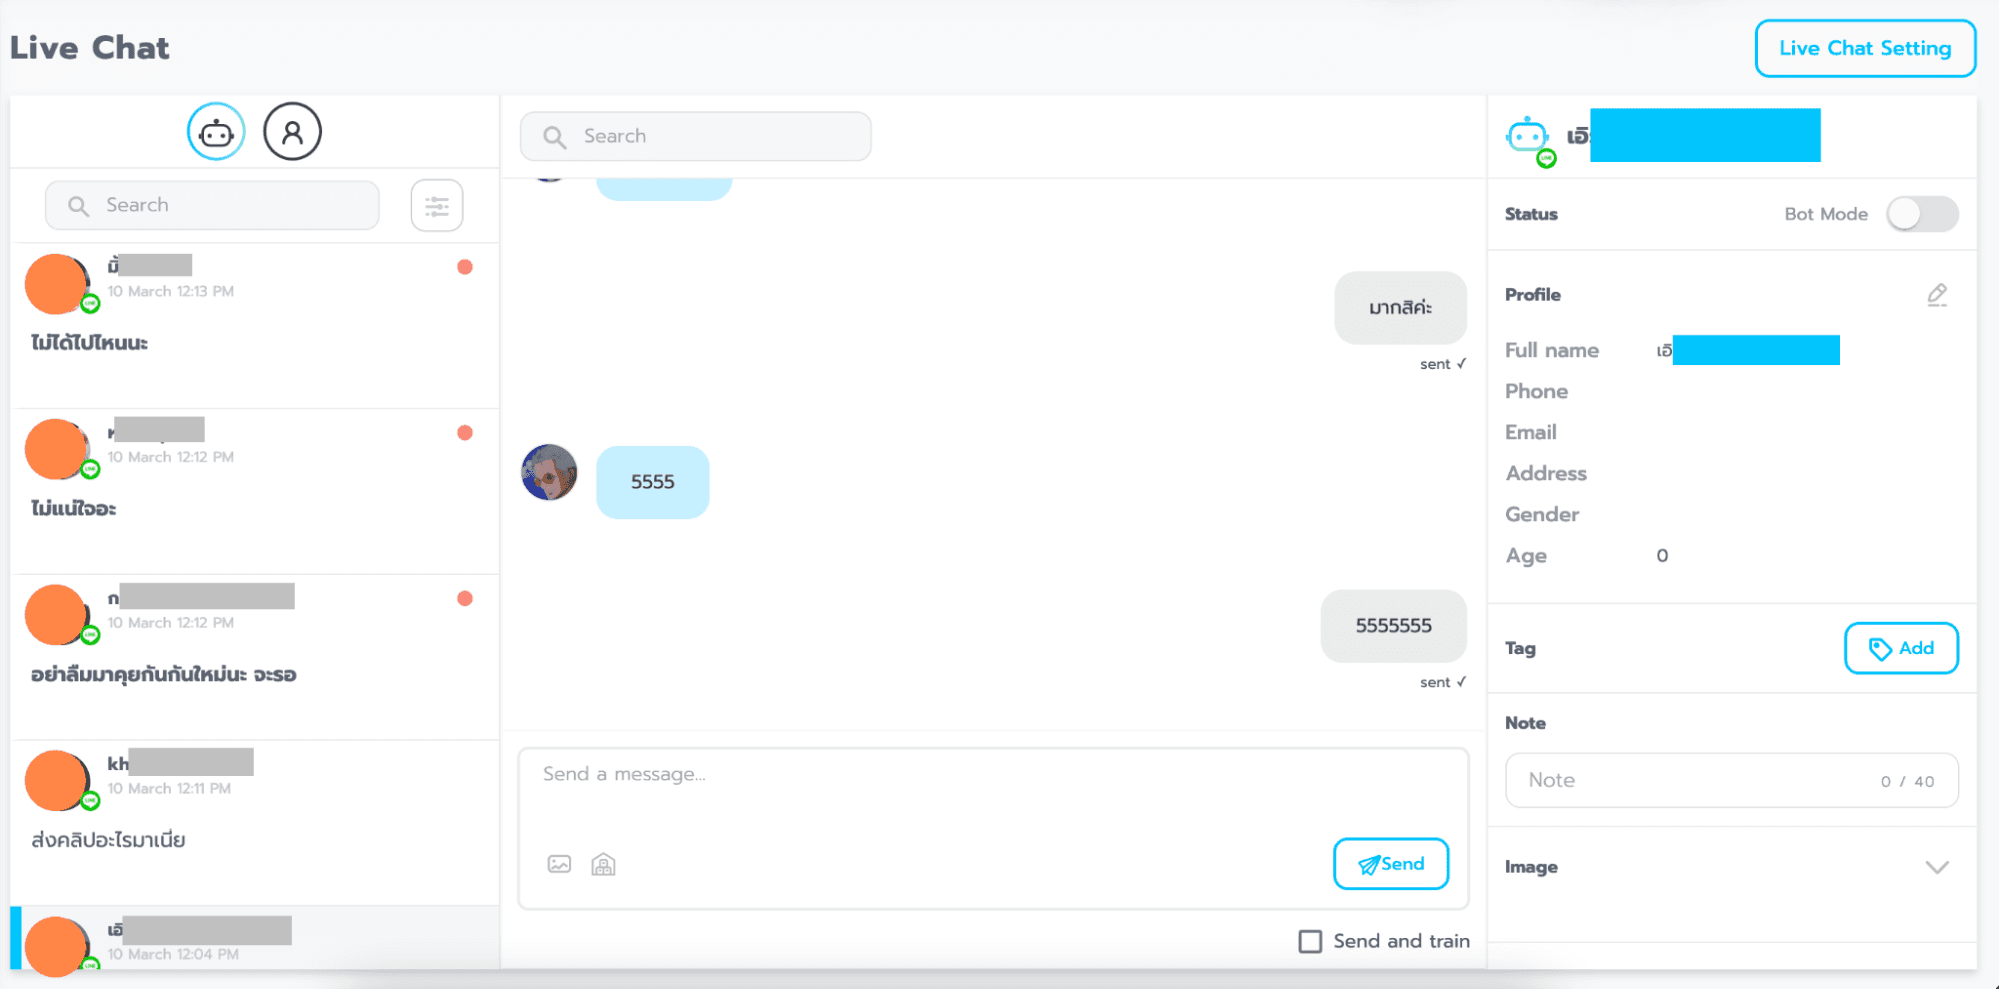
Components of the Live Chat page
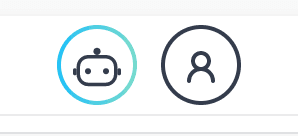
Bot/Agent can press toggle to view incoming messages.
Bot is the message that the user is currently talking to the bot about.
Agent is a message that has Agent status because the user wants to talk to an agent.

Search is field for searching for the user's name

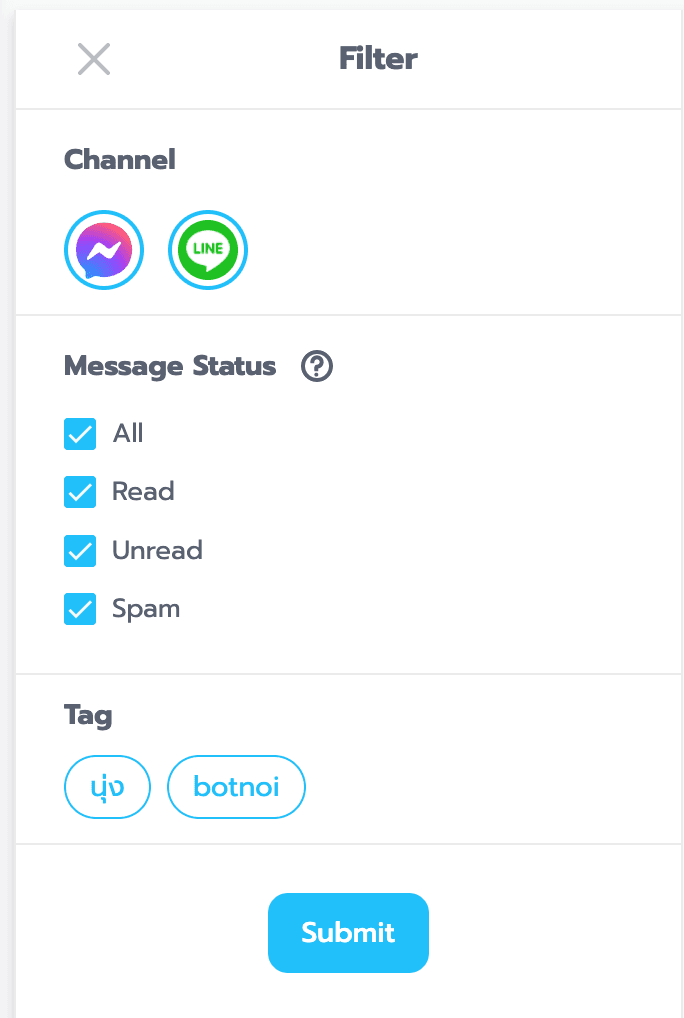
Filter is the section for setting up message filtering consists of:
Channel is the filter section shows the type of message that comes from which channel.
Message Status for filtering to show what type of message it is.
All is choose to display messages from all users.
Read is Choose to show only messages from users who have read them.
Unread is Choose to show only messages from users who have not yet read them.
Block is choose to show only messages from blocked users.
Tag is select to display only messages from selected tagged users.

Inbox Message is list of messages the user is currently discussing The details will be as follows.
Profile Picture is the area highlighted in orange is where the user's profile picture is displayed.
Profile Name is highlighted in gray is the user's profile name.
Message is section showing messages from users Front letters are unread text, thin letters are read text.
Red Dot indicates that the message is new and unread.
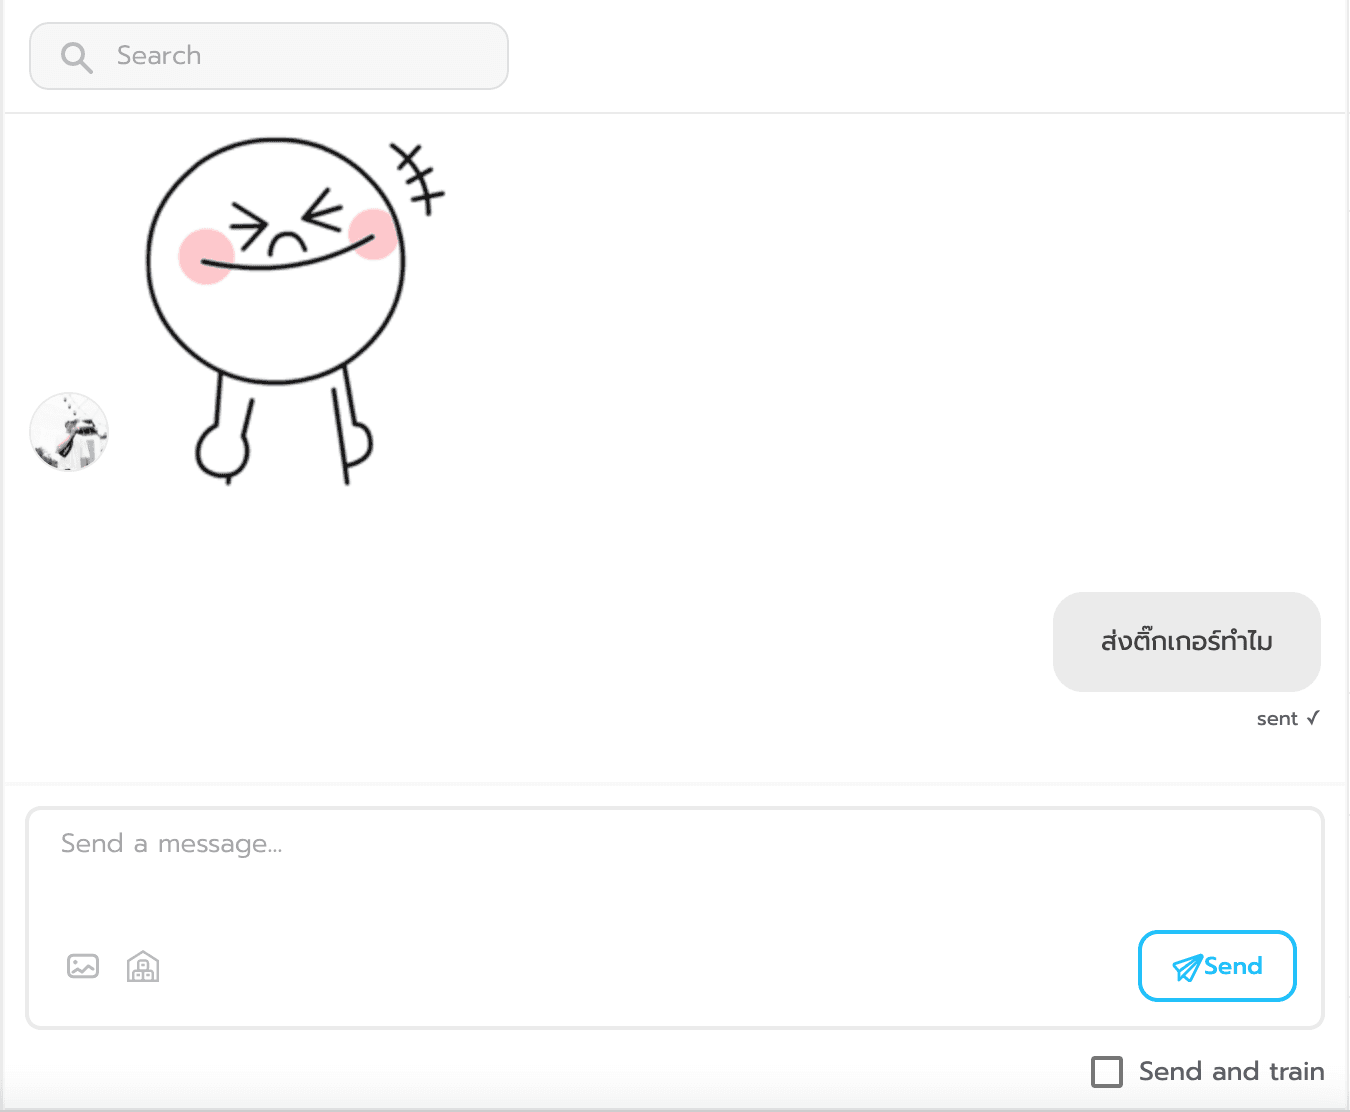
Window Message is conversation details box and can interact with users The text on the left will be from the user side. On the right side are messages from bots and agents.
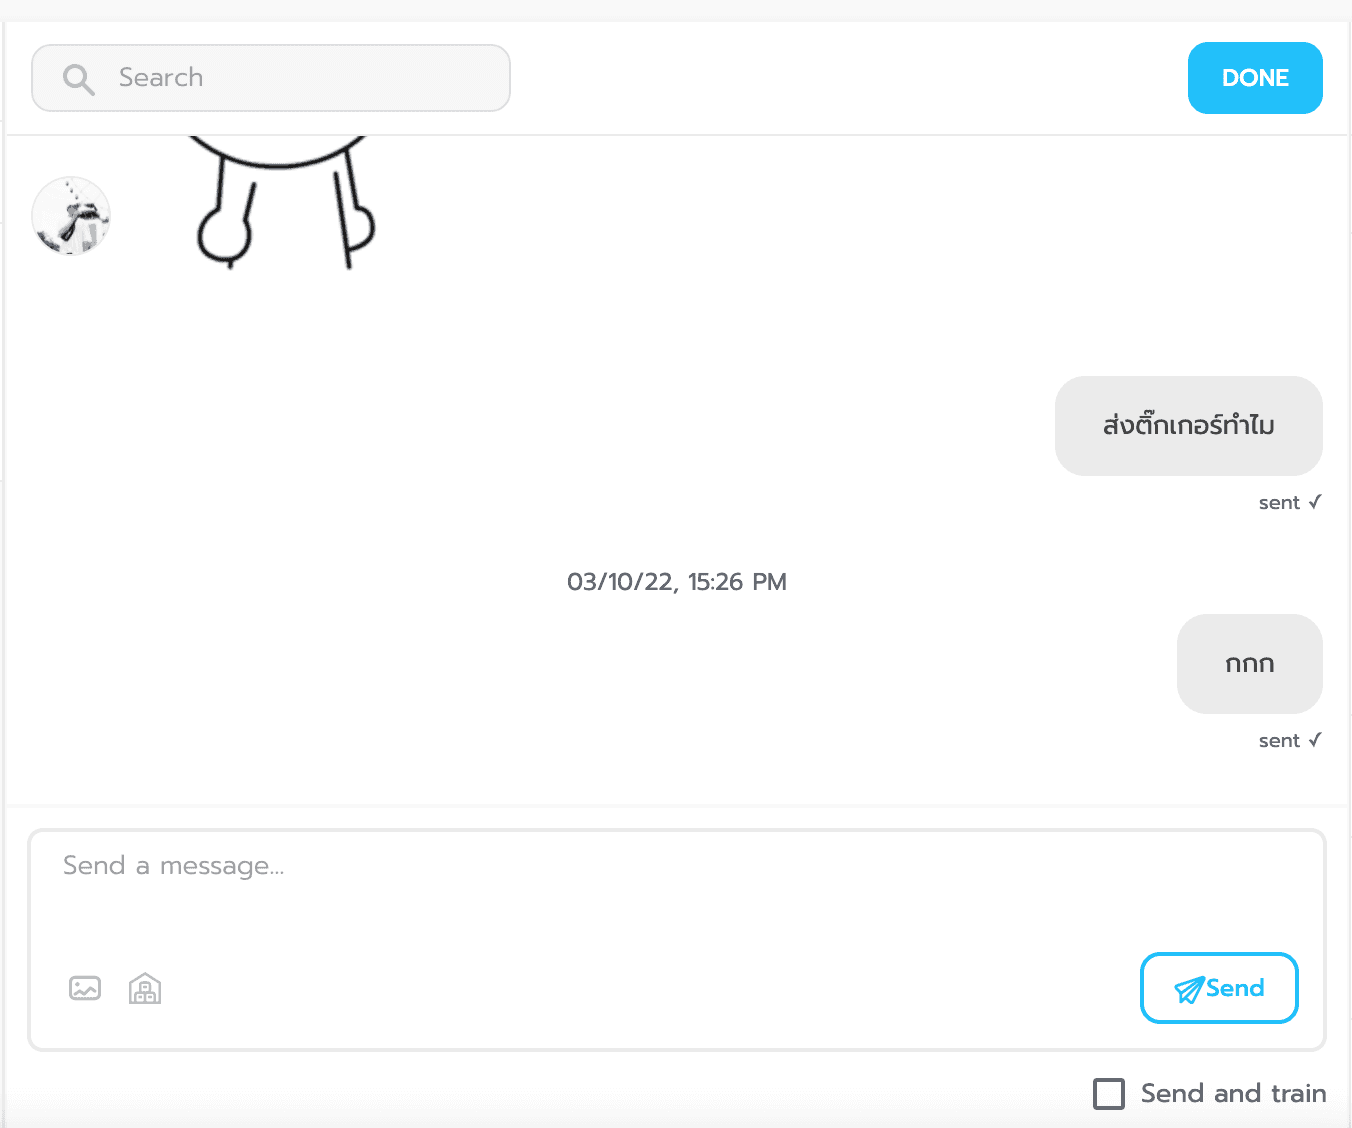
Tip: When an agent talks directly to a user, a Done button will appear for them to press. When the conversation with the user is finished. Will send the user back to talk with the chatbot as before.
Search is a box for searching for old messages that were previously discussed.
Sent is status for sending messages
1. / One line means it sending.
2. // Two lines means it has been sent successfully.Send a message is field for writing messages
1. Image can select images from your computer to send.
2. Intent&Object can select objects and intents from the library to send.
3. Send is button for sending a message
4. Send and train are when you check this box When you press the Send button, a message will be taught in the Trained section of Chitchat.
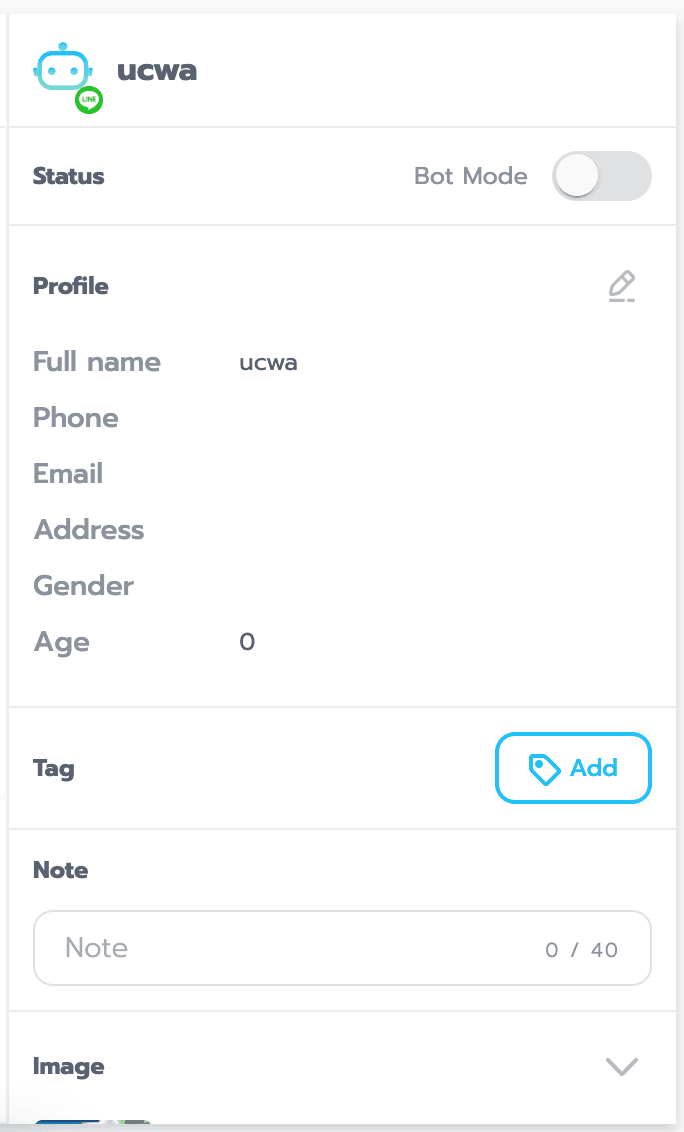
Right Channel is the field shows various details about the user. You can add tags, notes, or edit the user's personal information. And you can switch the mode to let the agent answer or switch back to the chatbot answering as well.
Profile Name is the top section shows the user's profile name.
Status is this section shows the status in which mode. which can be pressed to switch between chatbot mode or mode officer
Profile is section for displaying user information Staff can edit this information by pressing the pencil icon in the top right.
Tag can add tags to be labeled or status available to users By pressing the Add button.
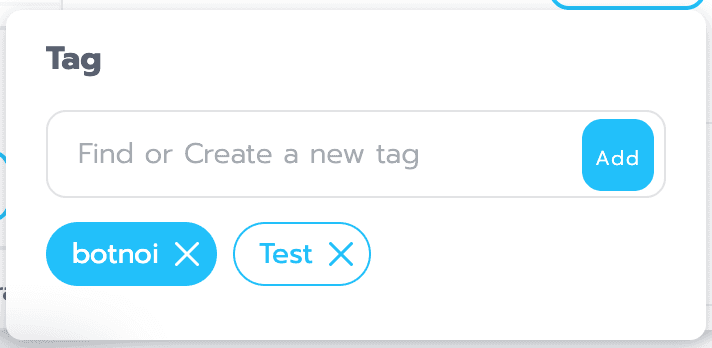
. When you press Add, a window will appear. You can type the name of the tag to add in the Find or Create a new tag box and press Add. When the tag is checked, it will be blue, meaning it has been successfully tagged. Tags that are not selected will be white.
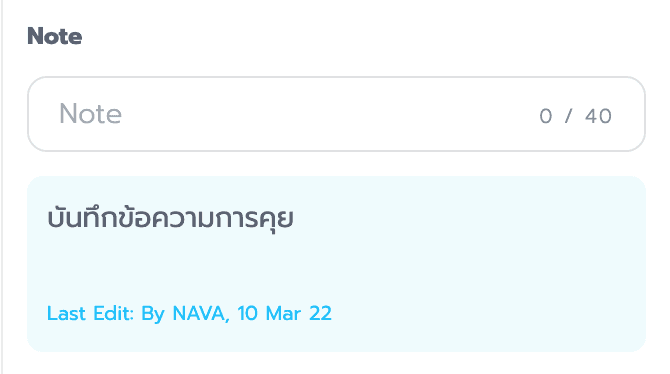
. Note: You can add text notes. The record will have details. Name of recorder and the recording date is displayed
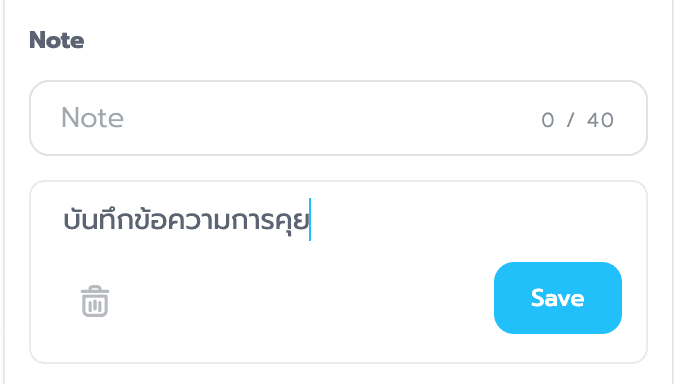
When you click on the saved record. Will be able to edit or delete records.
Image Shows images that users have previously sent.
Live Chat Setting
For additional settings for various Live Chat functions.
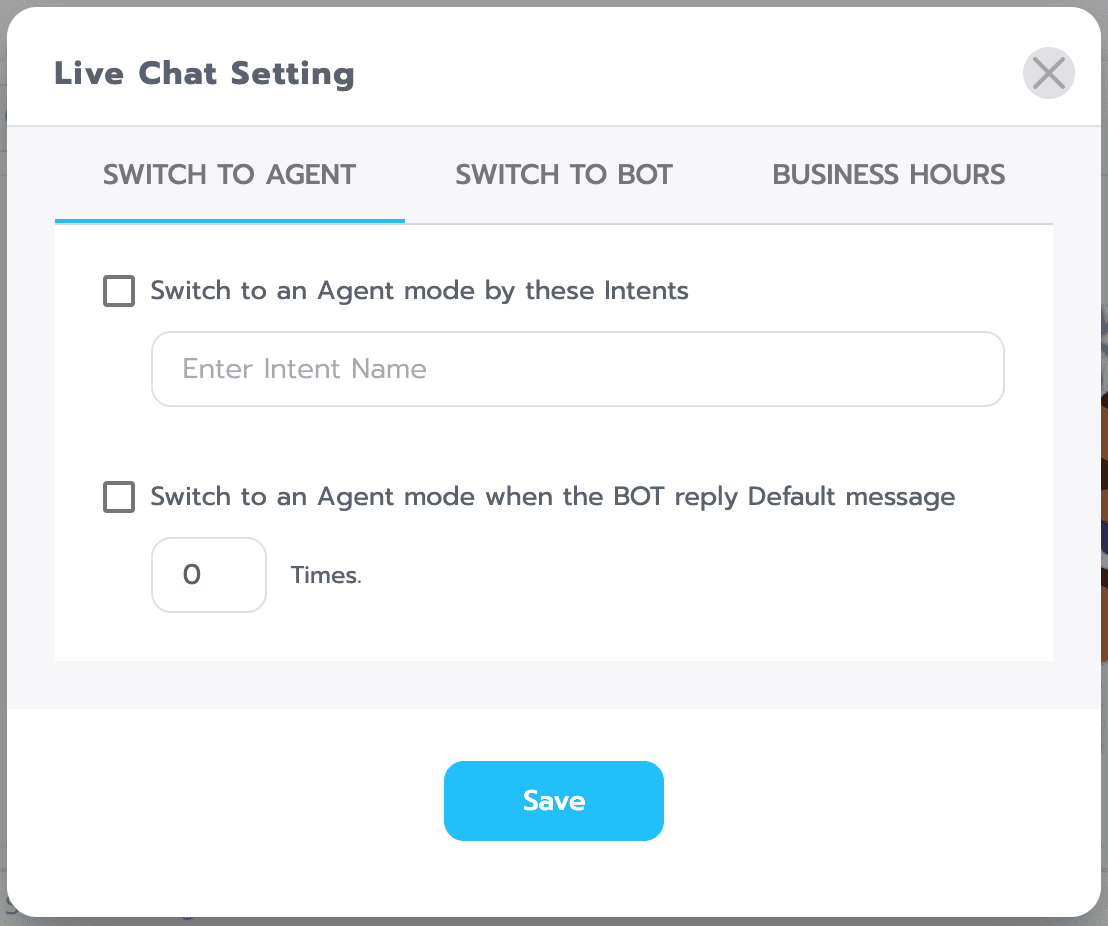
Switch To Agent can be set to switch to officer mode. When the conditions set are met.
Switch to an agent mode by these Intents can be included. When a user greets the bot with the phrase that is taught in the intent, the user will immediately switch to agent mode.
Switch to an agent mode when the bot reply Default Fallback can enter the number of times. When users greet the bot Then the bot responds to the user with the Default Fallbak Response that was set. When will the number of times be reached? The user will be switched to Officer Mode immediately.
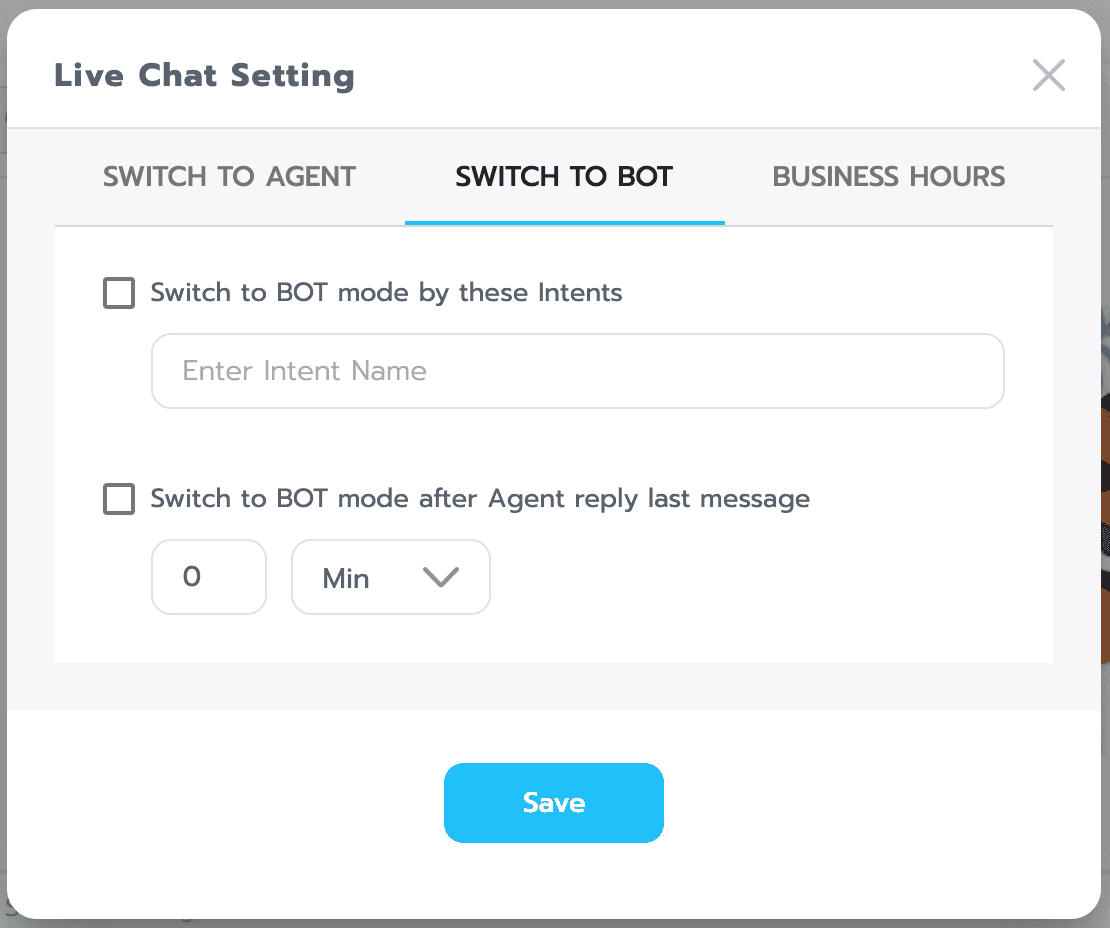
Switch To Bot can be set to switch to chatbot mode. When the conditions set are met.
Switch to bot mode by these Intent an Intent can be inserted. When a user greets you while stuck in Agent Mode with the phrase taught in the Intent, the user will be immediately switched back to Chatbot Mode.
Switch to an bot mode affter agent reply last message a time can be set for the user to switch back to chatbot mode. When the final message is sent after the specified time.
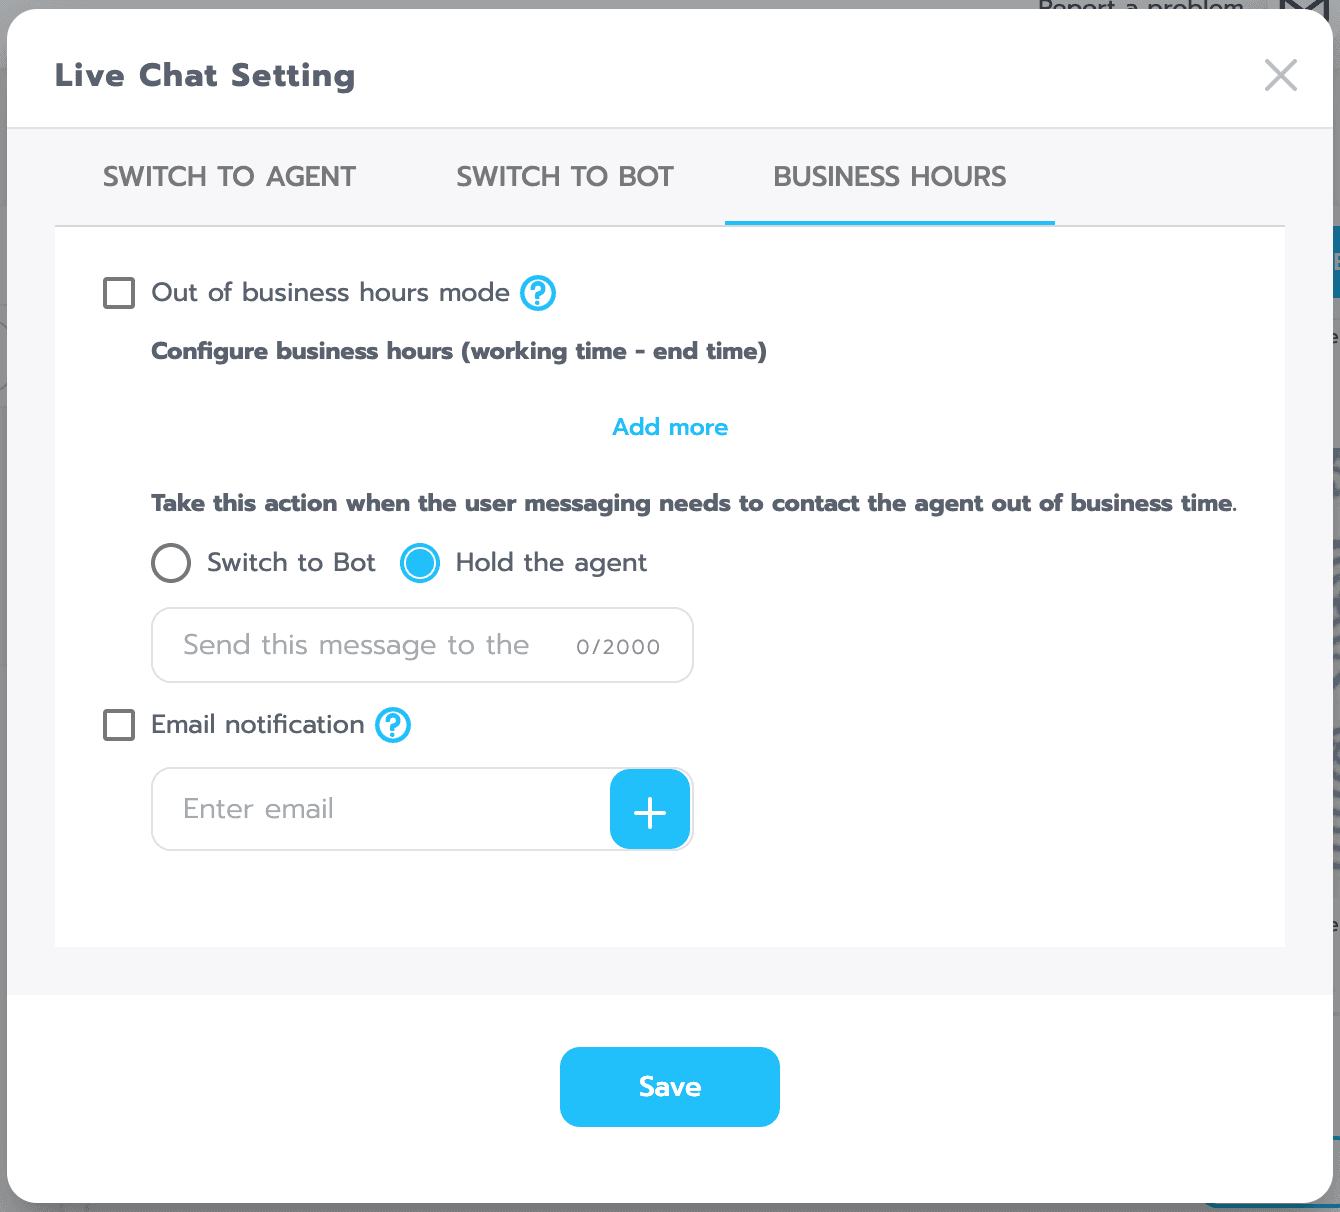
Business Hours able to determine what will happen when a user asks to contact staff outside of working hours. You can switch to chatbot mode to continue chatting with the bot. or send it to the mode official To wait for officials to answer the next day.
Out of business hours mode schedule your chatbot to work during off-hours.
Configure buisness hours section is used for setting your opening hours and days. You can press Add more to add opening hours and days.
Take this action is part defines the work of the chatbot and what it will do. When users message us and ask to contact staff outside of working hours.
1.1) Switch to Bot is switch to chatbot mode to continue chatting with the bot.
1.2) Hold the Agent is send to staff mode To wait for officials to answer the next day.Send this message is set the message you can reply to.
Email notification can add email recipients When someone greets you After-hours staff There will be a message from the user sent to the email.
Setting
A page for bot administrators to manage various settings such as profiles, chatbots, connections, access permissions, and more.
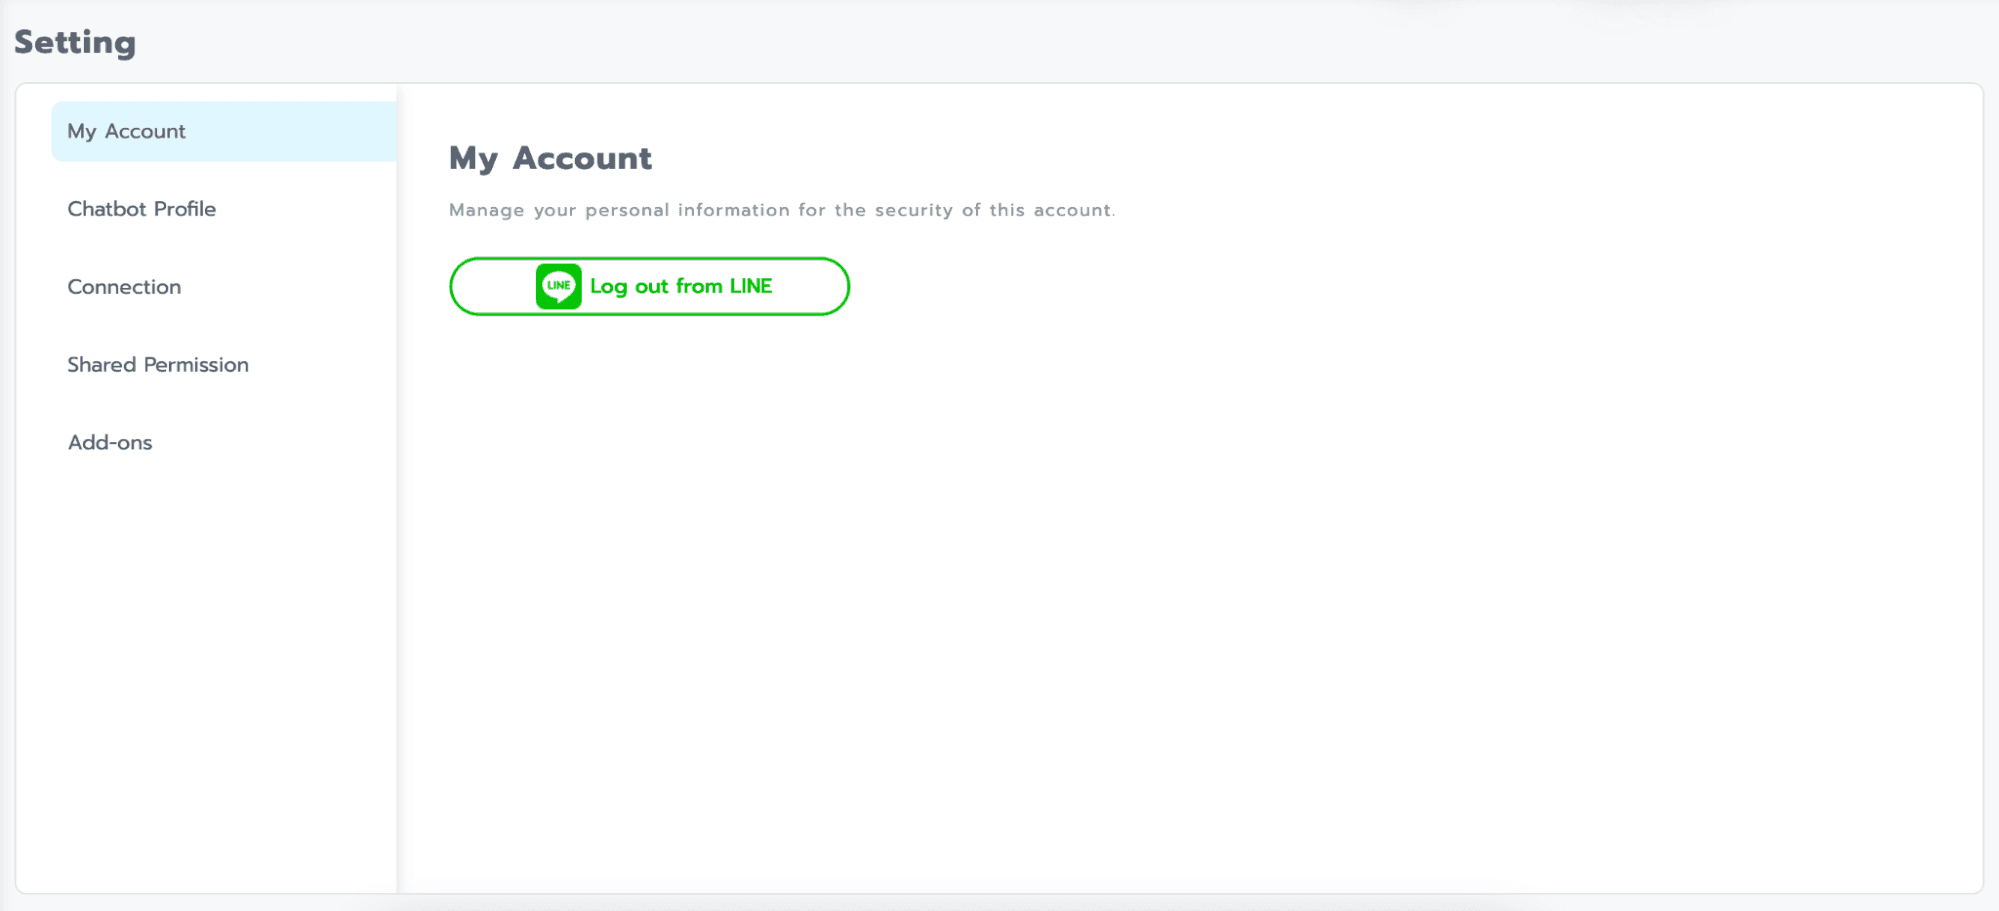
a. "My account" for logging out of the system.
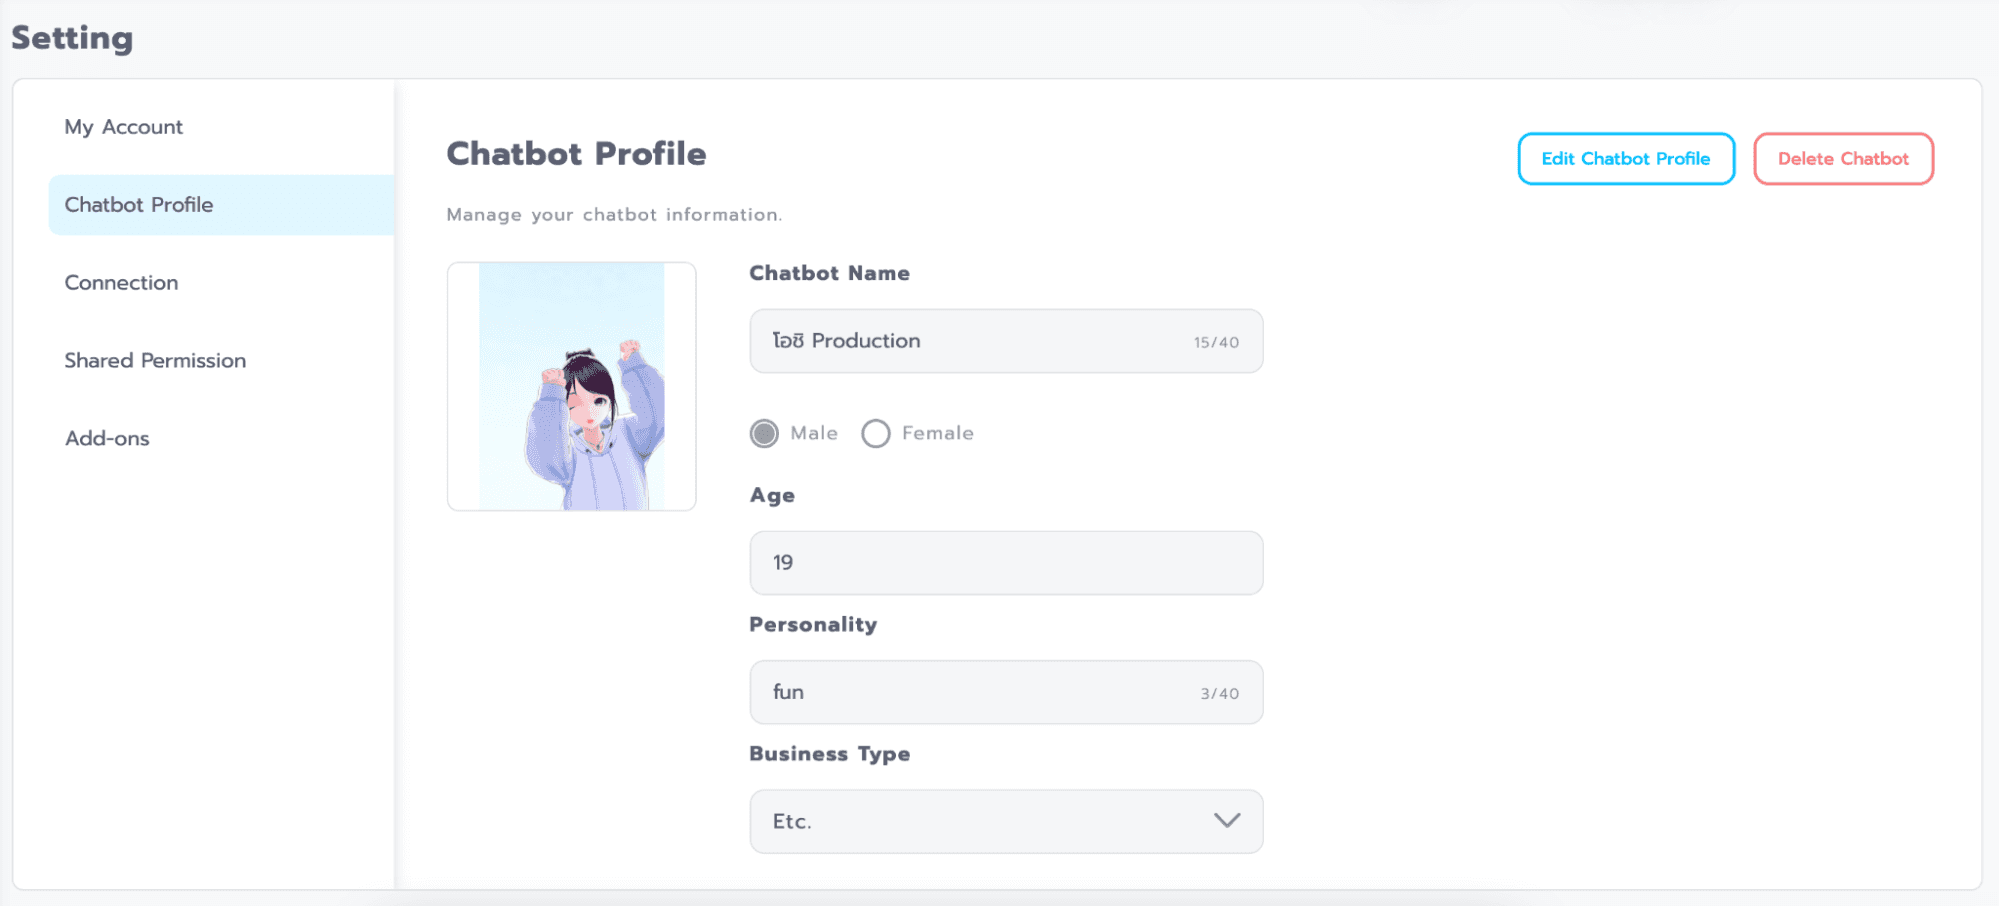
a. "Chatbot Profile" page for managing the profile settings of the chatbot.
a. "Edit chatbot profile" can be clicked to edit the chatbot's profile information.
b."Delete chatbot" can be clicked to delete the chatbot.
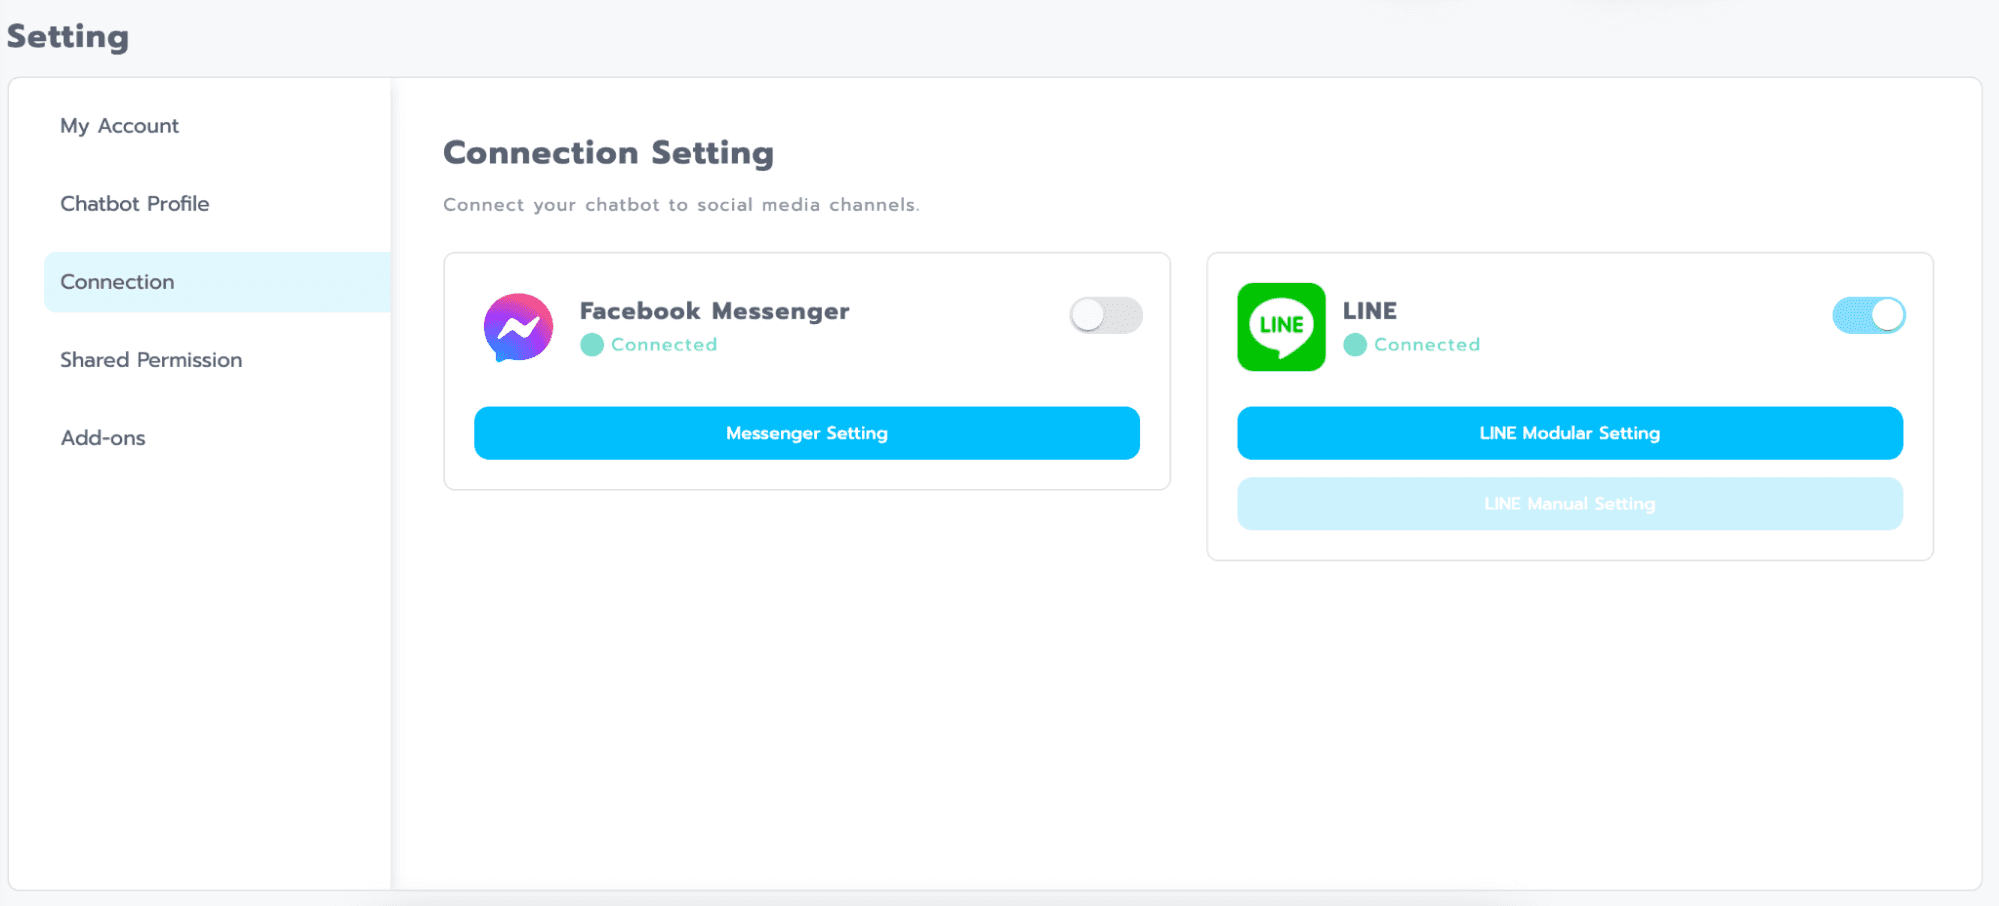
a. "Connection" can be clicked to connect the chatbot to various channels such as Line and Facebook.
a. "Facebook Messenger" can be clicked to access "Messenger settings" and connect with your Facebook Page.
b.LINE offers two connection methods, which are:
a. "LINE modular setting" can be used to easily connect with LINE Official Account (OA) without complexity.
b. "LINE manual setting" allows you to connect with LINE Official Account (OA) in a more complex manner compared to the easy method.
Tip: When connecting using LINE manual setting, you can configure the use of rich menus with toggling capabilities. This is not possible when using LINE modular setting.
Tip: When the connection is successfully established, the indicator light will turn green, as shown in the example in the image above, and it will display the word "Connected."
Tip: The button on the right-hand side is a toggle button used to turn the chatbot on or off. When it's turned off, the button will be gray, and the chatbot will not respond to messages. When it's turned on, the button will be blue, and the chatbot will respond to messages as usual.
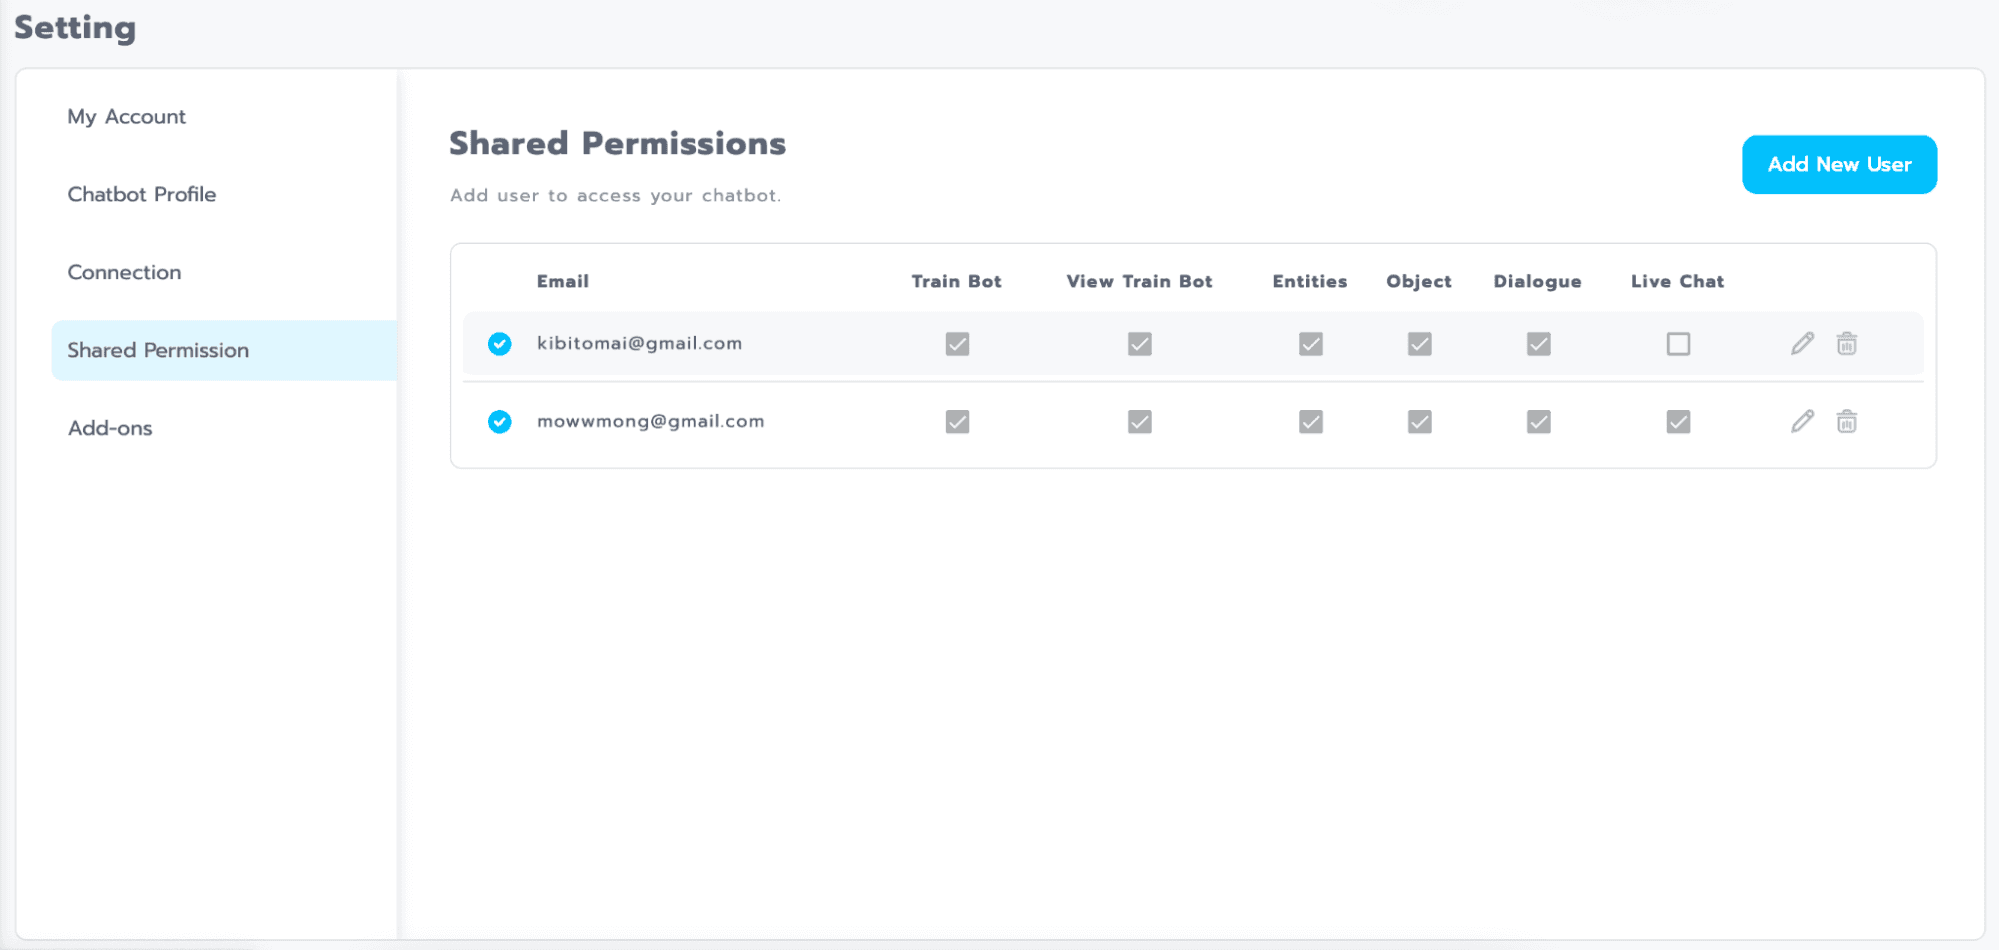
a. "Shared permissions" displays a list of users to whom you have shared permission to work together with the chatbot.
a. "Edit" can be clicked to edit the access rights of users for different sections (pencil icon).
b."Delete" can be clicked to delete users whom you have shared permissions with (trash can icon).
c."Add new user" can be clicked to add new users who can work together with you.
Tip: A blue icon indicates that the user has accepted the shared bot invitation, logged in, and is now using it successfully.
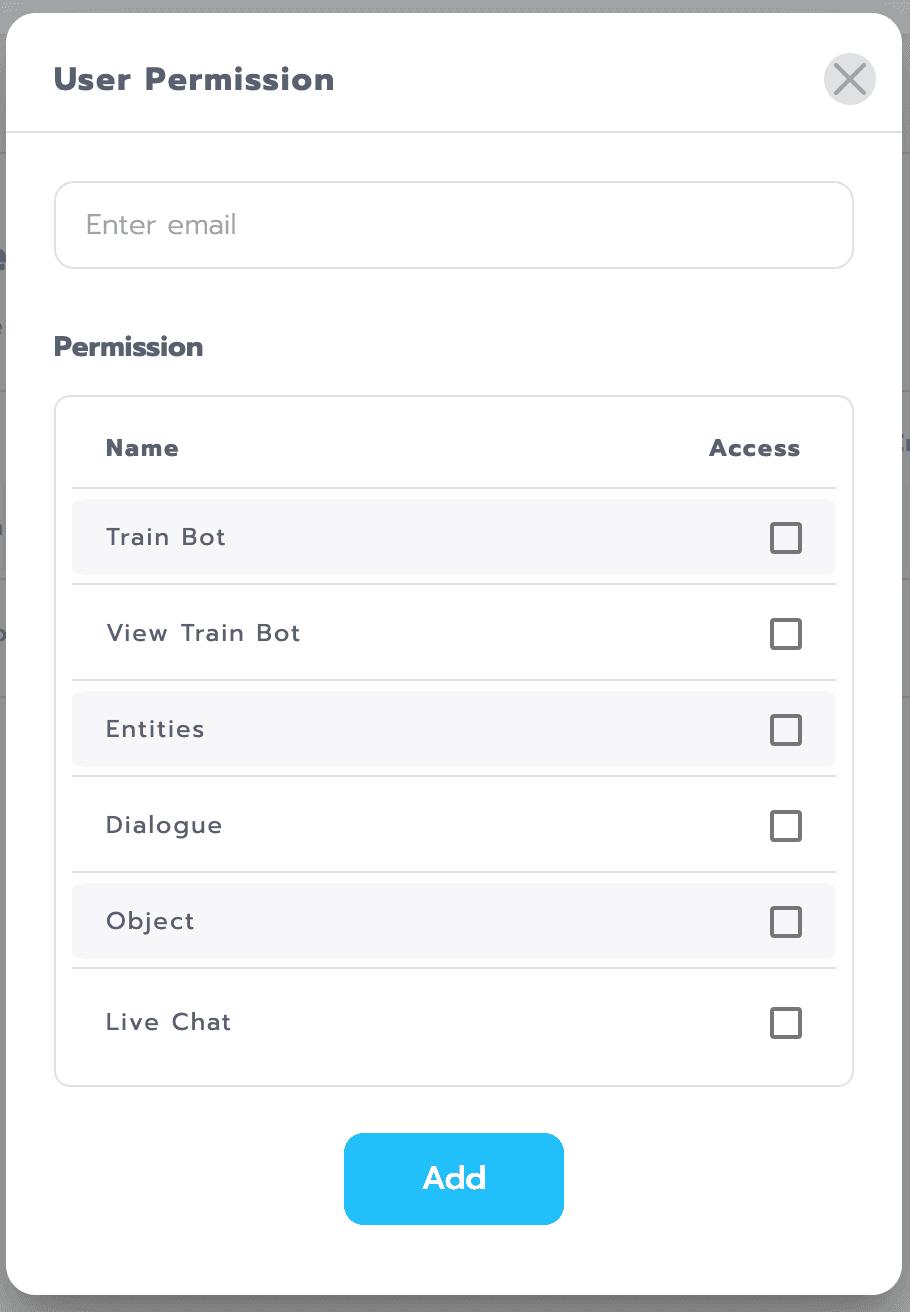
a. Enter email is fields for entering information for the people with whom we want to share the chatbot.
b. Permission can specify who you want the chatbot to be shared with. Can you access specific parts.
Table of Symbols
ชื่อสัญลักษณ์
รูปแบบ
รายละเอียด
เก็บข้อมูลลงในตัวแปร
<temporary>
นำข้อความที่ส่งเข้ามาจัดเก็บในตัวแปร temporary
ดึงข้อมูลจากในตัวแปร
<<temporary>>
แสดงข้อมูลที่เก็บไว้ในตัวแปร temporary
Set Parameter
<!greeting|hello!>
นำข้อความที่อยู่ด้านหลัง | ไปเเก็บไว้ในตัวแปรที่อยู่ด้านหน้า ดังตัวอย่างคือ นำคำว่า hello ไปเก็บไว้ในตัวแปร greeting
Intent Parameter
{{farewell}}
แสดงคำตอบ (Bot Response) ที่กำหนดไว้ใน intent ชื่อ farewell
Math Parameter
<$2+2$>
นำข้อมูลรูปแบบตัวเลขมาทำการคำนวณและแสดงผล (เรียกใช้ formula fucntion)
Bubble Group Break
<$BUBBLE_GROUP_BREAK()$>
ฟังก์ชันให้คำสั่งที่อยู่ก่อนหน้าทำงานทันที
Mapping Pattern
<$GET_MAPPING_MSG("HELLO")$>
นำข้อความด้านใน Get Mapping Msg ไปหาคำตอบและนำข้อความที่ได้มาแทนสัญลักษณ์โดยแต่ละbubble จะคั่นด้วยรูปแบบที่เป็นผลลัพธ์จะเป็นคำตอบของ intent ที่ตรงกับข้อความ HELLO
Get Intent Pattern
<$GET_INTENT("HI")$>
นำข้อความในตัว Get Intent ไปหา intent ที่ตรงกับข้อความ HI
Postback Fillter Pattern
\[\[.*?\]\]
ทำงานเฉพาะใน postback เมื่อได้รับข้อความที่เป็น postback จะเอา regex [[.*]] ไปค้นหาข้อความที่ตรงกันและเปลี่ยนข้อความที่ postback เข้ามาเป็นข้อความที่ตรงกัน
Our New Service
AI Voice Bot
AI Voice Bot
ช่วยลดงาน Call Center
AI bot commands by voice
เอไอบอทอัจฉริยะ สนทนาด้วยเสียง ทำงานตลอด 24 ชม. ลูกค้าไม่ต้องรอนาน ตอบคำถามแม่นยำ เพิ่มประสิทธิภาพงาน Call Center
Dashboard
Dashboard เป็นหน้าสรุปสถิติการใช้งานแชทบอท โดยจะประกอบด้วย

Date range โดยสามารถเลือกดูข้อมูลได้ 3 ช่วงเวลา คือ
7 day เป็นสถิติรายสัปดาห์ โดยจะมีแสดงผล %เปรียบเทียบสถิติ 7 วันก่อนหน้า
30 day เป็นสถิติรายเดือน โดยจะมีแสดงผล %เปรียบเทียบสถิติ 30 วันก่อนหน้า
365 day เป็นสถิติรายปี โดยจะมีแสดงผล %เปรียบเทียบสถิติ 365 วันก่อนหน้า
Total Users คือ สถิติจำนวนผู้ใช้งานทั้งหมด นับตั้งแต่เปิดใช้งานแชทบอท
เคล็ดลับ: จำนวนเปอร์เซ็นต์ % เป็นการเปรียบเทียบกับช่วงเวลาก่อนหน้า ตามช่วงเวลาที่เลือก (7 วันก่อนหน้า, 30 วันก่อนหน้า, 365 วันก่อนหน้า)
Total Messages คือสิถิติจำนวนข้อความที่แชทบอทตอบออกไปทั้งหมด นับตั้งแต่เปิดใช้งานแชทบอท
Active Users คือสถิติจำนวนคนที่เข้ามาใช้งานแชทบอทเฉพาะในช่วงเวลาที่เลือก แบ่งเป็น
New User คือ ผู้ใช้งานที่เข้ามาใช้งานแชทบอทเป็นครั้งแรก
User Retention คือ ผู้ใช้งานที่เคยเข้ามาคุยกับแชทบอทแล้วกลับมาใช้อีก
Incoming Message คือจำนวนข้อความที่ผู้ใช้งานส่งเข้ามาแชทกับบอท แบ่งเป็น
Responded Messages คือจำนวนข้อความที่แชทบอทสามารถตอบได้
Non Responded Messages คือจำนวนข้อความที่แชทบอทไม่สามารถตอบได้ (Default Fallback)
Agent Call Messages คือจำนวนข้อความที่ผู้ใช้งานต้องการคุยกับเจ้าหน้าที่

User Statistics คือสถิติจำนวนผู้ใช้งานแชทบอทรูปแบบกราฟ

Total Intents คือจำนวนรวมครั้งที่ intent ถูกเรียกใช้ไปตอบผู้ใช้
ตาราง intent แสดงรายการ intent ที่ถูกเรียกออกไปตอบ โดยจะเรียงลำดับ จากจำนวนมากขึ้นก่อน โดยจะแสดงผลจำนวนหน้าละ 5 intent แบ่งเป็น
Intent name คือชื่อ intent
Total คือจำนวนครั้งที่ intent ถูกเรียกออกไปตอบ
Ratio คือสัดส่วนเปอร์เซ็นต์ที่ intent นั้นถูกเรียกออกไปเทียบกับจำนวน การเรียก intent ทั้งหมด
Train Bot
Train Bot เป็น ส่วนสำคัญในการสร้างแชทบอท เพราะเป็นส่วนที่ใช้สำหรับการตั้งค่าคำตอบของบอทกับคำถามของผู้ใช้งานแชทบอทให้สัมพันธ์กัน ส่วนประกอบของรายการของ Intent มีดังนี้

Search Intent สำหรับค้นหา Intent, Phrase, Response ที่ต้องการตั้งค่า
Sort สำหรับจัดเรียง Intent ตามรูปลำดับตัวอักษร a-z หรือความเก่า-ใหม่
Default Fallback แสดงข้อความทั้งหมดของผู้ใช้ ที่บอทไม่เข้าใจเมื่อ ข้อความนั้น มีค่าความมั่นใจ (Confident) ต่ำกว่าที่ตั้งค่าไว้

เราสามารถตั้งค่า Default Fallback ได้ดังนี้
a. Bot Response คือ ตั้งค่าคำตอบที่อยากให้บอทตอบออกไปเมื่อไม่เข้าใจประโยค คือเมื่อระบบพบค่าความมั่นใจ % ต่ำกว่าที่ตั้งไว้
b. Confident คือ ตั้งค่าความมั่นใจที่ต้องการให้บอทตอบ ยิ่งใกล้ 100% เท่าไหร่ หมายความว่าผู้ใช้จะต้องพิมพ์ประโยคที่มีความแม่นยำหรือตรงกับข้อมูลที่เราได้สอนบอทไว้มากเท่านั้น
ตัวอย่าง Default Message คือ Sorry I don't understand และ ค่า Default Confident เท่ากับ 65%
ตั้งค่า Bot Response ไว้ว่า Sorry I don't understand และ ค่า Confident เท่ากับ 65% ความหมายเมื่อ ข้อความที่ผู้ใช้ส่งมา มีค่า Confident มากกว่า 65% = บอทจะตอบ ด้วย Bot Response ของ Intent นั้นๆ ที่บอทมีความมั่นใจ แต่เมื่อ ข้อความที่ผู้ใช้ส่งมา มีค่า Confident น้อยกว่า 65% = บอทจะตอบด้วย Bot Response ว่า Sorry I don't understand ที่เราตั้งไว้ใน Default Fallback
Chitchat หมดคุยเล่นสำหรับเทรนบอทด้วยประโยค ถามตอบ แบบ 1-1 เพราะบางที สิ่งที่พิมพ์เข้ามา มันเฉพาะเจาะจงเกินไป เราไม่รู้จะจัดกลุ่มประโยคแบบไหน เช่น “อยากไปอยู่บนดาวอังคารมั้ย” เราก็ไมจำเป็นต้องสร้าง Intent เราสามารถสอนแชทบอท ได้เลยว่า ถ้าเจอประโยคนี้ให้ตอบว่า “ไปด้วยกันไหม”สำหรับการสอนบอทในส่วนของ Chitchat ให้ไปที่ส่วน Trained ซึ่งเราสามารถเลือกสอนบอทได้ด้วยกัน 2 โหมด

a. Train โหมดนี้ระบบจะซุ่มคำถามขึ้นมาจากส่วน Untrained ด่านล่าง โดยเรา สามารถสอนบอทได้ด้วยการใส่ข้อความที่ต้องการให้บอทตอบลงที่ช่อง Enter Bot Response และกดที่ปุ่ม Train เพื่อเป็นการบันทึกคำตอบ หรือกดปุ่ม Skip เพื่อข้ามไปยังประโยคถัดไป

b. New โหมดนี้เราจะต้องคิดคำถามขึ้นมาเอง โดยสามารถใส่คำถามลงที่ช่อง Enter Phrase และใส่คำตอบของบอทลงที่ช่อง Enter Bot Response และกดที่ปุ่ม Train เพื่อเป็นการบันทึกคำตอบ

Intent (IN) สำหรับการสร้างหมวดหมู่เพื่อใช้สอนข้อความที่มีความหมาย เดียวกันแต่เขียนต่างกัน ไว้ด้วยกัน เพื่อให้ง่ายต่อการจัดการ ตัวอย่าง Intent ชื่อ ทักทาย ก็จะรวบรวม ประโยคคำทักทาย ต่างๆเอาไว้ เช่น สวัสดี, ดีจ้า, หวัดดี, มอนิ่ง ซึ่งเราสามารถรวมกลุ่มประโยคเหล่านี้ แล้วสร้างชุดคำตอบสำหรับกลุ่มนี้เอาไว้ ที่เดียว เพื่อให้ง่ายต่อการจัดการในทีเดียว

a. +New ปุ่มสำหรับสร้างชุด Intent
b. Intent Name ช่องสำหรับตั้งชื่อ Intent

เคล็ดลับ: Intent ที่ถูกสร้างใหม่จะถูกแสดงในรายการ My Intent ด้านล่าง

เคล็ดลับ: สามารถลบ Intent ได้ด้วยการกดติ๊กถูกที่ช่องหน้าชื่อ Intent จากนั้น ระบบจะแสดงปุ่มลบ ขึ้นมาให้กดที่ปุ่ม กดที่ปุ่ม Delete เพื่อทำ การลบ หรือสามารถเลือกลบ Intent ทั้งหมดพร้อมกันได้ด้วยการติ๊กถูกที่ช่อง All จากนั้นกดที่ปุ่ม Deleteเพื่อทำการลบ
สำหรับการสอนบอทในส่วนของ Intent แบ่งเป็น 2 ส่วนหลักๆ คือ การสอนให้ บอทเข้าใจจุดประสงค์ของข้อความที่ผู้ใช้ส่งมา (Expected Phrase) กับ การสอนให้บอทตอบคำถามให้ตรงกับจุดประสงค์นั้นๆ (Bot Response)
c. Expected Phrase สำหรับสอนให้บอทเข้าใจจุดประสงค์ของข้อความที่ผู้ใช้ส่งมา จะสามารถสอนได้ด้วย 2 วิธี คือ
a.ในส่วน Trained สามารถพิมพ์ข้อความที่คาดว่าผู้ใช้จะถามเข้า
มาลงในกล่อง “Enter Phrase” แล้วกดปุ่ม Train เพื่อบันทึก


เคล็ดลับ: ข้อความใน Trained สามารถแก้ไขข้อความได้โดยคลิกที่ไอคอนดินสอหน้าข้อความได้

เคล็ดลับ: และสามารถกดลากย้ายข้อความนั้นๆ เข้าไปในรายการ Intent อื่นๆที่อยู่ใน My Intent ด้านซ้ายมือได้

เคล็ดลับ: สามารถลบข้อมูลใน Trained ได้ด้วยการคลิกที่ข้อความ Phrase ที่ต้องการลบและกดปุ่ม Delete เพื่อทำการลบ หรือสามารถลบข้อมูลทั้งหมดได้ด้วยการ กดที่ปุ่ม Deleate Trained ด้านซ้าย
a. ในส่วน Untrained ถ้าข้อความที่ผู้ใช้พิมพ์ข้ามาไม่ตรงกับข้อความที่เคยสอนไว้ (Confident น้อยกว่า 100%) แต่มีค่าความมั่นใจ (Confident) มากกว่าที่ตั้งค่าไว้ในการตั้งค่า Default Message ข้อความเหล่านั้นจะถูกแสดงในส่วน Untrained เราสามารถกดคลิกที่ไอคอนบวก เพื่อทำการสอนบอท โดยข้อความที่สอนแล้วจะถูกย้ายขึ้นไปอยู่ในส่วนของ Trained ด้านบน


เคล็ดลับ: ในหน้า Untrained สามารถกดลากข้อความเหล่านั้นลงไปใน Intent อื่นๆ ที่ตั้งอยู่ใน My Intent ที่ด้านซ้ายมือ หรือในส่วน Trained ที่อยู่ด้านบนสุด

เคล็ดลับ: สามารถสอนบอททีละหลายๆคำ ได้ด้วยการคลิกที่ข้อความ Phrase ที่ต้องการสอน แล้วกดปุ่ม Add จะเป็นการสอนที่เดียวพร้อมกันหลายๆคำ

เคล็ดลับ: สามารถลบข้อมูลใน Untrained ได้ด้วยการคลิกที่ข้อความ Phrase ที่ต้องการลบและกดปุ่ม Delete เพื่อทำการลบ หรือสามารถลบข้อมูลทั้งหมดได้ ด้วยการ กดที่ปุ่ม Deleate Trained ด้านซ้าย
d.Bot Response สำหรับจัดการกับคำตอบของบอท ซึ่งคำตอบของบอทสามารถตอบได้หลายรูปแบบ
a. +New ปุ่มสำหรับสร้างชุดคำตอบของแชทบอท
b. Response ชุดคำตอบของแชทบอท สามารถสร้างชนิดของคำตอบได้หลายแบบ
Existing objects: การเลือกคำตอบในรูปแบบ Object , Intent จากคลังสื่อที่เคยสร้างเอาไว้อยู่แล้ว
Text: การตอบข้อความในรูปแบบตัวอักษร หรือ ข้อความ
Image: การตอบข้อความในรูปแบบภาพ
Carousel: การตอบข้อความในรูปแบบการ์ดหมุนที่มีภาพและปุ่มกด Button: การตอบข้อความในรูปแบบของปุ่มกด Quick Reply: การตอบข้อความในรูปแบบปุ่มกด ที่กดได้ครั้งเดียว Flex Message: การตอบข้อความในรูปแบบที่เรา Custom เองได้ Custom Payload: การตอบข้อความในรูปแบบที่เรา Custom เองได้

เคล็ดลับ: ถ้าต้องการลบชุดคำตอบให้ติ๊กถูกที่ช่องหน้าชื่อชุดคำตอบ ระบบจะ แสดงปุ่มลบขึ้นมา ให้กดที่ปุ่ม Delete หรือถ้าต้องการลบชุดคำตอบทั้งหมด ให้ติ๊กที่ช่อง All แล้วกดปุ่ม Delete

เคล็ดลับ: ถ้าต้องการเลือกใช้งานชุดคำตอบให้ติ๊กถูกที่ช่องหน้าชื่อชุด คำตอบ ระบบจะแสดงปุ่ม Enable/Disable ขึ้นมา ให้กดที่ปุ่ม 1 ครั้ง สีข้อความจะจางลง หมายความว่า Disable อยู่ บอทจะไม่นำคำตอบชุดนี้ไปตอบ กลับผู้ใช้งานอีก หากต้องการใช้งานชุดคำตอบอีกครั้ง ให้ติ๊กถูกที่ช่อง หน้าชื่อชุดคำตอบ ระบบจะแสดงปุ่ม Enable/Disable ขึ้นมา ให้กดที่ปุ่ม 1 ครั้ง สีข้อความจะเข้มขึ้น หมายความว่า Enable อยู่ บอทจะนำคำตอบชุดนี้ไปตอบกลับผู้ใช้งานอีกครั้ง

e. Import การเพิ่มข้อมูลอีกช่องทางหนึ่งผ่าน Excel เหมาะกับข้อมูลที่มีจำนวนมาก

สามารถ “Download Template” ที่เตรียมเอาไว้ให้ เพื่อให้สามารถนำไปแก้ไขข้อมูลได้ทันที ซึ่งมีทั้งหมด 3 ประเภท
a. Download Intent-Phrase Template สำหรับจัดการกลุ่มคำถามของแต่ละ Intent
a. Intent คือช่องสำหรับใส่ชื่อ Intent
b. Phrase คือช่องสำหรับใส่คำหรือประโยคของ Intent นั้นๆ
b. Download Intent-Response Template สำหรับจัดการกลุ่มคำตอบของแต่ละ Intent

a. Intent คือช่องสำหรับใส่ชื่อ Intent
b. Response คือช่องสำหรับใส่คำตอบหรือประโยคที่อยากให้บอท
ให้กับ Intent นั้นๆ
c. Download Chitchat-Response Template สำหรับจัดการกลุ่มคำถามและคำตอบของ Chitchat

a. Phrase คือช่องสำหรับใส่คำถามหรือประโยคที่คาดว่าผู็ใช้จะ
พิมพ์เข้ามา
b. Response คือช่องสำหรับใส่คำตอบหรือประโยคที่อยากให้บอท
ให้กับ Phrase นั้นๆ
เคล็ดลับ: ส่วนหัวของ Column ใน Template ห้ามทำการเปลี่ยนชื่อเด็ดขาด

f. Export การนำข้อมูลที่เทรนไว้แล้วออกมาในรูปแบบ Excel

a. Date สามารถระบุช่วงเวลาของข้อมูลที่อยากจะ Export ออกมา
ได้
a. Starting-Present: เลือกตั้งแต่เริ่มจนถึงปัจจุบัน
b. Select a date range: เลือกตามช่วงเวลา
b. Type สามารถเลือกข้อมูลที่ต้องการ Export ว่าเป็นส่วนไหน
a. Trained: ข้อมูลในส่วนของ Trained
b. Untrained: ข้อมูลในส่วนของ Untrained
c. Categories สามารถเลือกข้อมูลที่ต้องการ Export ว่าเป็น
ประเภทไหน
c. All: ข้อมูลทุกประเภท
a. Chitchat: เฉพาะ Chitchat
b. Default Message: เฉพาะ Default Message
c. Intent: เฉพาะ Intent

d. เคล็ดลับ: สามารถเลือก Export ข้อมูลเฉพาะที่ต้องการพร้อมกันได้
Entity
คือ กลุ่มคำต่างๆที่จัดอยู่ในหมวดเดียวกัน หรือเป็นคำที่มีความหมายเดียวกัน (โดย feature Entity จะนำไปใช้ใน Object Dialogue)


a. New Entities ปุ่มสำหรับสร้างชุด Entities
b. Entities Name ช่องสำหรับตั้งชื่อ Entities
c. คลิกปุ่ม (+Add Phrase)
d. Confident ช่องสำหรับตั้งค่าความมั่นใจของ Entities

เคล็ดลับ: สามารถลบข้อมูลใน Trained ได้ด้วยการคลิกที่ข้อความ Phrase ที่ต้องการลบและกดปุ่ม Delete เพื่อทำการลบ

เคล็ดลับ: สามารถลบ Entities ได้ด้วยการกดติ๊กถูกที่ช่องหน้าชื่อ Entities จากนั้น ระบบจะแสดงปุ่มลบ ขึ้นมาให้กดที่ปุ่ม กดที่ปุ่ม Delete เพื่อทำการลบ หรือสามารถเลือกลบ Entities ทั้งหมดพร้อมกันได้ด้วยการติ๊กถูกที่ช่อง All จากนั้นกดที่ปุ่ม Delete เพื่อทำการลบ
Dialogue
โดยปกติทั่วไปแชทบอทจะตอบคำถามแบบ 1:1 (ถาม-ตอบ) แต่ Dialogueเป็นรูปแบบคำตอบอีกอย่างหนึ่ง ที่สามารถตอบกลับเป็นบทสนทนาต่อเนื่องได้
ซึ่งเราสามารถทั้งกำหนดรูปแบบของคำถาม-คำตอบ และเส้นทางในบทสนทนานั้นๆได้
และยังสามารถเก็บข้อมูลที่เป็นคำตอบของ User เพื่อเอาไปใช้ในการเชื่อมต่อระบบอื่นๆได้อีกด้วย
ส่วนประกอบของหน้า Object (Dialogue Flow)
หน้า Object Dialogue มีส่วนประกอบหลัก 6 ส่วน ได้แก่

Add ปุ่มสำหรับเพิ่มหน้าสร้าง Dialogue
Delete ปุ่มสำหรับลบ Dialogue (ไอคอนรูปถังขยะ)
Import/Export ปุ่มสำหรับนำเข้า นำออกไฟล์ dialogue
Edit ปุ่มสำหรับนำแก้ไข dialogue (ไอคอนรูปดินสอ)
Duplicate ปุ่มสำหรับคัดลอก dialogue (ไอคอนรูปกระดาษซ้อนกัน)
Search ช่องสำหรับค้นหาชื่อ dialogue
ส่วนประกอบหน้าสร้าง dialogue

Object Name ช่องสำหรับตั้งชื่อ Dialogue
Zoom In ปุ่มสำหรับขยายมุมมองพื้นที่การทำงาน (ไอคอนรูปแว่นขยายบวก)
Zoom Out ปุ่มสำหรับย่อมุมมองพื้นที่การทำงาน (ไอคอนรูปแว่นขยายลบ)
Home ปุ่มสำหรับกลับมาจุดเริ่มต้นของ flow (ไอคอนรูปบ้าน)
Save ปุ่มสำหรับบันทึก Dialogue
ส่วนประกอบของ Node
Node คือ การบอกลำดับของกล่องข้อความที่บอทจะตอบกลับผู้ใช้ โดยกล่องข้อความจะไล่ลำดับตั้งแต่ 1 ขึ้นไปเรื่อยๆ ตามลำดับ


Command ช่องสำหรับเอาไว้ใส่ข้อความที่ต้องการให้บอทตอบสามารถใส่ได้ทั้ง Text, Object
Duplicate (ไอคอนรูปกระดาษซ้อนกัน) เป็นฟังก์ชั่นที่เอาไว้คัดลอก Command
Delete (ไอคอนรูปถังขยะ) เป็นฟังก์ชั่นที่เอาไว้ลบ Command
Enter message ช่องสำหรับใส่ข้อความที่ต้องการให้บอทตอบ สามารถใส่ได้ทั้ง อีโมจิ, parameter <..>, Object
Parameter <..> ฟังก์ชั่นนี้มีไว้สำหรับการเก็บค่าและแสดงค่าของตัวแปร โดย Use parameter เป็นการนำค่าตัวแปรมาแสดง ส่วน Add parameter คือการเก็บค่าของตัวแปร


a. Add parametor สามารถเพิ่มตัวแปรเพื่อนำไปใช้งานเก็บข้อมูลได้จากส่วนนี้ โดยตัวแปรที่เพิ่มเข้าไปจะแสดงอยู่ที่ส่วน Parameter สามารถกดเพื่อเรียกใช้งานซ้ำได้
รูปแบบของตัวแปรเก็บข้อมูลจะถูกครอบเอาไว้ด้วย <ชื่อตัวแปร> เช่น เมื่อเรียกใช้ จะเป็นการเก็บข้อมูลชื่อ เป็นต้น - Use parametor สามารถเรียกใช้งานตัวแปรที่เพิ่มเอาไว้ได้จากส่วนนี้ สำหรับฟังก์ชั่นนี้จะเป็นการนำข้อมูลที่อยู่ในตัวแปรออกมาแสดงโดยตัวแปรที่เพิ่มเข้าไปจะแสดงอยู่ที่ส่วน Parameter และมีตัวแปรสำเร็จของระบบที่สามารถเรียกใช้งานได้โดยตรงอยู่ที่ Global parametor สามารถกดเพื่อเรียกใช้งานได้ทันที รูปแบบของตัวแปรเก็บข้อมูลจะถูกครอบเอาไว้ด้วย <<ชื่อตัวแปร>> เช่น <> เมื่อเรียกใช้ จะเป็นการแสดงข้อมูลชื่อที่เก็บออกมา เป็นต้น

การใช้งาน Parametor เพิ่มเติม
Add Parametor ตัวอย่างการสร้างตัวแปรเพื่อเก็บข้อมูล


กดที่ไอคอน <..> เพื่อเรียกหน้าต่างสร้างพารามิเตอออกมา
คลิกแท็บ Add parametor ใส่ชื่อตัวแปรที่ต้องการลงไปในช่อง แล้วกด Add

การสร้างตัวแปรปกติจะออกมาแบบรูปด้านบนโดยจะมีเครื่องหมาย<ชื่อตัวแปร> ครอบชื่อตัวแปรเอาไว้
Use Parametor ตัวอย่างการเรียกดูข้อมูลที่เก็บไว้ในตัวแปร

การเรียกดูข้อมูลที่เก็บไว้ในตัวแปรจะเป็นการเพิ่มเครื่องหมาย<<ชื่อตัวแปร>> ครอบชื่อตัวแปรเอาไว้
Value Parametor ตัวอย่างการกำหนดค่าให้ตัวแปร


การสร้างตัวแปรปกติจะออกมาแบบรูปด้านซ้ายโดยจะมีเครื่องหมาย <ชื่อตัวแปร> ครอบชื่อตัวแปรเอาไว้
การกำหนดค่าตัวแปรให้เราแก้ไขข้อความให้เป็นรูปแบบด้านขวาตามรูป โดยจะมีรูปแบบ <!ชื่อตัวแปร|ค่าของตัวแปร!>
Formular Parametor การนำตัวแปรมาใส่สูตรคำนวณ บวก ลบ คูณ หาร

เราสามารถนำค่าตัวแปรของเรามาทำการคำนวณได้ โดยตามรูป ตัวอย่าง จะเห็นรูปแบบของการเขียนสูตร <!ชื่อตัวแปร|<$<<ชื่อตัวแปร>>/<<ชื่อตัวแปร>>$>!>
ในตัวอย่างจะเป็นการ เอาค่าในตัวแปร tall มาหารกับ ค่าในตัวแปร weight เพื่อเก็บค่าลงตัวแปร sum <!........|....!> = การกำหนดค่าให้ตัวแปร <$……$> = การเรียกใช้ฟังชั่นคำนวณใน formular
Add more command สามารถเพิ่มจำนวน Command ได้
เคล็ดลับ: Command list ที่เพิ่มมาจะตอบข้อความในกรณีที่ user ตอบมาไม่ตรงเงื่อนไขที่ตั้ง ไว้และยังอยู่ใน Flow conversation

- If the response dosen’t match any ช่องสำหรับข้อความที่บอทจะตอบกลับไปในกรณีที่ user ตอบไม่ตรงเงื่อนไขและจบการสนทนา หรือ ออกจาก Flow conversation

- Setting มีส่วนประกอบหลักอยู่ 4 ส่วน ดังนี้
Set start point สำหรับกำหนดจุดเริ่มต้นของ flow ว่าให้เริ่มทำงานจาก Node ไหน
Duplicate สำหรับคัดลอก node
Time out สำหรับตั้งค่า flow เมื่อผู้ใช้ไม่ตอบในเวลาที่กำหนด
Remove สำหรับลบ node

- Next step สามารถเพิ่มหรือเชื่อมต่อไปยัง Condition ถัดไปเพื่อสร้างเงื่อนไขให้บอทสามารถทำงานในสเต็บถัดไปได้ สามารถกำหนดเงื่อนไขได้ 4 แบบ ได้แก่
Entities
Intent
RegEx
Match
ส่วนประกอบของ Condition
Condition ส่วนสำหรับสร้างหรือกำหนดเงื่อนไขให้แชทบอทสามารถทำงานในสเต็บถัดไปได้ ตามที่เราตั้งค่าไว้

Entities สำหรับกำหนดเงื่อนไขด้วย คำ, ประโยค หรือกลุ่มคำ หากผู้ใช้พิมพ์ข้อความด้วยคำที่ตรงกับที่เรากำหนดไว้ แชทบอทจึงจะสามารถไปยังสเต็บถัดไปได้


การใช้งาน สามารถเลือกจาก Entities ที่เราสร้างเอาไว้แล้วมาใช้ โดยกดที่ไอคอน รูปโกดัง หรือสามารถพิมพ์ข้อความลงไปในช่อง Select Entities or Enter Phrase ได้ และยังสามารถบันทึกเป็น Entities ใหม่ได้ ด้วยการกดที่ปุ่ม Save Entities ก็จะมีหน้าต่างแสดงขึ้นมา ให้ใส่ชื่อ, ปรับ condition และ กดปุ่ม save ก็จะเป็นการบันทึกไว้ใช้งานได้ในครั้งหน้าอีก
Intent การจับเจตนาของคำหรือประโยคของผู้ใช้ ตามที่ได้ train ไว้ก่อนหน้านี้ ในหน้า Train Bot

การใช้งาน สามารถเลือกจาก Intent ที่เราสร้างเอาไว้แล้วมาใช้ โดยกดที่ไอคอนรูปโกดัง
RegEx Regular Expressions คือ การกำหนดรูปแบบหรือกลุ่มคำ เพื่อเอาไว้ใช้ค้นหาข้อความต่างๆตามที่เราต้องการ สามารถค้นหาได้ทั้งอักขระธรรมดา หรือค้นหาความข้อที่กำหนดไว้ หรือจะเป็นอักขระพิเศษก็สามารถค้นหาได้ สมมติ เราต้องการให้ user ตอบเป็นตัวเลข เช่น เบอร์โทรศัพท์, รหัสประจำตัวประชาชน

การใช้งาน สามารถเลือกรูปแบบของ RegEx ได้จากลิสต์รายการที่เราเตรียมไว้ให้ หรือ
Character รับข้อความที่เป็นตัวอักษรทั้งหมด
Email รับข้อความที่เขียนเป็นรูปแบบอีเมล
Phone Number รับข้อความที่เขียนเป็นรูปแบบเบอร์โทร
License plate รับข้อความที่เขียนเป็นรูปแบบป้ายทะเบียนรถ
Date Format รับข้อความที่เขียนด้วยรูปแบบวันที่
Custom สามารถเขียนหรือกำหนด RegEx ได้เอง
Match คือ การกำหนดเงื่อนไข โดยอิงจากจำนวนค่าที่เก็บไว้ของของพารามิเตอร์นั้น ว่าถ้าเท่ากับหรือมากกว่าน้อยกว่า จำนวนค่าที่เราระบุไว้ จะให้เกิดเหตุการณ์ต่อๆไปในโฟลวที่เราสร้าง

<> ช่องสำหรับระบุชื่อของพารามิเตอร์ลงในช่องนี้
ช่องกลาง สำหรับให้เราเลือกเครื่องหมาย ว่าค่าในพารามิเตอร์ของเรามีค่าแบบไหน ดังนี้ =, !=, <, >, <=, >=
Value number ช่องสำหรับให้เราใส่ค่าของพารามิเตอร์นั้น เป็นตัวเลข
Image (IMG)
Image (IMG) คือ การตอบกลับของบอทในรูปแบบของรูปภาพ
ส่วนประกอบของหน้า Image
หน้า Object Image มีส่วนประกอบหลัก 6 ส่วน ได้แก่

Add ปุ่มสำหรับเพิ่ม Image
Delete ปุ่มสำหรับลบ Image (ไอคอนรูปถังขยะ)
Import/Export ปุ่มสำหรับนำเข้า นำออกไฟล์ Image
Edit ปุ่มสำหรับนำแก้ไข Image (ไอคอนรูปดินสอ)
Duplicate ปุ่มสำหรับคัดลอก Image (ไอคอนรูปกระดาษซ้อนกัน)
Search ช่องสำหรับค้นหาชื่อ Image
ส่วนประกอบหน้าสร้าง Image

Object Name ช่องสำหรับใส่ชื่อของ Object Image
URL ช่องสำหรับใส่ลิงค์เว็บของรูปที่อยกนำมาใช้ ต้องเป็น https
Upload ช่องสำหรับอัพโหลดรูปภาพจากคอมพิวเตอร์เข้าไปเก็บไว้ในระบบ
คำแนะนำและข้อจำกัดของ Image
a. แนะนำ size : 900*900px
b. ขั้นต่ำ : 450*450px
Carousel (CRS)
Carousel (CRS) คือ การตอบกลับของบอทในรูปแบบ Card ที่ประกอบด้วยรูปภาพและข้อความ โดยมีปุ่มที่สามารถกดเพื่อดูข้อมูลเพิ่มเติมได้ ซึ่งสามารถตอบกลับเป็น ข้อความหรือ Object ก็ได้
ส่วนประกอบของหน้า Carousel
หน้า Object Carousel มีส่วนประกอบหลัก 6 ส่วน ได้แก่

Add ปุ่มสำหรับเพิ่ม Carousel
Delete ปุ่มสำหรับลบ Carousel (ไอคอนรูปถังขยะ)
Import/Export ปุ่มสำหรับนำเข้า นำออกไฟล์ Carousel
Import/Export ปุ่มสำหรับนำเข้า นำออกไฟล์ Carousel
Duplicate ปุ่มสำหรับคัดลอก Carousel (ไอคอนรูปกระดาษซ้อนกัน)
Search ช่องสำหรับค้นหาชื่อ Carousel
ส่วนประกอบหน้าสร้าง Carousel


Object Name ช่องสำหรับใส่ชื่อของ Object Carousel
Add สำหรับสร้างการ์ด Carousel ขึ้นมาเพิ่ม (ไอคอนรูปบวก +)
เคล็ดลับ: สามารถเพิ่มสูงสุดได้ 10 การ์ด
เคล็ดลับ: สามารถคลิกที่ไอคอนรูปภาพเพื่อลากสลับตำแหน่งการ์ด Carousel ได้

a. Duplicate สำหรับคัดลอก Card Carousel (ไอคอนรูปกระดาษซ้อนกัน)
b. Delete สำหรับลบ Card Carousel (ไอคอนรูปกากบาท)
c. URL สำหรับใส่ลิงค์เว็บของรูปที่อยกนำมาใช้ ต้องเป็น https
d. Upload สำหรับอัพโหลดรูปภาพจากคอมพิวเตอร์เข้าไปเก็บไว้ในระบบ
e. Enter title ช่องสำหรับใส่ชื่อหัวข้อของ Carousel
f. Enter description ช่องสำหรับใส่ชื่อรายละเอียดของ Carousel
g. Add button ช่องสำหรับเพิ่มปุ่มกดให้ Carousel เพิ่มได้ 3 ปุ่ม

a. Button Label สำหรับตั้งชื่อปุ่มกด
b. Button Type สำปรับเลือกชนิดปุ่มกด มี 3 แบบ
1. Message สำหรับสร้างปุ่มที่เป็นข้อความธรรมดา
2. Phone สำหรับสร้างปุ่มที่เป็นเบอร์โทรศัพท์
3. URL สำหรับสร้างปุ่มที่เป็นลิงค์ของเว็บไซต์
c. Message สำหรับใส่ข้อความที่จะให้บอทตอบออกไป จะต่างไปตามประเภทปุ่มกดที่เราเลือก
คำแนะนำและข้อจำกัดของ Carousel
สร้างการ์ดได้สูงสุด: 10 การ์ด
ขนาดรูปภาพแนะนำ : สำหรับเฟศบุ๊ค 1200px * 1200 px, ไลน์ 976px * 648px
หัวข้อ: สูงสุด 40 ตัวอักษร
รายละเอียด: สูงสุด 60 ตัวอักษร
เพิ่มปุ่มกดได้มากสุด: 3 ปุ่ม
ชนิดของปุ่ม: มี 3 แบบ (ข้อความ , เบอร์โทรศัพท์ , URL)
ชื่อปุ่มกด: สูงสุด 20 ตัวอักษร
เคล็ดลับ: ในการสร้างการ์ดใบที่ 2-10 จำเป็นต้องสร้างจำนวนปุ่มกดให้เท่ากันกับจำนวนปุ่มกดในการ์ดที่ 1 ทั้งหมด
Button (BTN)
Button (BTN) คือ การตอบกลับของบอทในรูปแบบของปุ่มกดซึ่งเมื่อคลิกไปที่ Button แล้ว ปุ่มจะยังคงอยู่
ส่วนประกอบของหน้า Buttonหน้า Object Button
มีส่วนประกอบหลัก 6 ส่วน ได้แก่

Add ปุ่มสำหรับเพิ่ม Button
Delete ปุ่มสำหรับลบ Button (ไอคอนรูปถังขยะ)
Import/Export ปุ่มสำหรับนำเข้า นำออกไฟล์ Button
Edit ปุ่มสำหรับนำแก้ไข Button (ไอคอนรูปดินสอ)
Duplicate ปุ่มสำหรับคัดลอก Button (ไอคอนรูปกระดาษซ้อนกัน)
Search ช่องสำหรับค้นหาชื่อ Button
ส่วนประกอบหน้าสร้าง Button

Object Name ช่องสำหรับใส่ชื่อของ Object Button\
Enter title ช่องสำหรับใส่ชื่อหัวข้อของ Button
Add button ช่องสำหรับเพิ่มปุ่มกดให้ Button เพิ่มได้ 3 ปุ่ม

a. Button Label สำหรับตั้งชื่อปุ่มกด
b. Button Type สำปรับเลือกชนิดปุ่มกด มี 3 แบบ
1. Message สำหรับสร้างปุ่มที่เป็นข้อความธรรมดา
2. Phone สำหรับสร้างปุ่มที่เป็นเบอร์โทรศัพท์
3. URL สำหรับสร้างปุ่มที่เป็นลิงค์ของเว็บไซต์
c. Message สำหรับใส่ข้อความที่จะให้บอทตอบออกไป จะต่างไปตามประเภทปุ่มกดที่เราเลือก
คำแนะนำและข้อจำกัด Button
หัวข้อ : สูงสุด 160 ตัวอักษร
เพิ่มปุ่มกดได้มากสุด: 3 ปุ่ม
ชนิดของปุ่ม : มี 3 แบบ (ข้อความ , เบอร์โทรศัพท์ , URL)
ชื่อปุ่มกด : สูงสุด 20 ตัวอักษร
Quick Reply (QRP)
Quick Reply (QRP) คือ การตอบกลับของบอทในรูปแบบของ Choice ซึ่งเป็นปุ่มกดโดยเมื่อ คลิกไปที่ปุ่มใดปุ่มหนึ่งแล้ว Quick Reply จะหายไป
ส่วนประกอบของหน้า Quick Reply
หน้า Object Quick Reply มีส่วนประกอบหลัก 6 ส่วน ได้แก่

Add ปุ่มสำหรับเพิ่ม Quick Reply
Delete ปุ่มสำหรับลบ Quick Reply (ไอคอนรูปถังขยะ)
Import/Export ปุ่มสำหรับนำเข้า นำออกไฟล์ Quick Reply
Edit ปุ่มสำหรับนำแก้ไข Quick Reply (ไอคอนรูปดินสอ)
Duplicate ปุ่มสำหรับคัดลอก Quick Reply (ไอคอนรูปกระดาษซ้อนกัน)
Search ช่องสำหรับค้นหาชื่อ Quick Reply
ส่วนประกอบหน้าสร้าง Quick Reply

a. Object Name ช่องสำหรับใส่ชื่อของ Object Quick Reply
b. Enter quick reply title ช่องสำหรับใส่ชื่อหัวข้อของ Quick Reply
c. Add button ช่องสำหรับเพิ่มปุ่มกดให้ Quick Reply เพิ่มได้ 13 ปุ่ม

Flex Message (FX)
คือ รูปแบบการตอบคำถาม ที่สามารถออกแบบได้อย่างอิสระ โดยใน Flex message จะสามารถ บรรจุได้ทั้ง button, icon, image, text และอื่นๆ รวมถึงสามารถสร้าง action จาก button, image และ text ได้
เคล็ดลับ: Object รูปแบบ Flex จะรองรับการแสดงผลเฉพาะบนไลน์เท่านั้น
ส่วนประกอบของหน้า Flex
หน้า Object Flex มีส่วนประกอบหลัก 6 ส่วน ได้แก่

Add ปุ่มสำหรับเพิ่ม Flex
Delete ปุ่มสำหรับลบ Flex (ไอคอนรูปถังขยะ)
Import/Export ปุ่มสำหรับนำเข้า นำออกไฟล์ Flex
Edit ปุ่มสำหรับนำแก้ไข Flex (ไอคอนรูปดินสอ)
Duplicate ปุ่มสำหรับคัดลอก Flex (ไอคอนรูปกระดาษซ้อนกัน)
Search ช่องสำหรับค้นหาชื่อ Flex
ส่วนประกอบหน้าสร้าง Flex

Object Name ช่องสำหรับใส่ชื่อของ Object Flex
Go to Flex Simulator สำหรับลิงค์ไปยังหน้าแพลตฟอร์มที่ใช้สร้าง Flex
Field พื้นที่ว่างสำหรับวางโค้ด json ของ Flex
คำแนะนำและข้อจำกัด Flex
Custom Payload (FX)
คือ รูปแบบการตอบคำถาม ที่สามารถออกแบบได้อย่างอิสระเช่นกัน
ส่วนประกอบของหน้า Custom Payload
หน้า Object Custom Payload มีส่วนประกอบหลัก 6 ส่วน ได้แก่

Add ปุ่มสำหรับเพิ่ม Custom Payload
Delete ปุ่มสำหรับลบ Custom Payload (ไอคอนรูปถังขยะ)
Import/Export ปุ่มสำหรับนำเข้า นำออกไฟล์ Custom Payload
Edit ปุ่มสำหรับนำแก้ไข Custom Payload (ไอคอนรูปดินสอ)
Duplicate ปุ่มสำหรับคัดลอก Custom Payload (ไอคอนรูปกระดาษซ้อนกัน)
Search ช่องสำหรับค้นหาชื่อ Custom Payload
ส่วนประกอบหน้าสร้าง Custom Payload

Object Name ช่องสำหรับใส่ชื่อของ Object Custom Payload
Dropdown สำหรับเลือกชนิดของ Custom Payload ว่าเป็นของ LINE หรือ Facebook
Field พื้นที่ว่างสำหรับวางโค้ด json ของ Custom Payload
คำแนะนำและข้อจำกัด Custom Payload
Rich Menu (RM)
แถบเมนูลัดที่แป้นพิมพ์ในห้องแชท สามารถตั้งค่าการตอบกลับเมื่อเลือกที่ ริชเมนู ได้ตามความต้องการโดยที่จะเป็น Link web Text หรือ Intent ต่างๆ
เคล็ดลับ: Rich Menu จะรองรับการแสดงผลเฉพาะบนไลน์เท่านั้น
ส่วนประกอบของหน้า Rich Menu
หน้า Object Rich Menu มีส่วนประกอบหลัก 6 ส่วน ได้แก่

Add ปุ่มสำหรับเพิ่ม Rich Menu
Delete ปุ่มสำหรับลบ Rich Menu (ไอคอนรูปถังขยะ)
Import/Export ปุ่มสำหรับนำเข้า นำออกไฟล์ Rich Menu
Edit ปุ่มสำหรับนำแก้ไข Rich Menu (ไอคอนรูปดินสอ)
Duplicate ปุ่มสำหรับคัดลอก Rich Menu (ไอคอนรูปกระดาษซ้อนกัน)
Search ช่องสำหรับค้นหาชื่อ Rich Menu
ส่วนประกอบของหน้า Create Rich Menu

Object Name ช่องสำหรับใส่ชื่อของ Object Rich Menu
Select Type สำหรับเลือกชนิดของ Rich menu ว่าเป็นขนาดเล็กหรือใหญ่
Columns เพิ่มคอลัมน์สำหรับกำหนดตำแหน่งใน Rich menu
Rows เพิ่มแถวสำหรับกำหนดตำแหน่งใน Rich menu
Rich Menu Image พื้นที่สำหรับอัพโหลดรูปของ Rich menu
Setting สำหรับตั้งค่าการทำงานของ Rich menu
a. Set as main rich menu ตั้งเป็น Rich menu หลักเมื่อเปิดไลน์
b. Set as auto show ตั้งให้แสดง Rich menu ทันทีเมื่อเปิดไลน์
Click Action สำหรับกำหนดการทำงานของของ Rich menu แต่ละตำแหน่งใน คอลัมน์และแถว ที่สร้างไว้ โดยกำหนดการทำงานทั้งหมดได้ 4 แบบ
a. Text ส่งเป็นข้อความเมื่อผู้ใช้กดไปยังพื้นที่ที่กำหนด
b. URL เปิดเว็บไชต์เมื่อผู้ใช้กดไปยังพื้นที่ที่กำหนด
c. Object แสดงผลเป็น Object เมื่อผู้ใช้กดไปยังพื้นที่ที่กำหนด
d. Intent แสดงผลเป็นคำตอบจาก Intent เมื่อผู้ใช้กดไปยังพื้นที่ที่กำหนด
คำแนะนำและข้อจำกัด Rich Menu
รองรับไฟล์: png, jpg, jpeg
ขนาดไฟล์: ไม่เกิน 1 MB
ขนาดรูปที่รองรับ: 2500x1686, 2500x843, 1200x810, 1200x405, 800x540, 800x270 px
เว็บไซต์สำหรับสร้าง Rich menu: https://lineforbusiness.com/richmenumaker/
API
หน้าสำหรับให้ผู้ดูแลบอทคอจัดการกับแชทจากผู้ใช้ โดยสามารถแทรกการสนทนาระหว่างบอทกับผู้ใช้ได้ตลอดเวลา
ส่วนประกอบของหน้า API
หน้า Object Custom Payload มีส่วนประกอบหลัก 6 ส่วน ได้แก่

Add ปุ่มสำหรับเพิ่ม API
Delete ปุ่มสำหรับลบ API (ไอคอนรูปถังขยะ)
Import/Export ปุ่มสำหรับนำเข้า นำออกไฟล์ API
Edit ปุ่มสำหรับนำแก้ไข API (ไอคอนรูปดินสอ)
Duplicate ปุ่มสำหรับคัดลอก API (ไอคอนรูปกระดาษซ้อนกัน)
Search ช่องสำหรับค้นหาชื่อ API
ส่วนประกอบหน้าสร้าง API


Object Name ช่องสำหรับใส่ชื่อของ Object API
Method ช่องสำหรับเลือกประเภท API
a. GET
b. POST จะมีส่วน Body ไว้ให้ใส่ Code
URL ช่องสำหรับวางลิงค์ URL ของ API
Add Header สำหรับเพิ่ม Header ของ API หากต้องการใช้

a. Header ช่องสำหรับใส่ค่า Header
b. Value ช่องสำหรับใส่ค่า Value
Livechat
หน้าสำหรับให้ผู้ดูแลบอทคอจัดการกับแชทจากผู้ใช้
โดยสามารถแทรกการสนทนาระหว่างบอทกับผู้ใช้ได้ตลอดเวลา
ส่วนประกอบของหน้า Live Chat


Bot/Agent สามารถกดสลับเพื่อดูข้อความที่เข้ามา
Bot เป็นข้อความที่ผู้ใช้คุยกับบอทในขณะนี้
Agent เป็นข้อความที่ติดสถานะ Agent เนื่องจากผู้ใช้ต้องการคุยกับจ้าหน้าที่

Search ช่องสำหรับค้นหาชื่อของผู้ใช้


Filter ส่วนสำหรับตั้งค่าคัดกรองข้อความ ประกอบไปด้วย
Channel ส่วนสำหรับกรองให้แสดงประเภทข้อความว่ามาจากช่องทางไหน
Message Status สำหรับกรองให้แสดงข้อความว่าเป็นประเภทไหน
All เลือกแสดงข้อความจากผู้ใช้ทั้งหมด
Read เลือกแสดงเฉพาะข้อความจากผู้ใช้ที่อ่านแล้ว
Unread เลือกแสดงเฉพาะข้อความจากผู้ใช้ที่ยังไม่ได้อ่านแล้ว
Block เลือกแสดงเฉพาะข้อความจากผู้ใช้ที่ถูกบล็อค
Tag เลือกแสดงเฉพาะข้อความจากผู้ใช้ที่ถูกติดแท็กที่เลือก

Inbox Message รายการข้อความที่ผู้ใช้กำลังสนทนา โดยจะมีรายละเอียดดังนี้
Profile Picture ส่วนที่ไฮไลต์สีส้มเป็นส่วนแสดงรูปโปรไฟล์ของผู้ใช้
Profile Name ส่วนที่ไฮไลต์สีเทาเป็นส่วนแสดงชื่อโปรไฟล์ของผู้ใช้
Message ส่วนแสดงข้อความจากผู้ใช้ ตัวอักษรหน้าคือข้อความที่ยังไม่ได้อ่านตัวอักษรบางคือข้อความที่อ่านแล้ว
Red Dot จุดสีแดงแสดงว่าเป็นข้อความมาใหม่และยังไม่ได้อ่าน

Window Message ช่องแสดงรายละเอียดการสนทนา และสามารถตอบโต้กับผู้ใช้ได้ ข้อความด้านซ้ายจะเป็นข้อความจากฝั่งผู้ใช้ ส่วนทางด้านขวาจะเป็นข้อความจากฝั่งบอทและเจ้าหน้าที่

เคล็ดลับ: เมื่อเจ้าหน้าที่คุยกับผู้ใช้โดยตรง จะแสดงปุ่ม Done ขึ้นมา ซึ่งเป็นปุ่มไว้สำหรับให้เจ้าหน้าที่กด เมื่อจบการสนทนากับผู้ใช้แล้ว จะส่งผู้ใช้กลับไปคุยกับแชทบอทตามเดิม
Search ช่องสำหรับค้นหาข้อความเก่าๆที่เคยสนทนาได้
Sent สถานะในการส่งข้อความ
1. / ขีดเดียวคือกำลังส่ง
2. // สองขีดคือส่งเรียบร้อยSend a message ช่องสำหรับเขียนข้อความ
1. Image สามารถเลือก รูปภาพจากคอมพิวเตอร์เพื่อส่งได้
2. Intent&Object สามารถเลือก object และ intent จากคลังสือเพื่อส่งได้
3. Send ปุ่มสำหรับกดส่งข้อความ
4. Send and train เมื่อติ๊กที่ช่องนี้ เวลาที่กดปุ่ม Send ข้อความจะถูกสอนลงไปในส่วนของ Trained ใน Chitchat

Right Channel ช่องแสดงรายละเอียดต่างๆเกียวกับผู้ใช้ สามารถเพิ่ม tag,note, หรือแก้ไขข้อมูลส่วนตัวของผู้ใช้ได้ และสามารถสลับโหมดเป็นให้เจ้าหน้าที่ตอบหรือสลับกลับไปเป็นแชทบอทตอบได้อีกด้วย
Profile Name ส่วนบนสุดจะแสดงชื่อโปรไล์ของผู้ใช้
Status ส่วนนี้แสดงสถนะว่าอยู่ในโหมดไหน ซึ่งสามารถกดสลับไปมาระหว่างให้แชทบอทโหมด หรือเจ้าหน้าที่โหมดได้
Profile ส่วนสำหรับแสดงข้อมูลของผู้ใช้ เจ้าหน้าที่สามารถแก้ไขข้อมูลตรงส่วนนี้ได้โดยกดที่ไอคอนรูปดินสอขวาบน
Tag สามารถเพิ่มแท็ก เป็นติดป้ายหรือสถานะ ให้กับผู้ใช้ได้ โดยกดไปที่ปุ่ม Add

. เมื่อกด Add จะแสดงหน้าต่างขึ้นมา สามารถพิมพ์ชื่อแท็กเพื่อเพิ่มลงไปได้ที่ช่อง Find or Create a new tag แล้วกด Add เมื่อติ๊กที่แท็ก จะเป็นสีฟ้า แปลว่าติดแท็กเรียบร้อย ส่วนแท็กที่ไม่ได้เลือกจะเป็นสีขาว
. Note สามารถเพิ่มบันทึกข้อความลงไปได้ โดยบันทึกจะมีรายละเอียด ชื่อของผู้บันทึก แลัวันที่บันทึกแสดงไว้


เมื่อกดคลิกที่บันทึกที่บันทึกไว้ จะสามารถแก้ไขหรือลบบันทึกได้
Image แสดงรูปภาพที่ผู้ใช้เคยส่งเข้ามา

Live Chat Setting
สำหรับตั้งค่าการทำงานต่างๆของ Live Chat ได้เพิ่มเติม

Switch To Agent สามารถตั้งค่าให้สลับไปยังเจ้าหน้าที่โหมด เมื่อตรงตามเงื่อนไขที่ตั้งค่าไว้
Switch to an agent mode by these Intent สามารถใส่ Intent เอาไว้ เมื่อผู้ใช้ทักมาหาบอทด้วยข้อความ Phrase ที่ถูกสอนเอาไว้ใน Intent นั้น ผู้ใช้จะถุกสลับมาเป็นเจ้าหน้าที่โหมดทันที
Switch to an agent mode when the bot reply Default Fallback สามารถใส่ จำนวนครั้งเอาไว้ เมื่อผู้ใช้ทักมาหาบอท แล้วบอทตอบกลับผู้ใช้ไปด้วย Response ของ Default Fallbak ที่ตั้งไว้ ครบจำนวนครั้งเมื่อไหร่ ผู้ใช้จะถูกสลับมาเป็นเจ้าหน้าที่โหมดทันที

Switch To Bot สามารถตั้งค่าให้สลับไปยังแชทบอทโหมด เมื่อตรงตามเงื่อนไขที่ตั้งค่าไว้
Switch to bot mode by these Intent สามารถใส่ Intent เอาไว้ เมื่อผู้ใช้ทักมาในขณะที่ติดอยู่ในเจ้าหน้าที่โหมดด้วยข้อความ Phrase ที่ถูกสอนเอาไว้ใน Intent นั้น ผู้ใช้จะถูกสลับกลับมาเป็นแชทบอทโหมดทันที
Switch to an bot mode affter agent reply last message สามารถกำหนดเวลาที่จะให้ผู้ใช้สลับกลับมาเป็นแชทบอทโหมด เมื่อเจ้าหน้าที่ส่งข้อความสุดท้ายออกไปภายหลังจากเวลาที่กำหนด

Business Hours สามารถกำหนดการทำงานได้ว่าจะให้เกิดอะไรเมื่อผู้ใช้ทักมาขอติดต่อเจ้าหน้าที่นอกเวลาทำงาน สามารถให้สลับไปยังแชทบอทโหมดเพื่อให้สนทนากับบอทต่อไปได้ หรือส่งไปที่เจ้าหน้าที่โหมด เพื่อรอเจ้าหน้าที่มาตอบในวันถัดไปได้
Out of business hours mode กำหนดการทำงานของแชทบอทในช่วงนอกเวลาทำการ
Configure buisness hours ในส่วนนี้ใช้สำหรับตั้งช่วงเวลาและวันเปิดทำการของคุณเอาไว้ สามารถกด Add more เพื่อเพิ่มช่วงเวลาและวันเปิดทำการได้
Take this action ในส่วนนี้เป็นส่วนกำหนดการทำงานของแชทบอทว่าจะให้ทำยังไง เมื่อผู้ใช้ทักมาขอติดต่อเจ้าหน้าที่นอกเวลาทำงาน
1.1) Switch to Bot ให้สลับไปยังแชทบอทโหมดเพื่อให้สนทนากับบอทต่อไป
1.2) Hold the Agent ส่งไปที่เจ้าหน้าที่โหมด เพื่อรอเจ้าหน้าที่มาตอบในวันถัดไปได้Send this message กำหนดข้อความที่จะให้ตอบกลับไปได้
Email notification สามารถเพิ่มผู้รับอีเมล เมื่อมีการทักมาหา เจ้าหน้าที่นอกเวลาทำการ โดยจะมีข้อความจากผู้ใช้ส่งไปที่อีเมล
Setting
หน้าสำหรับให้ผู้ดูแลบอทคอยจัดการการตั้งค่าต่างๆ เช่นโปรไฟล์
แชทบอท, การเชื่อมต่อ, การแชร์สิทธิ์การเข้าถึง เป็นต้น

a. My account สำหรับออกจากระบบ

a. Chatbot Profile หน้าสำหรับจัดการตั้งค่าข้อมูลโปรไฟล์ของแชทบอท
a. Edit chatbot profile สามารถกดเพื่อแก้ไขข้อมูลโปรไฟล์ของ
แชทบอท
b.Delete chatbot สามารถกดเพื่อลบแชทบอท

a. Connection สามารถกดเพื่อเชื่อมต่อแชทบอทเข้ากับแชลแนลต่าง ไลน์และเฟสบุ๊ค ได้
a. Facebook messenger สามารถกดที่ Messenger setting เพื่อ
ทำการเชื่อมต่อกับเฟสบุ๊ค Page ของเราได้ทัน
b.LINE สามารถเลือกเชื่อมต่อได้ 2 วิธี คือ
a. LINE modular setting สามารถเชื่อมต่อเข้ากับไลน์ OA
แบบง่ายไม่ยุ่งยาก
b. LINE manual setting สามารถเชื่อมต่อเข้ากับไลน์ OA ใน
แบบที่ยุ่งยากกว่า
เคล็ดลับ: การเชื่อมต่อแบบ LINE manual setting จะสามารถทำการตั้งค่าใช้งาน Rich menu แบบสลับได้ ถ้าเป็นการเชื่อมต่อแบบ LINE modular setting จะไม่สามารถทำได้
เคล็ดลับ: เมื่อเชื่อมต่อสำเร็จไฟจะเป็นสีเขียวดังตัวอย่างในรูปด้านบน และจะแสดงคำว่า Connected
เคล็ดลับ: ปุ่มสไลด์ด้านขวา จะเป็นปุ่มที่มีไว้สำหรับ เปิด-ปิด แชทบอท เมื่อปิดปุ่มจะเป็นสีเทาและแชทบอทจะไม่ตอบข้อความ เมื่อเปิดปุ่มจะเป็นสีฟ้าและแชทบอทจะตอบข้อความตามปกติ

a. Shared permissions แสดงรายชื่อของผู้ใช้งานที่เราแชร์บอทให้สามารถเข้ามาทำงานร่วมกันได้
a. Edit สามารถกดเพื่อแก้ไขสิทธ์การเข้าถึงส่วนต่างๆ ของผู้ใช้งาน
(ไอคอนรูปดินสอ)
b.Delete สามารถกดเพื่อลบผู้ใช้ที่เราแชร์สิทธิ์ได้ (ไอคอนถังขยะ)
c.Add new user สามารถกดเพื่อเพิ่มผู้ใช้งานให้สามารถเข้ามา
ทำงานร่วมกันได้
เคล็ดลับ: ไอคอนสีฟ้า หมายความว่าผู้ใช้ตอบรับการแชร์บอทของเราและสมัครเข้าสู่ระบบเพื่อเข้ามาใช้งานเรียบร้อยแล้ว

a. Enter email ช่องสำหรับใส่อีเมลให้กับคนที่เราต้องการแชร์แชทบอท
b. Permission สามารถกำหนดได้ว่าต้องการให้คนที่เราแชร์แชทบอท เข้าใช้งานในส่วนไหนได้โดยเฉพาะ
Table of Symbols
ชื่อสัญลักษณ์
รูปแบบ
รายละเอียด
Retrieve Parameter
<temporary>
นำข้อความที่ส่งเข้ามาจัดเก็บในตัวแปร temporary
Replace Parameter
<<temporary>>
แสดงข้อมูลที่เก็บไว้ในตัวแปร temporary
Set Parameter
<!greeting|hello!>
นำข้อความที่อยู่ด้านหลัง | ไปเเก็บไว้ในตัวแปรที่อยู่ด้านหน้า ดังตัวอย่างคือ นำคำว่า hello ไปเก็บไว้ในตัวแปร greeting
Intent Parameter
{{farewell}}
แสดงคำตอบ (Bot Response) ที่กำหนดไว้ใน intent ชื่อ farewell
Math Parameter
<$2+2$>
นำข้อมูลรูปแบบตัวเลขมาทำการคำนวณและแสดงผล (เรียกใช้ formula fucntion)
Bubble Group Break
<$BUBBLE_GROUP_BREAK()$>
ฟังก์ชันให้คำสั่งที่อยู่ก่อนหน้าทำงานทันที
Mapping Pattern
<$GET_MAPPING_MSG("HELLO")$>
นำข้อความด้านใน Get Mapping Msg ไปหาคำตอบและนำข้อความที่ได้มาแทนสัญลักษณ์โดยแต่ละbubble จะคั่นด้วยรูปแบบที่เป็นผลลัพธ์จะเป็นคำตอบของ intent ที่ตรงกับข้อความ HELLO
Get Intent Pattern
<$GET_INTENT("HI")$>
นำข้อความในตัว Get Intent ไปหา intent ที่ตรงกับข้อความ HI
Postback Fillter Pattern
\[\[.*?\]\]
ทำงานเฉพาะใน postback เมื่อได้รับข้อความที่เป็น postback จะเอา regex [[.*]] ไปค้นหาข้อความที่ตรงกันและเปลี่ยนข้อความที่ postback เข้ามาเป็นข้อความที่ตรงกัน